Halloween Sculpt - Saw Billy Puppet

moonmin82

New member
As a break from the norm' I thought I'd have some fun sculpting a mini' for Halloween. Using the concept of a 'speed sculpt' as an excuse I thought I'd have a go at this guy (I've been meaning to get round to this project for some time):
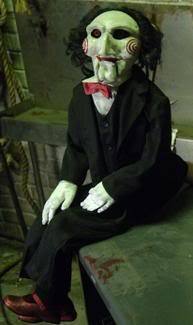
Billy-the-Puppet-saw-18729830-193-325.jpg


So I made some lazy sketches over breakfast:

Saw-Billy1-29-Oct-2011-0.jpg


...then set about making an armature:

Saw-Billy1-29-Oct-2011-1.jpg
Saw-Billy1-29-Oct-2011-2.jpg


...fleshed out:

Saw-Billy1-29-Oct-2011-3.jpg


...and once cured under a halogen lamp for a little while:

Saw-Billy1-29-Oct-2011-4.jpg


Some of this project was inspired by a chap I met from GW called Chris Baker. He was recommended to me a few years back as a guy new to green stuff who had taken to it pretty well. I met him in Sheffield and he showed me a few tips. I was mostly impressed by the speed with which he worked: going from wire-to-armature-to-almost 40% complete mini within just an hour or two. And the detail as well! In such a short space of time. He worked with such confidence. He would create an armature from numerous pieces of wire and, rather than wait, would use some green stuff frozen with super glue to hold the join in place while he simply got on with the job.

I should have learned from this guy but here I am still sculpting in such short sittings! I hope to have this sculpt complete and (maybe even) painted by Halloween... Stranger things have happened I'm sure!

PS I'm very bad for allowing myself to (once again) become distracted from my current projects...
 
Last edited:

moonmin82

New member
I've been working on a blazer for the little bugger:

Saw-Billy1-29-Oct-2011-5.jpg


...and back under the lamp he goes.

PS Potential superglue on jeans fail :-(
 

moonmin82

New member
I must say that I'm pleasantly surprised at just how fast green stuff firms up under a lamp.

Here's the latest progress - I've started the head:

Saw-Billy1-29-Oct-2011-6.jpg
 

moonmin82

New member
Thanks again! I'm enjoying this sculpt and can't wait to paint it. For such a (seemingly) simple sculpt I'm learning a great deal.
 

moonmin82

New member
Last post for the evening... I've adjusted the arms:

Saw-Billy1-29-Oct-2011-7.jpg


...and sculpted the forehead and jacket sleeves:

Saw-Billy1-29-Oct-2011-8.jpg


I'm quite happy with todays progress and don't see why I shouldn't be able to finish sculpting tomorrow in time for painting on Halloween :)
 

moonmin82

New member
This morning I have trimmed the remaining wire as I imagine this would interfere with sculpting the fingers. I've also continued work with the cheeks and eyebrows and begun with a base layer for the hair:

Saw-Billy1-29-Oct-2011-9.jpg


Later down the line I may consider making a display stand, just to help with my basing work. No hurry on that front as he's really just designed to sit on a monitor or table edge.
 

moonmin82

New member
Nearly there!

Saw-Billy1-29-Oct-2011-10.jpg


I'm pleased with the hair (I think all of the work spent sculpting Nurgley pipes and such is starting to pay off).

I need to sculpt the shoes and then neaten up the hands, jacket and trousers.
 

QuietiManes

New member
I really don't like the movies but the puppet is a creepy fellow indeed. Your face came out really nice. I might recommend bending his legs, downward from the knees. I'd think they should be strait down, especially HIS right lower leg looks a little off to me. It would be simple enough to cut the knee and re-position but it might escalate into a lot more work so give it some consideration before you start cutting.

Being the season, on the off chance you cast him up, I want to buy one! :)

P.S. What's your avatar, anyway?
 

moonmin82

New member
Thanks guys :) your support and constructive criticism means a lot.

QuietiManes: I agree regarding the legs - there was a distinct lack of forward planning there! I don't yet have the capability to create resin casts of my minis but if you did want one of your own I'm sure we could arrange something if you want to PM me? I'm sure I could whip something up using a combination of Instant Mold and sculpting. Resin casting is something I intend to explore when I get a place of my own (space is currently somewhat lacking...)

My avatar is:

57b888fe-88df-4940-837b-816f4059d654.jpg


Somebody posted the image on the forum and I kind of 'took ownership' before anybody else got the chance! Once this mini is painted it may infact replace my current avatar.
 

No Such Agency

New member
Nice sculpt!

Also, LOL @ Joseph Ducreux as an avatar ;) "My difficulties number four score and nineteen, but verily a mistress 'tis not one"
 

A Luna

A Lunatic
Interesting little thing you got there. Next up: Jigsaw's traps.. including the hysterical people? :)

Ah yes, Joseph Ducreux... he's a hero at some dark places of the internet.

PS: Whoa! I'm in your signature!
 

moonmin82

New member
No Such Agency: Thanks for the praise and for tipping me off about Joseph Ducreux - I had orignally assumed the painting had been doctored somehow so it's been good to read about his work and put the record straight.

A Luna: Not sure if I'll get round to any Saw trap scenarios - too many rojects & too little time!

Back to the sculpt...

...don't see why I shouldn't be able to finish sculpting tomorrow in time for painting on Halloween :)

Ahem...! What's the use in arbitrary deadlines anyway?!

Last night I gave him some nicely pressed trousers and did a little work on his hands:

Saw-Billy1-29-Oct-2011-11.jpg


Tonight I sculpted Billys shoes and built up his fingers, although I worry I may have screwed the hands up. I'll tidy up a little more as it firms up.

Saw-Billy1-29-Oct-2011-12.jpg


Tonight I also had my first serious go at using Instant Mold and prepared a rough 2 piece mould. Things weren't going too badly until I realised my two halves must have resulted in a slightly hollow cast: half of the face appears to have caved in and left me with a phantom of the opera lookalike:

Saw-BillyCast1-01-Nov-2011-1.jpg


...and it had been looking a success until I pressed too hard one time too many! Oh well. I intend to use the Instant Mold to save work on building / fleshing armatures.

Tomorrow I'll open up my first cast and inspect the 'damage'!

Edit: I've since removed the front half of the mould and am pleasantly surprised at the level of detail. It's a shame about the face as half of it is totally caved in. Shows hows hollow the cast was - it did require a lot of GS to fill... It'll certainly have it's uses once cured. It'll take a lot of touching up (and a new set of legs...) but "what the hell?", it sure beats sculpting a new one from scratch!
 
Last edited:

QuietiManes

New member
Ah, that's a shame about the mold. Maybe try mounting both halves of the Instant Mold on a rigid surface? Couple pieces of MDF or plasticard (or even a hardback book wrapped in tinfoil/saran wrap) might enable you to push things together with even pressure. That or splitting the mold up, one for the body and one for the head, might help.

Someone with more mold experience will have better advice, I'm sure.
 

No Such Agency

New member
I think replicating this entire sculpt with Instant Mold (polycaprolactone) will be very difficult. It's not really intended for that, and in my admittedly limited experience with it, it's hard to get the material pressed around all that 3-D detail before it starts to cool. If course, if you wanted multiple poses of this little guy, you could totally use it to replicate the face/head and save all that effort.

ps: for the uninitiated in internet memes, J. Ducreux is used to rephrase hip-hop lyrics/philosophy in archaic form, for lols, as seen above :)
 

moonmin82

New member
It was just the cast which collapsed! I was surprised at how filling the mould halves was eating up green stuff so I ended up skimping a little. I filled each mould half seperately and this left a slight void between the two halves when I put them together. The cast was looking pretty good until I pressed one time too many - the front half stuck to the back and pulled it away from the mould surface! You can see from the cast photo that there's an air bubble at the surface.

Having removed the piece from the mould I'm fairly happy with the detail. I did recently see a great YouTube video regarding Instant Mold where the guy used the common DIY resin casting technique of using lego to build a well in which to create the mould. This I will try at a later date. I'll post some pictures later on. At the very least the Instant Mold will allow me to recreate the face and torso.
 

moonmin82

New member
I intend to make a small number of 'reproductions' (half Instant Mold casting / half sculpting) of this mini (if anybody out there is interested, PM me). Here are some of the components I have been playing with so far:

Saw-Billy1-castcomponents1.jpg


To the left you'll see my first attempt (with the collapsed face!). This guy will take some work to neaten up.

This next picture not only shows the direction I will proceed in, but also illustrates the detail you can get from Instant Mold (the hair turned out very very well, but as it was incomplete it would be easy to start from scratch than add to the cast):

Saw-Billy1-castcomponents1-1.jpg


I'm currently working on one of these for QuietiManes:

Saw-BillyCast1-1.jpg


Using the above components I've made a start (photo pending as my camera battery is currently recharging...). As you can see, I've added wire to the legs over which I can finish the trousers and add the shoes. I've since carved away the hair and sculpted a plain base layer over which I can sculpt a fresh head of hair (as per the original - see post #7, above). I've joined the torso back to the front half - photo to follow.
 
Last edited:
Back To Top
Top