Sukigod's All-In-One Painting Log

Sukigod

Member
Busy. So very busy!


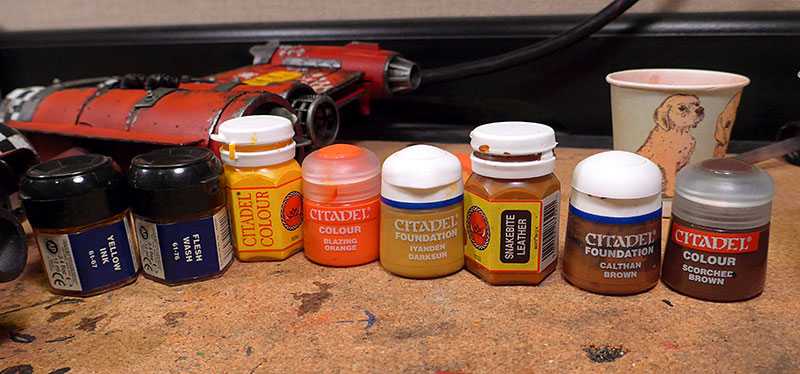
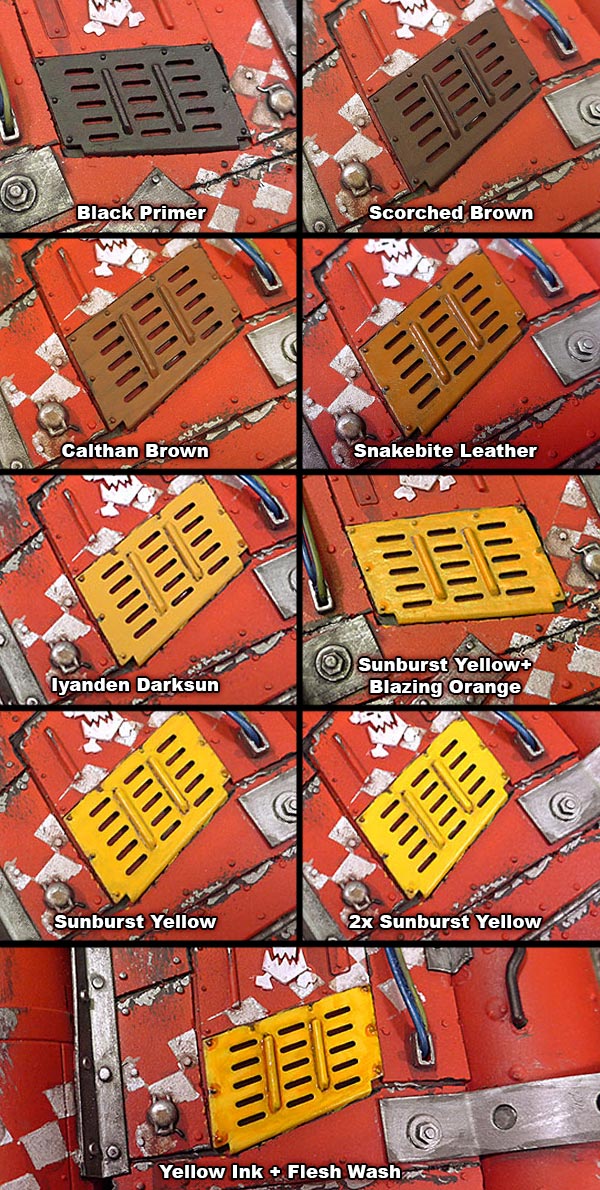
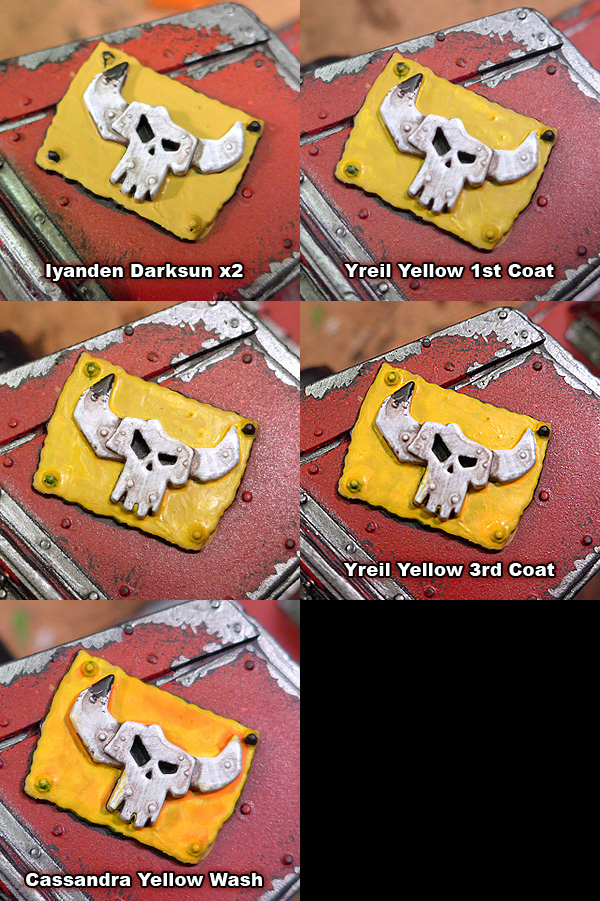
Life is a cruel mistress, especially where hobbies are concerned. Between work, school, teaching and preppign for Waaagh!Fest!, I don't get much free time, but with what little i do, Itry to make it orky ;)


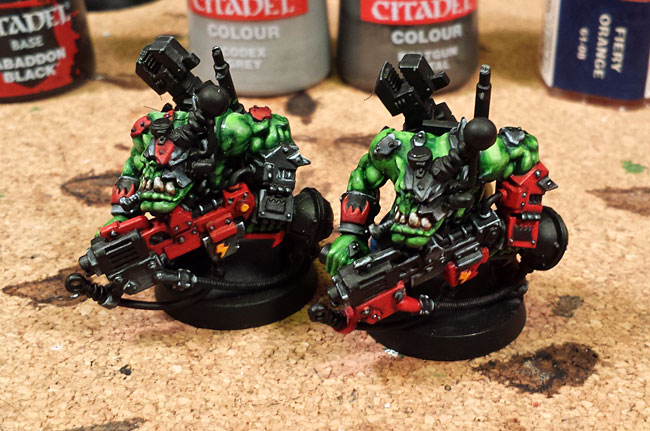
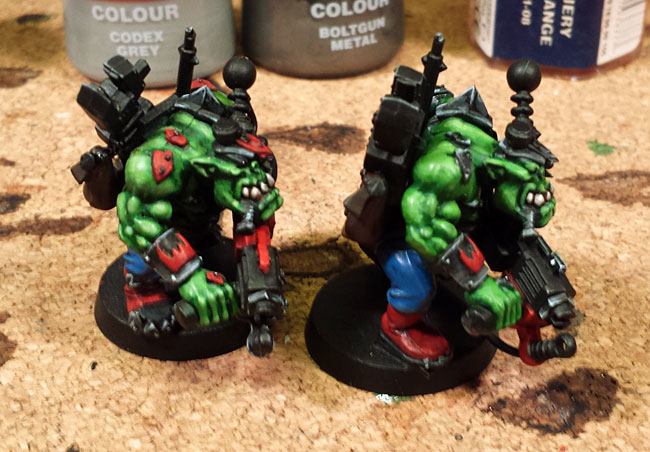
Wanted to do a little showing off now that they are finished :)

Each year we host a pub tournament called Granite City Waaagh!Fest! in honor of Redd's own Kalm Before the Storm. Beer, pretzels, food, friends and 40K. It happens that every other year I attempt to make something specials for the top placers. Along with their already handsomely etched 1 ltr. beer mugs, two years ago I made custom ork boy slugga pistols using Nerf Mavericks as a base.

This years creation was actually two years in the making. I had the idea for last year's event and the poster even had it incorporated into it (#1 Squig!) but it just wasn't working out creatively (wrong artist) and price wise (too expensive). This year, the warp aligned and I found someone who could (would) do what I was looking for. Behold the Stuffed Squigs!

squigs-final.jpg


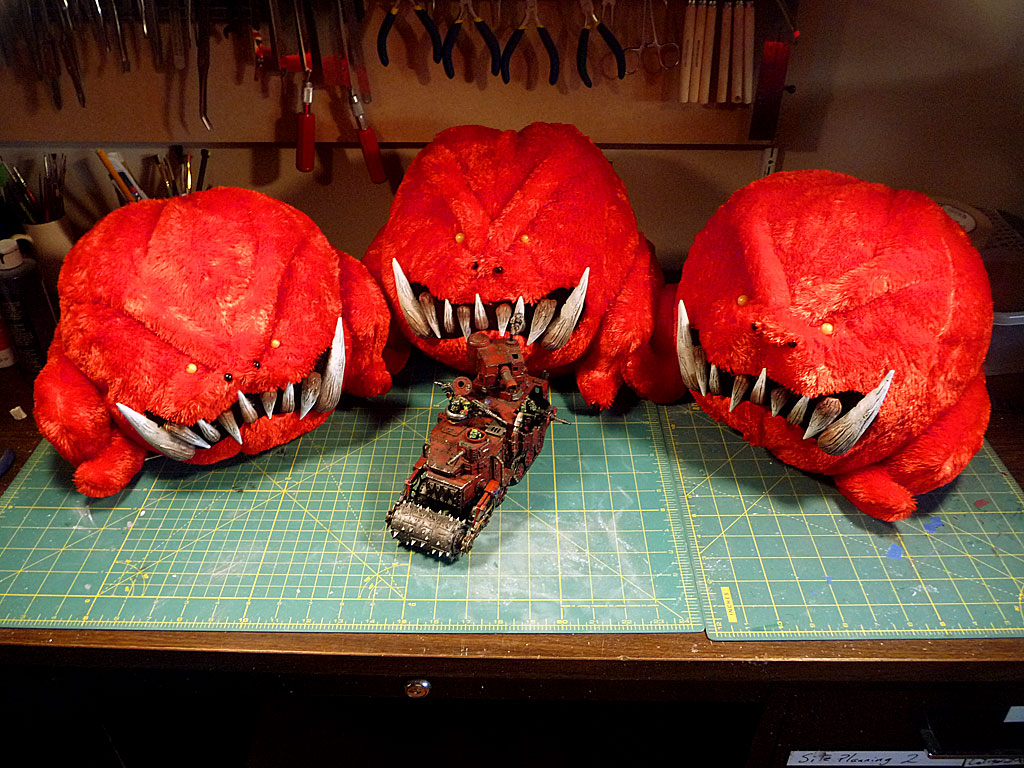
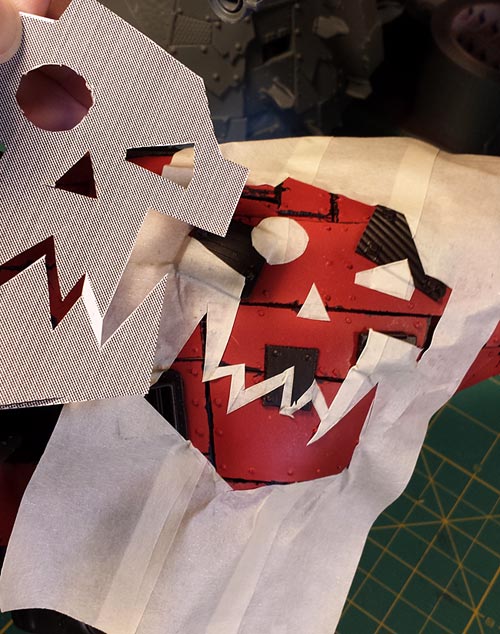
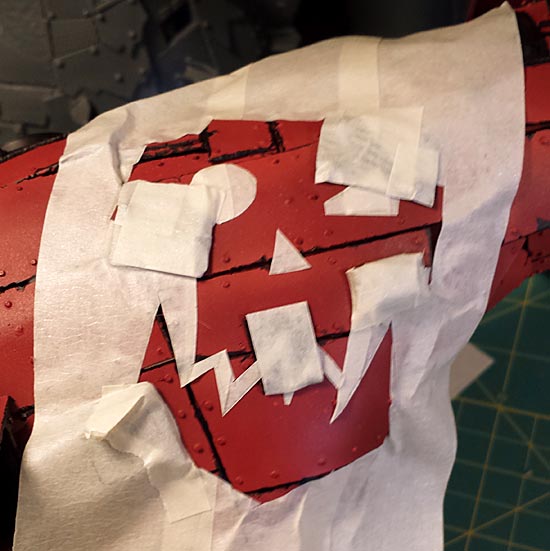
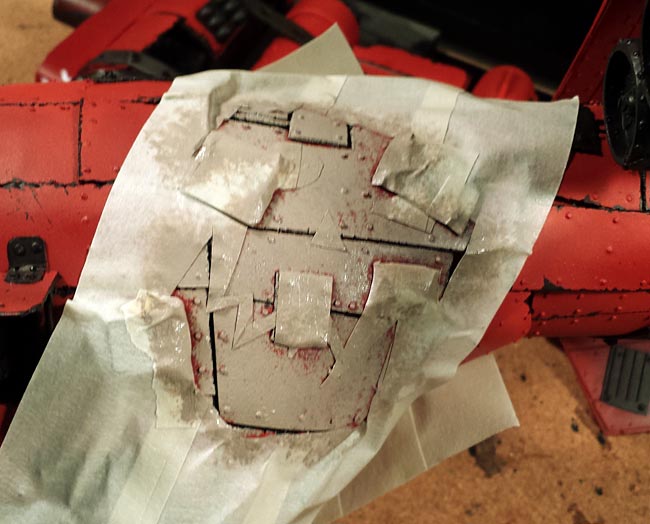
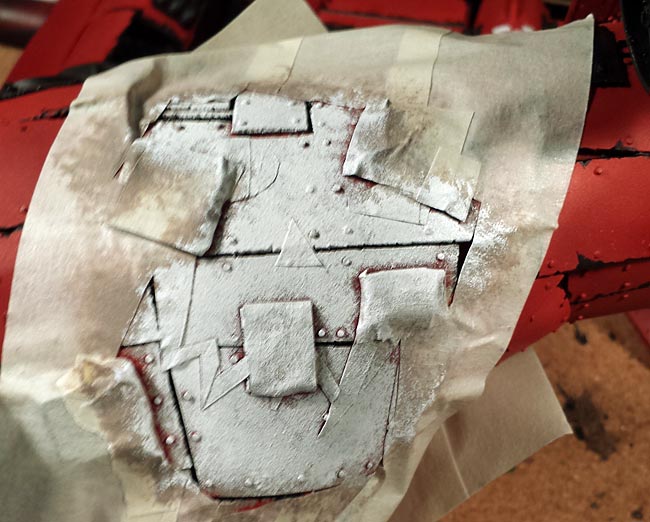
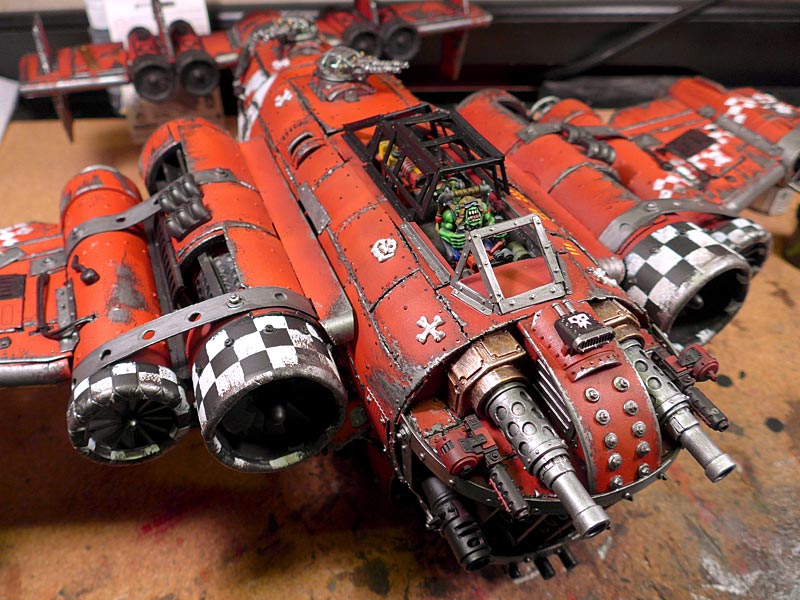
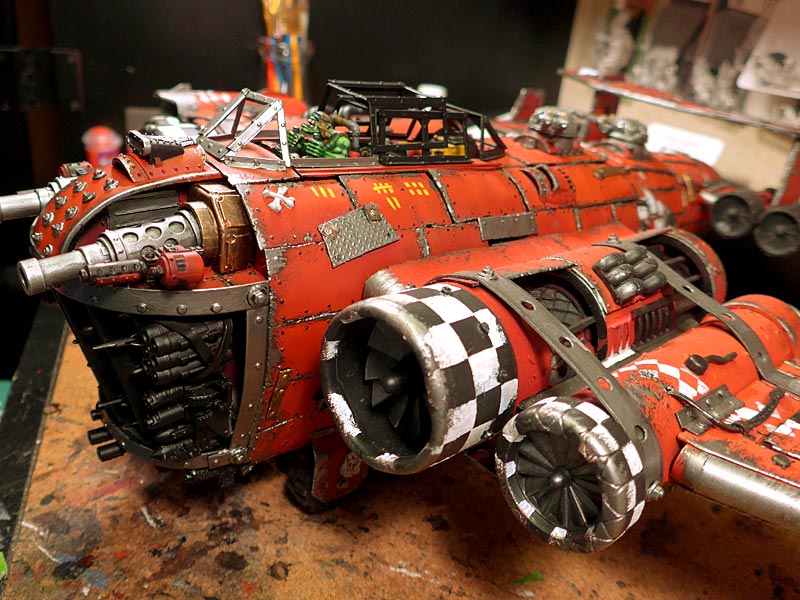
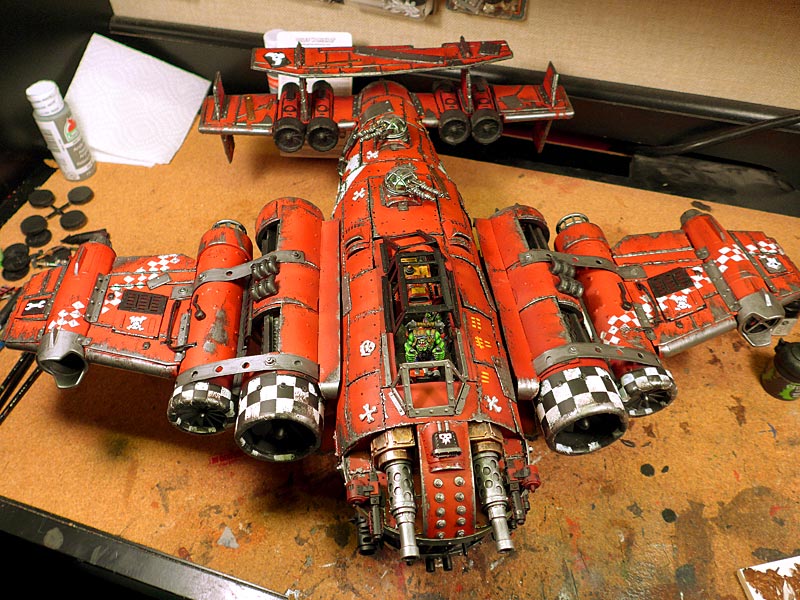
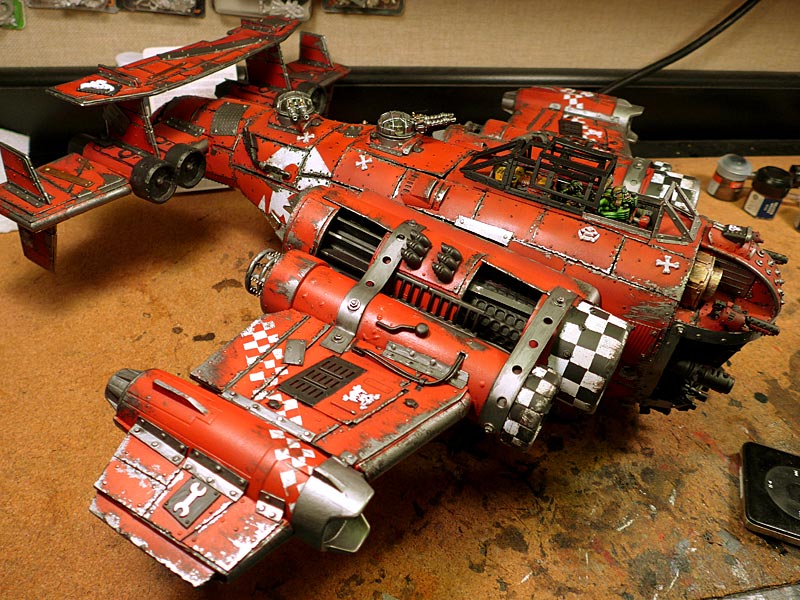
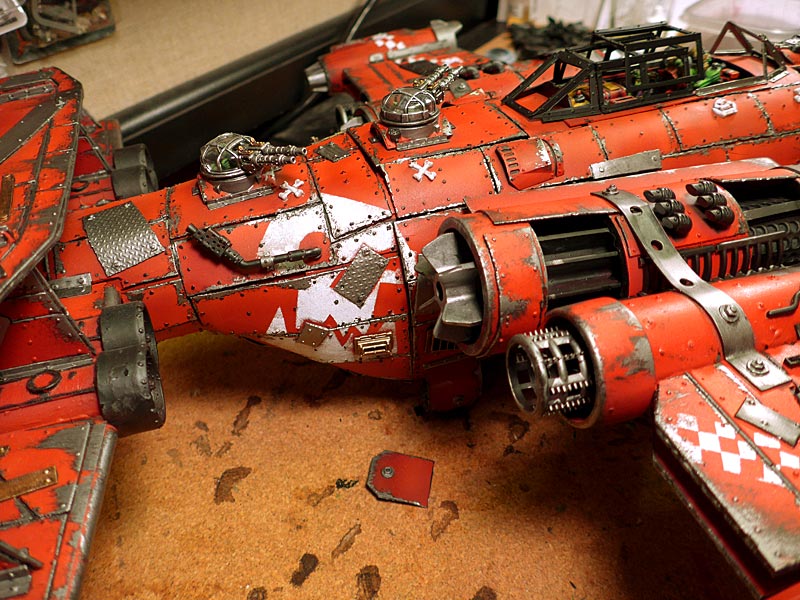
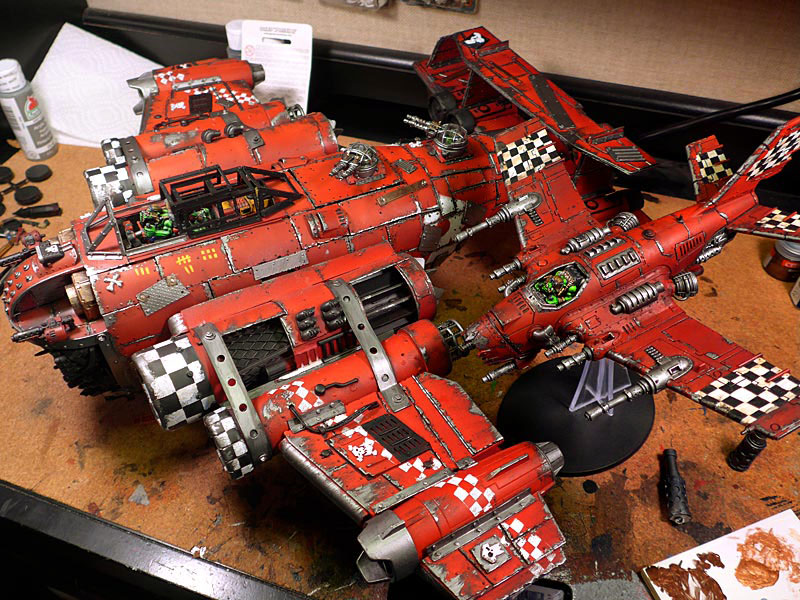
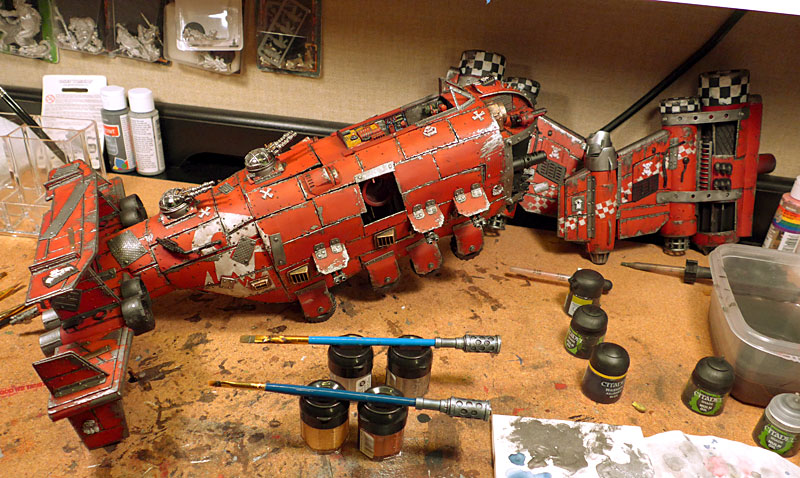
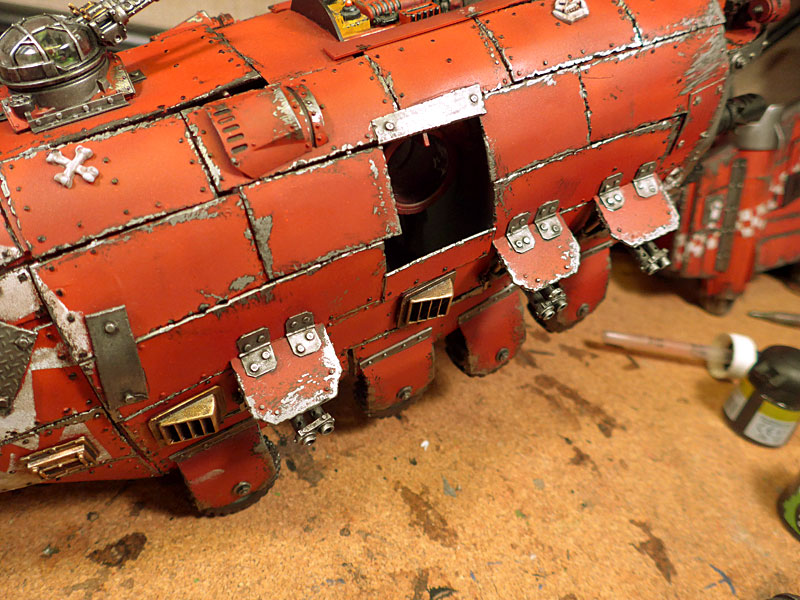
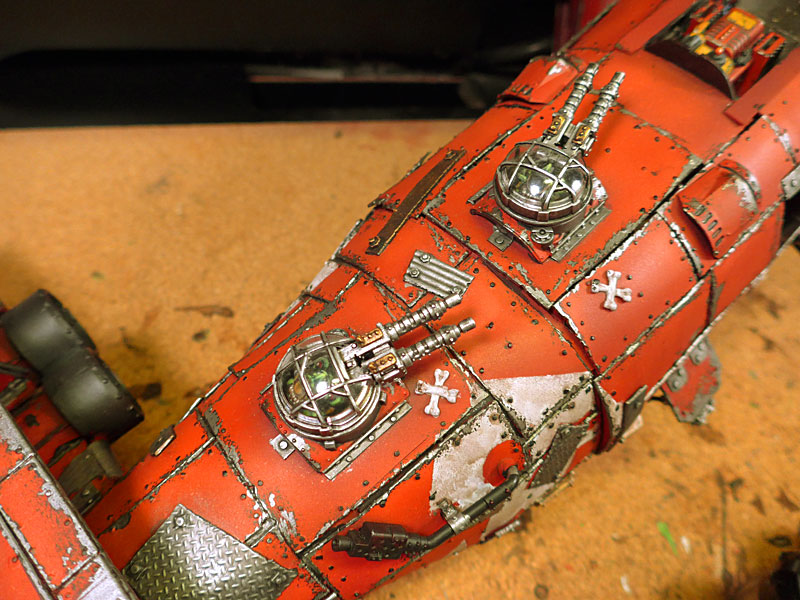
Adorable! There are actually four but I still need to attach a miscast toof to the last one. Their about the size of a basketball and a very bright, deep flame-colored, brilliant red (which is hard to photograph). I've got them slavering over a stock GW battlewagon as a Barry shot for scale.

I am really excited at how well they turned out and can't' wait to give these little buggers out in two weeks (1 1/2?).
 

Sukigod

Member
Got some precious time on the bench lately and didn't want to dig into the monotony of the blasta bomma and wanted something a little mrope detail oriented. Since Mekboyz are the new orky priests, I figured I'd finish off the two I've had hangning around my bench for the last year.


Here's some KMB Mekboyz to throw into the odd mob :)


mekboyz1.jpg


mekboyz2.jpg


mekboyz3.jpg


Just gettting back in to the swing of things so the edging is a little rough - it's been a while! Still working on improving a sort of NMM, and I admit, I'll be chickening out when it comes to the brass sections - I'm just not ready to tackle returning and learning a new color progression. Lots of little details that are fun to work on with these boys, a great distraction.


Later!
 

Sukigod

Member
So, I've been chipping away (hehe) at the paint job on the blasta bommer. I was almost finished with the initial outlining of the metallics when I realized I hadn't added any larger painting details like the checks or glyphs so I decided to knock that out. And guess what? I made a tutorial for ya all!

This technique is pretty much identical to the Skyshield Landing pad demo I did a while back but not as complicated or clean. I make a large format stencil out of rows of masking tape for the larger area. I could have used frisking paper/plastic but I don't have any on hand so when with what I did have.

I printed the glyph to scale, leaving a little bit of paper to keep the two parts together for tracing, easily filled in when penning the outline on the tape.

bommer177.jpg


(sorry for the blur) Here I've trimmed out what will be the painted areas.

bommer178.jpg


I CAREFULL lifted the tape stencil from the self-healing cutting mat. Take your time with this as masking tape tears easily, especially in thin areas. I use the original template to help align/place the interior mask parts.

bommer179.jpg


Since I've already blacked out the metallics, I want to keep them from being painted so I went back and taped over the black areas with small cutout pieces of tape.

bommer180.jpg


My first color is GW Rakarth Flesh, this simulates multiple layers of wear (from white). I'll play things pretty loose around the outside edges to help push home the look of weathered paint. This is applied with a sponge, dabbed straight up and down to the model.

bommer181.jpg


Next up is Ceramtie White, again, sponged on. This time I concentrated the paint in the middle areas so the Rakarth Flesh shows at the edges, underneath the white.

bommer182.jpg


After the paint has dried, carefully peel off the masking tape.It's not perfect and I'll have to touch up some of the black areas before doing the metallics, but this is the nearly end result.

bommer183.jpg


bommer184.jpg


Now I've got some extra detail painted on to help break up the wide expanse of red. There's going to be quite a bit of metallics when I'm done and I don't want it to be tooo busy to the eye. I know ork's is usually that way but I like people to be able to focus on it ;)

I've cleaned up the black basing areas and just need to put down a one or two meatllics before wishing this beastie.

bommer185.jpg


bommer186.jpg


Later!
 

Meph

Cat-herder Extraordinaire
Welcome back woth such joyful greenskin to show us! The stencil-tut is great, and that ork head looks ace on that plane. Good to see that you're still chugging along.

Btw, those Mekboyz are great as well, I like the red-green-black combo
 

Sukigod

Member
So I'm back in the saddle for a time, we'll see how long it goes ;)

I've actually been working on and off on this monster for about three weeks and the only thing I've accomplished has been the metallic weathering. I know, not much to weathering, right? Egggad, I wish. For anyone who saw the tutorial a few years ago about my weathering using the Skullhamma's, you'll know it's a long and tedious process. Sponged base/primer layer, then all hand done (with various size brushes) metals so they all stay nicely within (or trying to) the boundaries of the worn primer.

I'm done with the weathered metallics and done the brassy pieces and the main guns in the Deff Arsenal. I put it together for show since I haven't seen it in one piece in about a year. It is coming together now and I can finally see some sort of light at the end of the tunnel. Lots of smaller details like the exhausts, canopy, rear engine nacelles (black/white checks), bombs, and the Deff Arsenal. Then it's back to washes for grime, an airbrush for smoke/exhaust smoke stains - a brief touch up on details to bring them back out from washing - then sealing. I'm really hoping to have this giant wrapped up by Halloween. We'll see how that goes ;)

ps. I know there's some shots without the main Deff Arsenal kannons - they were in the process of being painted when I took these. That also accounts for some barrel droop in some photos as well, they're only blue-tac'd on at the moment.

Later!
bommer187.jpg


bommer188.jpg


bommer189.jpg


bommer190.jpg


bommer191.jpg


And a couple of Barry shots - one shown against a dakka jet.....

bommer192.jpg


And a different kinda Barry shot ;)

bommer193.jpg
 

Sukigod

Member
I had almost forgotten about this behemoth. Glad to see it's nearing completion!


Me too ;)

Thanks everyone. Hopefully I can chip away a little here and there on a consistent basis through the end of the year. The goal is to use this as motivation before I can start the gargantuan squiggoth :)
 

Sukigod

Member
Boom!

We'll see how long this lasts ;)

A long time ago in a house about 5 miles away, I started a green project, but of a different kind. It's a Bride of Frankenstein and The Monster kit that my wife wanted me to do up (she's a huge Bride fan). Looking for something to while the time away and brush up on my painting skills before returning the mighty green horde, I revisited this awesome kit to test myself.

Earlier I worked on the clothing for both as it was pretty easy. I was hesitant to work on the faces for a few reasons. One, the scale is MUCH larger than our standard 28mm figures. Second, I knew I'd need to do some larger area blending and wasn't sure how to go about it. In the interest of pushing myself, I dove in last night and figured I could always strip and reprime if I screwed it up too badly.

So, in my usual fashion of step by step (when I remembered to take photos, that is), here's how I did Frankie's head and hands.

The head and hands were primed white, then I applied a base coat of Bleached Bone and a thin covering of Rotting Flesh - (first two photos). I wanted a light, almost ghostly pallor to his skin, I wasn't looking to go all super-green, comic style monster. The green should almost be a rotting, under the skin appearance so I didn't mind of the lighter Bleached Bone showed on the high points as I was planing on wet brushing back up to create highlights later.

bride10.jpg

bride11.jpg


To achieve a bit of a sore, bruising effect around the stitching/attachment points for the various body parts (you would think they'd be a bit sore), I used Baal Red wash from GW. This was built up in a multiple layers, each one adding more color closer to the gaps and the deepest recesses under the eyes and around the rope/metal bar holding the left wrist together. (looks a little painful, doesn't it?) Yes, the application is a little sloppy at this point but I know I was going back over with the Rotting Green and Bleached Bone to blend it back in. This also achieves a bit of an underpainting technique, tinting the skin form underneath.

bride12.jpg


I now moved onto the blues. This was applied around some of the veins in the hands, under the chin, mouth, nostrils, and under the brow. The blue creates a much more subtle shadowing under the brows that simply using black. There's a small touch of Baddab Black wash in the deepest recesses of the mouth, nostrils, and underbrow/eyesockets. Things are a little rough, bit the wet brushing stage helps bring it all together.

bride13.jpg


So, here's where I got dug in and was so in the flow I didn't take many pics. Here's what's happened since: I wet brushed Rotting Flesh, then a wet brushing of Bleached Bone to bring back the highlights and blend the bruising effects together. I also did a very light wet brushing of Skull White to the very highest points (brow, nose, cheekbones, knuckles, etc). This gives a little extra pop and adds depth without having to darken the recesses excessively. I also did the fingernails, rope and bar, hear, and leather stitching holding his skullcap on.

bride14.jpg


Here's the completed Frank figure with his head and hands in the right place :)

bride15.jpg

bride16.jpg


And a quick shot with his honey - Her dress and arms are done, still waiting for the courage to start her face. There's also a settee, floor, stone wall background and assorted lab equipment to paint up but those will be fairly easy and quick. I'm excited to work on the settee and stone as I've read up on some new techniques I want to try on them.

bride17.jpg


Till next time!

Later!

and yes, I'll be returning soon to the bomma - just need to finish the Bride and Frank first.
 

bgcdazzler

New member
Sukigod! Welcome back. I'm a big fan - in fact it's your WIP thread's fault that I started painting - so great to see you're still kicking brush. This looks excellent as usual, and look forward to seeing the bride come to 'life'.
 

Sukigod

Member
So this whale is back on the bench :)

Now it's down to the details; pick one, knock it out and move on to the next one. Pretty soon I should be done.

The metallics took for ever and it's not a dramatic change from back when I put it on hold again. I'll be finishing off the wing details first, then on to the deff arsenal - which I'm is going to suck since I made it so danged detailed. Anyway, here's some pics of progress.

bommer194.jpg


bommer195.jpg


bommer196.jpg


Later!
 

Sukigod

Member
Yellow – the bane of nearly every mini painters existence. I wanted a few panels in yellow as it a great accent color for all the reds and whites across this model. So I started where I always start – the Internet!


After an hour or so of research I had a plan. It seems the only really good way is to layer from dark to light, something I’m not afraid of doing. I dug through my collection of aging paints and pulled out this selection to get me there.


bommer197.jpg


I’m not a big fan of the Bad Moons shade of yellow – to light and bright for me, I prefer a Golden Yellow, something a bit warmer to go with the reds, less contrast. Aaaand, of course, since I haven’t actively painted in some time, my Golden Yellow has dried up hard as a rock :( So, with what I have on hand that’s salvageable, I try to mix up my own version to limited success.


Here are the steps I used to create my yellow panels. All paints were thinned, even the base paints.


Starting with a black primer, I blanketed the panels with Scorched Brown, then stepped up to Calthan Brown, finishing up my brown base layers with Snakebite Leather.The first real yellow color was the Iyanden Darksun base paint. This went on extremely well and I was really happy at where it was at this point. I figured it would be an easy layering of the other yellows to what I wanted but things didn’t work out that way.


I tried to approximate the Golden Yellow color by mixing Sunburst Yellow and Blazing Orange but this only created a weird orangy/yellow mix that frankly didn’t look good, so I tried simply working up to the Sunburst Yellow, hoping to add the warm tone through inks/washes.


It took about 4 layers total of Sunburst Yellow to get a somewhat smooth, even coating. I didn’t have the new Casandra Yellow wash so I did what I always do, improvise. I mixed Yellow Ink with Flesh Wash, thinned it down and washed the panels with it. While it does add depth, it really didn’t tint like I thought it would – leaving the panels looking “washed” and not Golden Yellow. Oh well.


I have since picked up the new replacement for Golden Yellow, Yriel Yellow, and the Cassandra Yellow wash and will be trying them out on a couple other smaller panels soon. Hopefully I can crack the yellow code and make it work.


Here’s the pics of progression – enjoy!


bommer198.jpg


Later!
 

Sukigod

Member
Yellows - Round Two!


I’m not ready to give up yet on yellows - grrrr. After picking up a couple of new paints I tried out another idea that many use. Going from Iyanden Darksun base to layering the new Yriel Yellow and washing with the new Cassandra Yellow wash. In the end, I’m still not sold.


Below is the progression: I base-coated two payers of thinned Iyanden Yellow over black primer. This covered quite well and I was pretty happy with it - smooth and not think, no excessive pooling around the detail areas. The Yriel Yellow however, still sucked. Or, at least I sucked with it.


MY experience with yellows is the paints (Citadel) always behave oddly compared to ALL other colors. Even thinned down it has a tendency to not lay evenly flat, there was always some sort of brush marks or troughs that appeared. This time I tried thinning it down further than I normally would most paints - even whites, and the first coat when on somewhat smoother than normal. In the pics you can see it sort of “tinting” the base color (a bit on the mustard yellow side).


By the second coat, things started to fall apart. Paint/pigment welled up in odd areas and pooling around the detail like the bolts on this panel. The brush marks only seemed to get worse. By the third coat, it was a real mess - and still not really close to the final color of the paint Yreil Yellow. I did finally end up washing with a thinned down Cassandra after reading that it has a habit of turning things orange when used straight form the put. To be honest, I needed up with something that looked pretty much like the last attempt. Muddy, dirty, washed out and not a clean golden yellow at all.


I have one more part on the bomma that needs yellow (the large lightning bolt on the rear hatch) and there’s one more technique I want to experiment with - basing white and gazing, though with what I’ve seen online, it still leaves a lot to be desired (problems like the depths being too orange, etc.).


Of course, I’ll document and post here to let you see what happens. Yellow is one of those colors that most painters have problems with and I’m hoping I can crack this code for one of the hardest paints to master. Heck, I just want to use it without it looking dirty and greased up.


bommer199.jpg


Later!
 

Zab

New member
Try shading or preshading with purple.

It will bump the contrast without looking muddy. Welcome to hell :p
 

Sukigod

Member
Try shading or preshading with purple.

Welcome to hell :p

No kidding!

I might try the purple out on a test piece. I used to work up from brown through reds and then oranges before hitting the yellow (loooong time ago). I might test that out again and see if it affords any better results.
 

shakes

New member
Hey Sukigod,

If you have it, try using vomit brown for your yellow, then use layers to work up to bleached bone or Vallejo ivory. Once you're finished, go over it with a glaze of liquitex golden yellow ink (I think that's what it's called, they make two, you want the rich orange/yellow one, not the one that looks like sunburst yellow). I usually do 50/50 water/ink to tone it down. The yellow is too vibrant for me otherwise. The more vomit brown you leave showing the richer/more orange your yellow will be. Over straight ivory you'll get a more vibrant yellow. The ink is worth ordering if you can't get it locally. The rest of their inks are good too, but nothing special.

I'm curious what palette you're using for your skin tones, mind sharing? I don't have many paints from the last couple of gw ranges, most of them are screw top, or the black flip tops. However, if you have a recipe that uses the new colours I'd love to hear that too. I've stayed away from them because of their new layering/basing/etc. system.

Shakes
 

Sukigod

Member
TLDR: I’m back.

Wow - almost 10 years since my last post! So, what have I been up to? Well…

I transferred all of my energy to a different hobby - home brewing. I became completely entrenched in the home brew/craft brew movement that swept the US between 2015 and COVID. I homebrewed competitively (got a few medals) and I became a certified beer judge (sounds more glamorous than it really is), helped run competitions and was the president our out local home brewing club. Got a third job working in a brewery as a beertender (still do, awesome fun job!).

I stopped teaching (my second job at the time), then, my wife and I decided to start a second business (marketing is the first). Firestick Pretzel Company, a spicy snack pretzel that comes in a matchbox-like package. So, now I’m back to three jobs: Graphic Design/Web Development, Beertender, and Snack Pretzel entrepreneur. Not busy enough, eh?

We then decided to sell our house and move - it was a business decision - our mortgage and warehouse lease combined was higher than if we found a property that could facilitate both living, and our pretzel business. We found 20 acres out in the woods that fit the bill perfectly. It’s gorgeous and I do not miss, for one minute, living in the “city”.

I’ve also become a grandfather 7 times over. I love grandkids. All the stories grandparents tell, they’re true. The oldest is 4, the youngest will be born the end of this month.

Crazy how much can happen in 9 years.

I fell out of WH40K because I just didn’t have the time. I eventually sold my ork army to a collector in Baltimore. Haven’t seen them since. I did keep a few cherished minis though. I also sold most of the plastic/metal, gave my paints to my son-in-law, and donated the rest of the terrain and building material to the local game store. The only things left are the tools, a few models, and the skills I learned.

So why come back?

With so much of my time being taken up between 3 jobs, 20 acres of property to maintain, our increase in traveling (for grandkids and cruises), I realize I don’t have time to do the brewing hobby (basically needs a whole day) which I really haven’t done that either since 2021. I felt the need to not just be creative, but to be creatively productive. I read a lot as another hobby, but that’s all internalized. I don’t get to see the products of my “labor” other than seeing the book on the shelf. Mini painting gives me that outlet and I can devote smaller chunks of time, whenever I have the opportunity, and still progress .

So, I’m starting over as far as space and equipment. I know the tools and materials I need and can gather those over time. Back in the day, I was working on an online modeling book/resource and one of the topics was “How to Start”. Well, I’ll be leaning back on those concepts to restart painting minis. I’ll be starting with 2-3 small boxes/containers to hold my tools, paints, and models. A couple of gooseneck table lamps and a cutting mat. Picking up some paints to start (this alone will be the most $$$ investment getting back into it), and just putting brush to model to get my previous Mojo back. Finding space for a dedicated table/desk will come later.

My focus now will be minis I want to paint, not because I need them for an armylist. Yes, I’ll do a few works here and there, but this will be strictly for my own edification. The other focus will be to better my painting skills. I can do many things, but there’s a lot more skills and techniques I plan to add to my painting toolbox.

I look forward to reconnecting with some of the Grognards, meeting new people, and sharing my journey again.

Later!
 
Back To Top
Top