A Couple of Space Wolf Vehicles

RuneBrush

New member
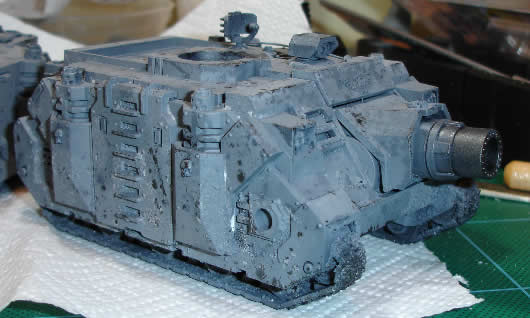
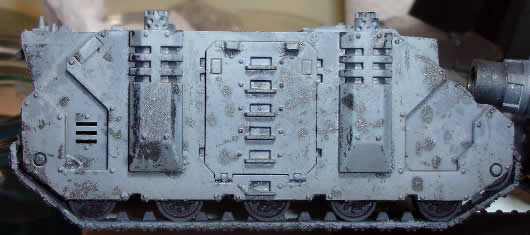
Taken a small break on my GD entry to experiment with my fairly new Iwata airbrush. The following tanks have both been \'double\' salt weathered. That is two applications of salt to expose a total of 3 different colours of paint.

I\'m pretty happy with them, though I know that there is still a lot to learn - for example, a lot of the weathering has come from the fact that the layers of paint were quite thin and washing the salt off allowed me to run paint off with a toothbrush :s I\'m currently in the process of replacing the double doors on the top of the rhino as I managed to spray the pack marking on poorly. I also realise that taking a picture of a tank requires a bit more thought than a normal mini ;)

Anyway, any comments and suggestions gratefully received - and any questions will be answered.
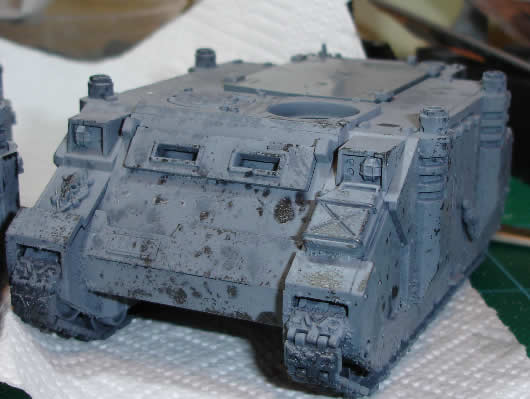
rhino_1.jpg


vindicator_1.jpg


pete
 
S

Shadzar

Guest
Not sure what I am supposed to be seeing with this salt method, but looks like a basecoated mini with some spots of other colors. ???
 
S

Shadzar

Guest
Originally posted by alextheartist
It gives the weathered effect, which has obveously been displayed here in these pictures...

Oh...I get it now! Yup they look like my poor decade old grill. Near time for the quartermaster to requisition some new ones before the wolves are...left out in the cold. lol

I am curious what they would look like if fully painted and the weathering technique showing through underneath the top coat of paint to make it look faded as if just6 starting to weather good, rather than that aged look.
 

RuneBrush

New member
Yup, the effect is not quite as subtle as I was intending to be honest :) They\'ve come out more battered than worn.

I experimented a little bit more last night and managed to do a more subtle effect on a cupola hatch, but there is still room for improvement. The biggest changes are that rather than washing the salt off under the tap and scrubbing with a tooth brush, I carefully ping the salt off with a knife and do a final rub with a wet toothbrush (no running water). I also used a salt grinder for the second application of salt - much finer, but more difficult to apply.

I plan to shade these with a mixture of washes and then probably drybrush a highlight on - not that I actually like drybrushing...
 

mattsterbenz

New member
Looks pretty cool so far. I think some brown washes and weathering will help out a bit. Salt method seems very effective. I\'ll have to give that a shot some time.

-Matt
 
S

Shadzar

Guest
Originally posted by RuneBrush
Yup, the effect is not quite as subtle as I was intending to be honest :) They\'ve come out more battered than worn.

I experimented a little bit more last night and managed to do a more subtle effect on a cupola hatch, but there is still room for improvement. The biggest changes are that rather than washing the salt off under the tap and scrubbing with a tooth brush, I carefully ping the salt off with a knife and do a final rub with a wet toothbrush (no running water). I also used a salt grinder for the second application of salt - much finer, but more difficult to apply.

I plan to shade these with a mixture of washes and then probably drybrush a highlight on - not that I actually like drybrushing...

Very interesting. You have inspired me to try this if my airbrush propellant wasn\'t illegal now in NC. (or so the reason Walmart gave for discontinuing it.)

Of course I could buy a compressor (if I had any money) for the el-cheapo but non-Testors airbrush I have.

What about alt and spray paint, or is it really too thick, thus the reason an airbrush is used?

I would picture it like this. brown for the rust, followed by a ring effect of silver for the unrusted, but paint removed metal, then followed by the weak paint, and finally the full paint color. Then drybrushing some grime build-up onto the paint where the next weathering will occur.

Sounds like more work than I am wanting to put into it afterall, but your idea works even if it is a bit much. Be a heck of a terrain piece, and a good technique for something like the crashed lander from the MacCragge set that they now sell separate.

May not have been exactly what you wanted, but looks good none the less!
 

RuneBrush

New member
@Chrome - oh yes :D Thought I\'d get the tanks done before the new troops came out.

@Matt - cheers, I did a bit of shading with a wash last night and it does tone it all down - however I looked at it this morning and need to go darker! The salt technique is pretty straightforward, but application of the salt is a little haphazard :s

@Shadzar - Glad it has potentially inspired you. I think that spray paint could be used for this, but it could end up as more \'precise\' than using an airbrush. One of the benefits of using an airbush is that as you build up the layers that the undercut underneath the salt becomes feathered in, giving a more worn look. A spray can might give you crisp edges around the salt - then again it might not, doing a number of light dustings could be the way to go?

As for your idea of the rust, you\'d be better off spraying metal (base coat), salting, then doing the top coat, but painting the rust on. The rust would me more likely to occur at the bottom of the worn patch where water would naturally pool/catch. The layering would also give to the perception of depth, and the metal would naturally have it\'s shine removed.

I\'ll try and post a pic of the cupola tonight, it definatly looks less bashed up than the tank (though still fits in).

And yes, doing this would be fantastic on one of the terrain peices - I\'d not actually considered this to be honest. In fact buildings/barricades could be \'mottled\' between two colours (the base colour doesn\'t have to be metal after all).

pete
 

Chrome

New member
I have set out to try the very same, brushing up at least a part of the army before the release... Hard to find the time in between everything else though. lol
 

RuneBrush

New member
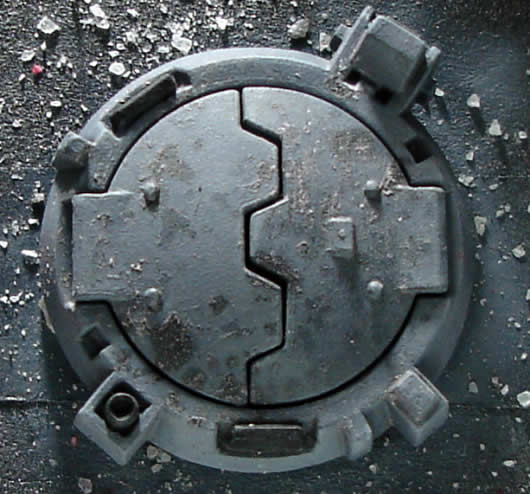
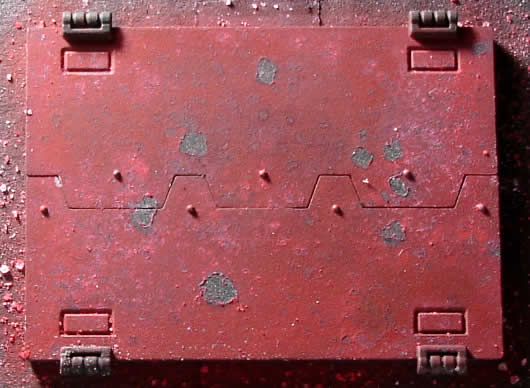
Right, as promised here is a reasonable pic of the cupola. I\'ve also added in one of the doors.

cupola_1.jpg


doors_1.jpg


The white flecks that are more visible on the cupola are dried salt... As with painting a picture at this size shows up things that my iffy eyes don\'t! It\'s also worth noting that the peely paint effect is actually from the hair spray used as a \'temporary glue\' and not the salt. I need to do a lighter dusting of hair spray in future :D As with the rest of it, the doors were given two different colours, a dark red followed by a lighter red (with salt applied between).

@chrome - Sad as it is for a chap who\'s almost in his 30\'s, I\'ve been looking forward to the new codex for ages - just hope it doesn\'t disappoint.
 

wingwong113

New member
I have to say, that\'s damned fine work. One of these days, on a boring shift, I\'m going to have to jot down a step-by-step process of how you got it to look that way, so I can email it back home and put it in my binder of \"How to create awesome paint/model effects 101\".

Bravo.
 

Chrome

New member
Sad? Do not worry, I have friends well over 40 waiting eagerly for that codex together with me. :D

And I\'m positive that it won\'t disappoint, only rumor I don\'t like is the one where they say they are removing the Leman Russ tank from the list. That would be a nice piece of fluff to miss.
 

CreganTur

Member
@RuneBrush

I remember someone else on the forum tried an alternate method of applying the salt. Instead of using hairspray, which can accidnetally be removed to devestating effect, they used water to get the salt to stick. It might be more of a hassle than hairspray, but it might work better in the long run. That\'s what I\'m going to try if I ever start doing vehicles.
 

RuneBrush

New member
I began washing the Rhino last night with various colours and although it seems to look the same, when compared to the Vindicator, you can see quite a difference. Will get a photo done tonight. What\'s really scary is that I seem to have got further on with these tanks than I ever have with a mini in the same time. Currently setting myself a deadline of this weekend to get one finished, so that I can put my attention back onto my GD entry.

@wingwong - Here is the process I used - feel free to use it wherever you fancy and glad that you like the effect :D

[*]Undercoat model black
[*]Spray the model with a metallic colour (light dusting), an aerosol will have better adherance than airbrushed paint for this (i.e. less chance of rubbing back to the undercoat)
[*]Apply coarse salt layer - rock salt broken down seems to be most effective for the look I want
[*]Airbrush with the first base colour. This should be between the top colour and a pure shadow.
[*]Apply finer salt - rock salt from a salt grinder is quite good for this.
[*]Airbrush with second base colour - i.e. the top colour
[*]Give it half hour or so to dry, even though it may seem dry to touch, the paint will be less soft if given a little while
[*]Remove salt:
method 1 - rinse under cold tap and scrub with toothbrush - can cause scratching back to the metal colour
method 2 - \'ping\' salt off with back of knife and rub with wettened toothbrush to remove salt stains - need to be very careful as chance of cutting model and/or finger
[*]Admire

@Chrome - They\'re apparently removing the Leman Russ tank and adding in a new Land Raider variant - assault cannon side sponsons. Having followed the fluff since the first codex I can see arguments for keeping the tank and arguments for not.

@CreganTur - That\'s a really good idea and one I\'d not thought of. I know where I can buy a \'atomiser\' plastic spray bottle, like you get air freshener in which would make applying it to the surface of the model pretty straight forward. Either plain water, or water with a bit of flow retarder (Klear/Acrylic Medium) in, as that might give it a bit more binding. Providing it doesn\'t dry before you can get the salt onto the model, it should work.

pete
 

RuneBrush

New member
Ok, the flash on my camera has washed it out, but the tank is primarily shaded now and a first highlight applied on this side. The metal patches need a little work, and I\'ve not really had a go at the tracks yet - I wish I\'d masked the buggers off tbh.

rhino_2.jpg
 
S

Shadzar

Guest
Disable the flash. They are always too harsh a light for any detail pictures. Hold a flashlight if you need more light. Silly camera makers thinking every image is taken outdoors in broad daylight. You would think by now someone would make an inexpensive camera for mini photographers. I mean don\'t short people need camera\'s too? Oh wait...what was I talking about?

It looks pretty good form this angle. The question is are you going to highlight the edges, or have them all rusted out?
 

RuneBrush

New member
Originally posted by Shadzar
It looks pretty good form this angle. The question is are you going to highlight the edges, or have them all rusted out?

I\'ve started to highlight the edges with Fortress Grey - doesn\'t show up that well though, I intend to take them a bit further with some Astronomican Grey as well. I\'m not going to apply much in the way of rust, though I\'m thinking overkilling on mud :D

My light setup is a bit poor for taking pics of anything larger than a single mini as my light tent is currently at work being used take product shots of shampoo and skin care products (long story). In fairness if I tidied my desk up a bit, I could take a better tank shot by moving the tank farther back.
 
Back To Top
Top