Bailey03's WIP

Bailey03

Well-known member
Well, I've started on the shield design thanks to the suggestion from Maenas. I just did one section to see how it looked, but so far I like it. I'm going to do the four sections to form a cross first and then decide if I want to do it on all 8 of the dark sections. I also did some minor tweaks to the horn and hands. The hands got some warm pink glazes on the knuckles and the right palm, then some cool blue-purple glazes in the shadows. I think the contrasting warm/cool works well for this scene.

N25.JPG
N26.JPG


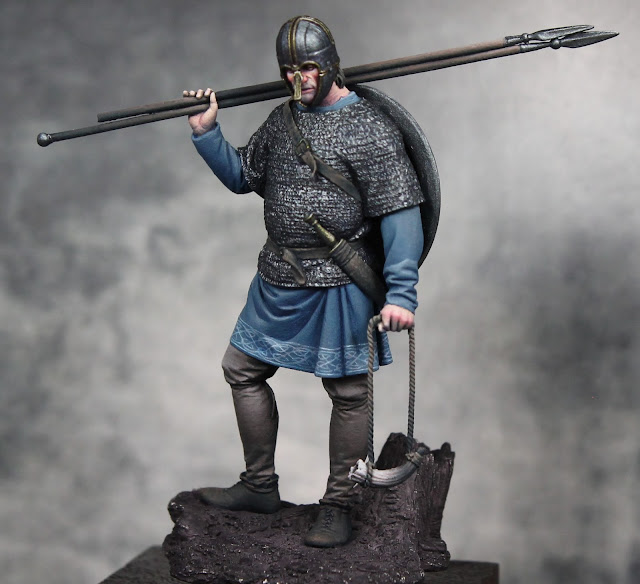
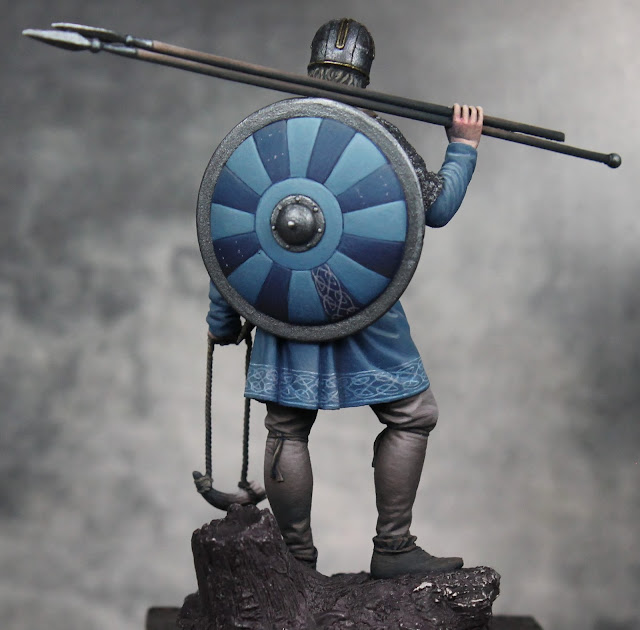
Once I finish the shield design, I'll add some glazes to tie it all together and reinforce the shadows. Then it's time for chipping and weathering before finally moving on to the base. I've got a busy weekend ahead so I doubt I'll finish it by Monday, but shouldn't be too much longer.

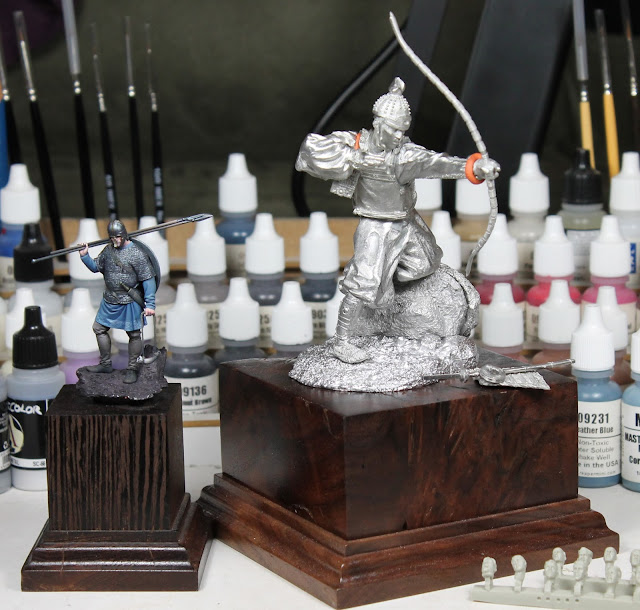
Well, with this project almost finished it's about time to get the next on ready. I've gone back and forth a lot on what I want to use as my 'big' project for Crystal Brush, but right now I'm leaning heavily towards a 90mm samurai archer from Pegaso. It's a beautiful piece with a lot of opportunities to work with freehand designs and plenty of color. This will definitely be a multi stage project. I've assembly most of the body but, because of the design work I'll have to do on the clothing, most of the armor panels will need to be attached later. There's also a bunch of equipment that will go on over those (sword, quiver, etc) but that will have to wait until after I do the detailing on the armor. Definitely a big project and one that has a lot of potential, but also one that is going to take a lot of time. I'd love to get in done in time for the contest but no promises yet. We'll see how it goes. Anyway, here's a look at the figure partially assembled. I included the Northumbrian for a sense of scale. It's definitely a big jump going from 54mm to 90mm.
N27.JPG
 

Kretcher

Active member
Indeed a big diffrence, the Samurai looks really nice be looking forward to see your version of him. I need to try something bigger than 54 mm myself sometime :)

/K
 

Maenas

New member
A giant Samurai! Run you fools!! XD XD

Glad to help you out with that idea... it looks nice because it ties everything up. Those pink glazes on the knuckles are ace, they really do the trick to trespassing yo some cold.
 

ArchArad

New member
The glazing on the knuckles and hand really works very nicely - job really well done.

The Northumbrian is only 54mm?! Clearly I wasn't paying attention somewhere because I thought he was a much larger figure.

The Samurai sounds (and looks) like an interesting and fun project.
 

ten ball

Active member
Very impressive blending on the blues and the freehand is your usual high standard :good:
The glazes have worked well on the hands also.
 

Digganob

New member
Wait wait wait. Hold up. You mean to tell me that Howard (thats the name I gave the shield guy) is actually that small! I mean Bailey that is insane. I thought he was a bust about the size of a water bottle with the pictures you take. With this new revelation I declare you not human. Really really good bud.
 

Bailey03

Well-known member
Thanks, everyone.


Well, just goes to show, don't believe everything you see online! Normally the photos make the figures look big at least in part because they show the figure magnified 2-3 times. Of course he's going to look small next to that larger 90mm figure. I imagine he'd look bigger if I placed him next to a space marine. Of course the paint bottles provide more of an impartial scale.
 

Bailey03

Well-known member
Little update on the shield. I decided to do the design work on only four of the sections instead of all eight dark ones. I think it looks better that way. I've painted on some cuts and scratches as well. The shield will get further weathering when I do the rest of the figure.
N28.JPG
 

ArchArad

New member
Good call Bailey. Less is definitely more in some cases (I'm slowly learning) and I think extending the pattern to more panels would lessen the impact and make it look too "busy".

Just a note: I am honestly loving watching your work progress. You're a great artist and very inspiring.
 

KruleBear

Active member
Love the free hand, but all the cut marks in the color look off as we are not currently seeing similar on the metal parts of the shield.
 
Last edited:

Bailey03

Well-known member
Thanks! ArchArad, I'm happy to share the progress. It's nice to get feedback and often just the act of posting the photos will help me see stuff and reevaluate my progress.

Krule, the color isn't bothering me. It's thin scratches so you really shouldn't see the metal underneath.
 

KruleBear

Active member
Helps if I spell right. I meant there seems to be more damage on the surface of the shield than the edges and center boss.
 

AndyG

Active member
Bailey kudos on the pattern and the work in general considering the size of the mini its top notch! OK that said I'm not liking the scratches sorry pal don't mean to run you down but IMHO they're too stark to black and white and I'm not sure about the highlite placement on them some of the white seems to me that its in areas that wouldn't get a major catch of light. I think it needs knocking right back. hope your not pissed off with the comment only said to help mate.
 

Bailey03

Well-known member
Ah, I see now. Yeah, I've done some weathering to the metal parts but it didn't really come across in the photos. The angle of the lights really affects how well you can see it. I'm going to continue to work with it and see if I can't make it stand out in all lighting.

Andy, no worries. I'll continue to play with it as I weather the rest of the figure.
 

Gino2dope

Member
Hi Bailey,

Nice work so far mate! I can only dream of something like that. I've done quite some weathering in my modelling life, both on figures and vehicles. What I find an excellent colour for deep scratches is German camo Black Brown by Vallejo. It's very dark brown, almost black but then not just black, if you know what I mean. Cassel earth is a great alternative. For the highlight I never used pure white; I never use white to be honest, except to highlight white? My prefered paint for this effect was Flat alumnium also by Vallejo, sometimes adding a bit of the base colour to it. I hope my ramblings might be of some use to you.

Cheers,

Gino(2dope)
 
Last edited:

oistene

Active member
The core of the shield would likely be wood, actually, so that we do not see metal in the scratches is completely fine. :)
 
Back To Top
Top