Bailey03's WIP

Bailey03

Well-known member
(Continued as a second post so CMON won't tag it as spam...)

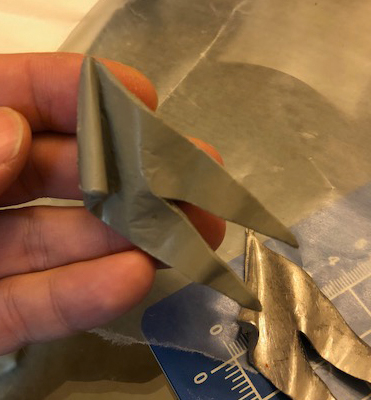
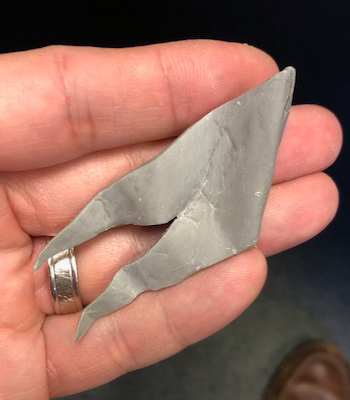
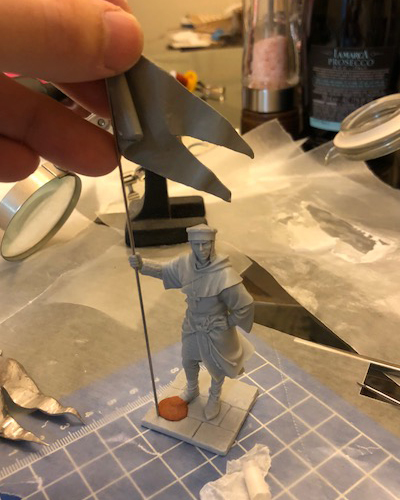
There are a few other details I need to wrap up. One of them is the arrows. I planned to have two stuck in the ground and another two on his shield. I figure for the arrows in the shield, he would have snapped those off, so they will just be stubs with the other half lying on the ground near his feet. So this brings us to the question of how do I make miniature arrows? Well, I'd already found some brass rod at about the right thickness. But I still needed to make the fletching, the feathers on the arrows. For this I remembered reading an article over on MassiveVoodoo about using real feathers on miniatures. Turns out it was authored by Matt DiPietro. In it one of the applications is feathers for arrows. I mostly followed that tutorial, though I made a few minor changes.


To start, I got a bag of feathers from a local arts and crafts store. Now, in Matt's approach, he clips off a section of the feathers shaft and glues that to the arrow. I just clipped a portion of the outer section and was careful to hold it together while attaching it to the arrow (first image below). To attach, I took the end of the brass rod and rolled it in glue. Then I carefully placed it against the edge of the feather section I'd clipped off (second image below). These pieces are intentionally too large so it'd be easier to hold them. Once they dried, I went in with a small scissors and clipped them down to size (third image below).
kn70.jpg
kn71.jpg
kn73.jpg


The process requires some finesse. I managed to screw it up a couple times. But, easy to just scrape the feather off the arrow and clip a new section. Take your time and be gentle as you clip the feather ends down to size. So far I've got the one down and another half finished. I still need to do the two ends from the shield, but I'm getting a better handle on this as I do more and more of them. Once those are complete, I'll go in and paint the shafts.
 

Guawol

Member
Great idea for the arrows, they look top notch. I also like the use of the clamp holding the brass rod. It looks a lot like something I could use my mini hand drill for, which I never thought off until I saw your pics.
 

Foxtail

New member
Excellent application of real world objects to a miniature scene. Inspired stuff, which looks excellent when finished.

The base looks bloody awesome too!
 

Canny

Active member
they quality of work is outstanding. I could look at the red cloth for a long time. when I have red fabric to paint I will be back. the base is looking great I love the arrow. look forward to the next instalment to gaze soon. I likethe extra detail and the other ends of the arrows in the shield snapped off scattered on the base too.
 

Bailey03

Well-known member
Thanks, everyone!

While I'm wrapping up the knight, I've started prepping another future project. I guess I'm on a bit of a knight kick since I picked this 75mm crusader from FER.
c01.jpg


The box art is a Hospitaller, but I plan on painting him as a Templar Sergeant. The original kit has him holding a cross icon on a pole, but I didn't care for it too much. So I decided to swap that out for a banner. I removed the pole and drilled a hole through his hand so I could insert a metal rod. Next I had to create the actual banner. I know that's not the most complicated thing, but I haven't done much sculpting so it's enough of a challenge for me. I started by looking through banners in other kits I own. I found a nice one from a 54mm mounted Pegaso knight that seemed to be the right size and shape for this knight (and the motion matching that on his clothing, similar wind state). My initial thought was to use instant mold to do a one sided cast and create a copy. Well, that worked horribly. One side looked fine by the other was atrocious. I briefly considered just using the other kit's banner here... but decided that wasn't a good idea. The main issue is that it's a metal flag and the rod supporting it is not all that thick. It holds, but I'm concerned it would start to bend over time. Plus if I ever want to paint or resell the other kit, the missing banner would be an issue.

So I moved on to a new plan: sculpt a banner from scratch. I looked at some tutorials and settled on an approach. I took some procreate putty and created a thin sheet between two pieces of wax paper. Using a rolling pin I further spread it out and evened out the thickness. Using a straight edge and a hobby knight, I cut out the shape of the banner (using the one from the kit as a guide for the size and shape). I then began the process of carefully folding and bending the putty to create the look of a flag in the wind. Again, I used the other banner for guidance and inspiration, though mine is not an exact copy. Here's how it turned out:
c02.jpg


Unfortunately on the opposite side the wax paper crinkled and stamped a texture into the banner.
c03.jpg


I considered having another go at it, but first I wanted to see if I could salvage what I had. I started sanding down the texture and I think the result is much improved. I want to work on it a bit more and perhaps I'll see if I can use some more putty to fill in some areas that I haven't been able to work out with the sanding. If all goes well, then I will be able to use this banner after all.
c04.jpg


Here's a quick look at the banner relative to the figure. I plan on sculpting a bit more of the banner where it connects up to the pole and will embed the rod at that point to get it on there nice and secure.
c05.jpg
 

Guawol

Member
Awesome work! I need to start looking at doing my own customizations to models to make them unique. Your painting is great, but gotta say I do enjoy seeing how you prep the models.
 

AndyG

Active member
Nice work with the dwarf and here with the knight. This might be teaching grandma to suck eggs but when I have done some sculpting (very simple stuff as I’m crap at it) when I did the sculpt while the milliput was still fresh I would get a moist brush (soft bristled) and gently brush it to remove any creases I didn’t want. Don’t know if that’s any use to you for the future.
 

Bailey03

Well-known member
Cool, thanks Andy!

Over the weekend I began work on the knight, focusing on the face and helmet. Here's the progress
View attachment 64636View attachment 64637View attachment 64638

What makes this project a bit different is I managed to record the work while I did it. I unfortunately lost the part on the helmet. Turns out the issue occurs when I try to pause the live recording, so from now on I will avoid that. But the videos covering the face were all fine. Recording video tutorials was definitely a learning experience. Nothing fancy here, no time jumps or sections that are sped up. The actual painting of the face probably took about 2 and 1/2 hours, but since I explain stuff and give introductions all the videos add up to 3 hours. Luckily they are broken up into various parts of the process so you can skip to the areas that interest you the most.

I've linked them all below or you can find them on youtube here: https://www.youtube.com/channel/UCNtk6z7eDgt8F5qzfLH-M7A/videos


BloodASmedium

[img]http://pnp
Sensational both in talent, the face, and the teaching of the video. Renaissance man!!! In every sense of the word!!! We love you and owe you everything for your deduction nd you contributions to this art form!!!!!
 

Canny

Active member
Fantastic, Now I must go and do some work before I get rained out - THEN I can come back home and watch these! He looks like a happy chap :)
 

Guawol

Member
I'll definitely have to peruse these videos, when I have time. The knight is looking wonderful, especially the eyes. The little dot of reflection you put in the pupil makes them that much more realistic.
 

Coyotebreaks

Active member
Really nice painting so far. And I'm looking forward to watching the rest of your videos. The first was
very interesting. It's very good of of you to take the time to make them.
 

Octavian80

New member
Thank you so much, Bailey, for showing us how you accomplish your amazing look. I've been dying for you to post videos of how you paint. I hope you keep it up and produce more!
 

Bailey03

Well-known member
I've been in a bit of a painting funk the last few weeks, but I'm hopefully breaking out of it. This past weekend I started painting Brom, the 54mm scale dwarf from Enigma. The sculpt is pretty random, he's got a mix of equipment and, to be honest, I'm not even sure what all of it is. It gives him a lot of character, but presents some challenges with the painting. I've been putting a lot of thought into how I want to approach the piece and finally decided to pick a color scheme and let that tie the figure together.

I started with the face. Considering most of it is hidden by the hair, the beard feels almost as important as the rest of the face.
Brom04.jpg
Brom05.jpg
Brom06.jpg


And a few close ups
Brom07.jpg
Brom08.jpg
 

Canny

Active member
lovely work! the details are chocka on this fella and his beard is very nice. Can you still get the 54mm version?
 

Chaotic Creations

New member
Brilliant start... it’s like a little character exploding out of a patch of black and white!!! Seriously though, it looks amazing and is already starting to tell the story you have given for the piece.

btw... outstanding job on those tutorials mate, very thorough and informative. Personally I have take a lot away from them, so thank you for taking the time to produce them. Always great to get an insight into how the masters of this art approach things.
 

Hairster

New member
Lovely start on the Dwarf, and it looks like I completely manged to miss your tutorial videos you posted....will be catchin up those ASAP. Thanks
 
Back To Top
Top