Bailey03's WIP

Bailey03

Well-known member
Thanks, everyone! Yes, SkelettetS, come back to TMM! ;)

WillS, it's a jewelers vise (designed to grip onto various shaped objects) but works quite well for minis. You can find them on Amazon, though the names differ. Here is one version. I don't know if you're in the US, so that may or may not be helpful. But you can try searching for 'jewelers vise' or 'universal work holder' or some combination of those terms and hopefully turn one up.

For the larger figures (54mm, 75mm, and larger), you typically will want to drill holes (using a pin vise) into the feet and insert pins. These will be used when you attach the figure to the base/plinth and create a much more secure attachment. They also come in handy for holding the figure, as the jewelers vise can clamp down on them. Best of luck with the 75mm figures. I've really enjoyed working on figures in that scale and hopefully you will too!

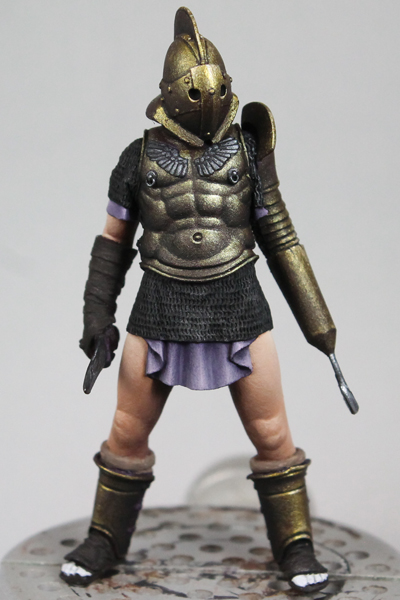
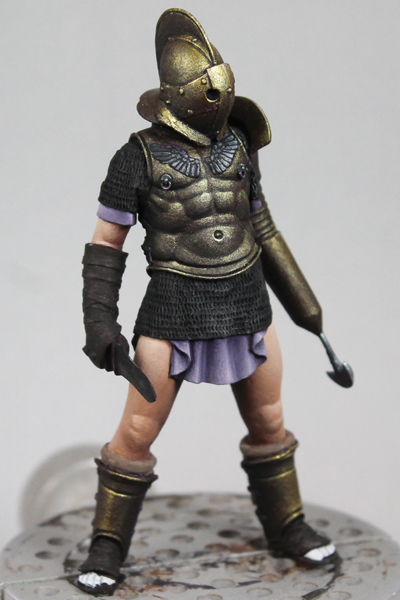
A bit of progress to show from last night's painting session. I worked on the lower part of the arm and then started to sketch in the metals for the torso. I switched up the mix a bit to get a slightly different color for the armor. I wanted to distinguish it from the helmet and arm. I took a similar approach to the earlier parts. I just rough in where the shadows and shiny spots on the armor should be, not working about fine detail or blending. This way I can get an idea for how the placement looks and if I need to make adjustments before putting in too much work.
View attachment 68359
The cuirass will end up being a bit dark. I want it to be consistent with the lighting on the other pieces. Plus, I don't want it to draw too much of the focus. The wing details at the top will get more light and help draw the eye up towards the face (well, helmet). I'm debating if I should do the wing details at the top in silver, the same color as the helmet, or the same color as the cuirass.
 

Bailey03

Well-known member
Whatever is handy. At the local art store they had sets of brass rods (maybe a foot long but of various small diameters). Look for the section where they've got thin metal sheets/foil. Then I just clip them to size. In the past, I've also used paper clips (straightened out). That would likely work for 75mm, but depending on the size of the feet/contact point you may want something smaller (in which case check out either an art store or an arts and crafts store). One pack should last you quite a while!
 

Bailey03

Well-known member
Thanks, Andy!

The gladiator is continuing to move along. Here's how he's progressing...
G21.jpg

The illustrates the stages for the cuirass. I begin with a dark base (metallics work best over a dark case), in this case purple as it contrasts with the yellow metal. Then I do a sketch with metallics to help me figure out placement of the lights and darks (middle image). This involves about 5 shades (base, 2 shadows, 2 highlights). It's quick, without much attention to blending. I just want to see how it looks and then I can make corrections to shadow and highlight placement as needed. At this stage the armor looks decent, but it looks even better after I go in to refine it (right image). I sharpen up the shadows, going to pure black, and further extend the highlights (using Citrine Alchemy from Scale75). I also mix a number of intermediate shades and blend everything together. Stippling is used in parts to help with the blends while also adding some texture. You can see from a comparison of the middle and right images that the final result looks sharper and a bit brighter too.

I just started on the white metals, with the details on his chest. Those still need a bit of work, but I opted to take a break from all those metallics and do a bit of the more familiar skin and cloth sections. As you can see above, I initially based the cloth in blue, but just wasn't feeling that color combination. So I switched to a pale purple to contrast with the yellow metal. I imagine I'll take on some more of the matte sections before I work up enough motivation to tackle that chainmail. =)
G18.jpg
G17.jpg
G19.jpg
 

SaintToad

New member
[jaw hits floor]
Amazing metals. You've really gotten a distinctive look on each section but the whole is cohesive. And the 'musculature' is incredible.

As always, thanks for explaining your techniques.
 

Bailey03

Well-known member
Thanks, everyone!

I'll be posting an update on the gladiator shortly, but first I could use some advice from you all. I'll be at the next Adepticon and they are in the process of setting up classes. I was asked to teach again and would like your opinions on the topics. First off, the classes now come in different varieties. They have 1.5 hr lectures/demo classes (can still be hands on, but meant for very specific or limited topics). They have 3.5 hr bootcamps which cover broader techniques or methods. And then there are 5.5 hr academies, for much more in-depth work. So the choice of topic and size of the class sort of goes hand in hand.

For topics, I was thinking of doing a class on painting skin (similar to the faces class I taught a few years ago, but maybe a bit broader) and/or a class on freehand. What do you think of those options? Is there another topic(s) you think would be better for me to cover?

I feel like the skin class should be one of the 3.5 hour classes. I've already got a figure in mind, Tagar from Hera Models. A great face and more than enough skin to work on. I've reached out to them to see if there's any bulk discount, as the price of the figure would factor into the price of the class. I also feel like a fantasy figure for the subject is likely to have broader appeal at a venue like Adepticon than a historical figure.

The freehand class could be either 1.5 or 3.5 hours. I could do it as more of a demo, showing the process and then maybe half an hour for everyone to try a bit on their own (1.5 hr class). Or expand it to 3.5 hours, have it be much more hands on, and maybe do several different approaches to freehand (pencil to paint, geometric designs using my guide dot approach, and then the sketch to more finished representative image like a lion on a shield or banner).

So, what do you all think of those ideas? Suggestions are welcome!
 

KruleBear

Active member
I like the idea of a skin class. I also think you could do the face class again and get a new set of students. Would some TMM work for a class or extreme isl like you did on the hafling.
 

SaintToad

New member
Between the new techniques you're developing/refining on the gladiator and the outstanding corrosion effects you've done recently, I'd say your hybrid TMM style would be a great class.
 

TheLost

New member
Sup man! been a while! Not that I'd be going (even though I'd REALLY want to!), you should do an academy class on how you painted Brom... that model amazes me every time I see it! Especially the beard!!! So you aren't in SoCal anymore?
 

Bailey03

Well-known member
Thanks, guys. I'll put some thought into a TMM class. Yup, I'm back up in San Jose. But I'll be down in SoCal from time to time. :)

Here's an update on the gladiator. He's getting pretty close. I did more work on the arms and legs. I still need to do the wraps on the back of his greaves, but otherwise the legs are finished. I started on the chain mail last night. Not 100% happy, but I'll keep messing with it. The back looks better than the front. I want to adjust the front so you get a clearer gradient, concentrating the shine in spots so you get a better sense of shape for the piece.
G28.jpg
G29.jpg
G30.jpg
G31.jpg


In other news, I've started on a 28mm project, a rarity for me. This is Vax, a character from Critical Role. The figure was a limited edition release from Steamforged Games for Gencon, but they kickstarted a series of all the characters which will be coming out early next year. From what I saw on Facebook, a lot of fans of the show got either this figure or the kickstarter set, but don't have much experience with painting. So I decided to write a very thorough tutorial meant to cover everything you need to know to prep, assemble, and paint a figure like this. I'm writing it as I go, so the first sections are already up here: http://powellminipainting.blogspot.com/p/critical-role-vax-tutorial.html . Most of this will be review for you experienced painters, but the most recent section where I do the face may still be of interest. This project definitely makes me appreciate those larger 54mm+ models I work with. Give me one of those faces over a 28 any day. =)
V01.jpg

V02.jpg
 
It's great watching the progress of the gladiator. I particularly like the contrast between the metallics against the smoothness of the of the skin and the cloth, I really get a feeling of texture from it
 

Bailey03

Well-known member
Thanks, everyone. I was quite pleased to see my Crusader wind up with a 1st place in it's category!

I've been doing some more work on the 28mm Vax figure. It's been a good exercise in painting black as I'm using a couple different mixes to indicate different materials. Not too much left to do, aside from the base.
V09.jpg
V10.jpg
V11.jpg
 

Foxtail

New member
Awesome to see the different techniques used to get different contrast on the various black materials. Great stuff as always Bails
 

BloodASmedium

[img]http://pnp
Congrats David- even when he’s not physically in the competition he wins the highest honors again. Very excited for you I know your competitive juices must be overloaded - so this should appease them awhile .;)
great jon on back too brother Black is so tough you make it look incredibly easy -all the time -every time!!!
 
Back To Top
Top