Black Reach Termie Conv. with Lightning Claws

CaelynTek

Color Blind Artist
I traded a guy a couple weeks ago for some lightning claws out of the Close Combat Terminators set. I wanted to make one or more of my Black Reach Terminators into a lightning claw.

BR_LC_WIP1.jpg


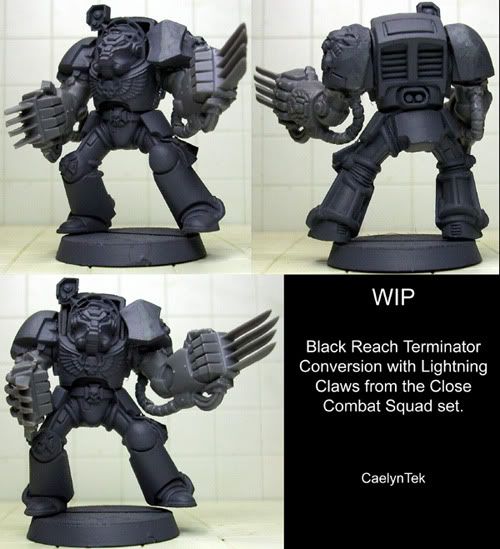
The hardest part was getting the power cable to line up on the left arm. I had to use half of the power cable on the lightning claw, and half the power cable from the black reach shoulder, cut them up a bit and change the connection point on the shoulder pad to make them fit.

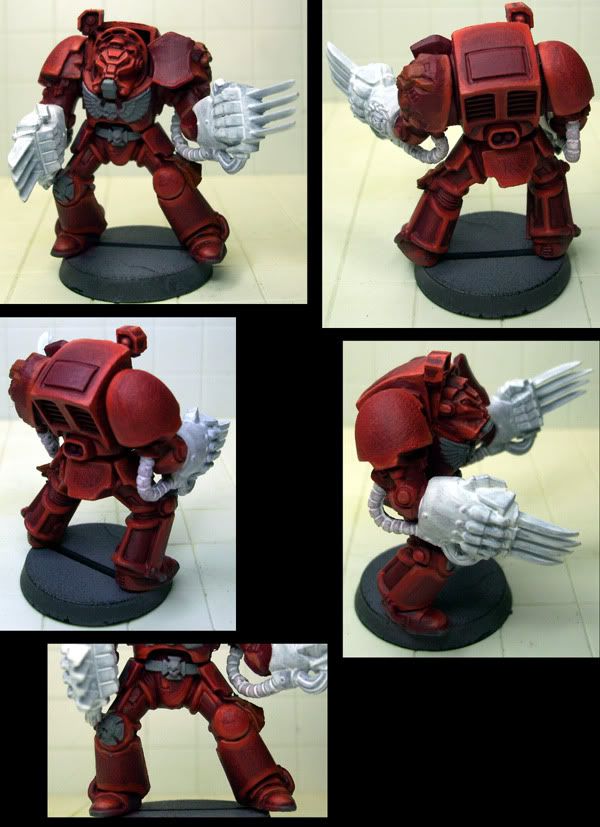
Here is my first stage on the painting process:

BR_LC_WIP2.jpg


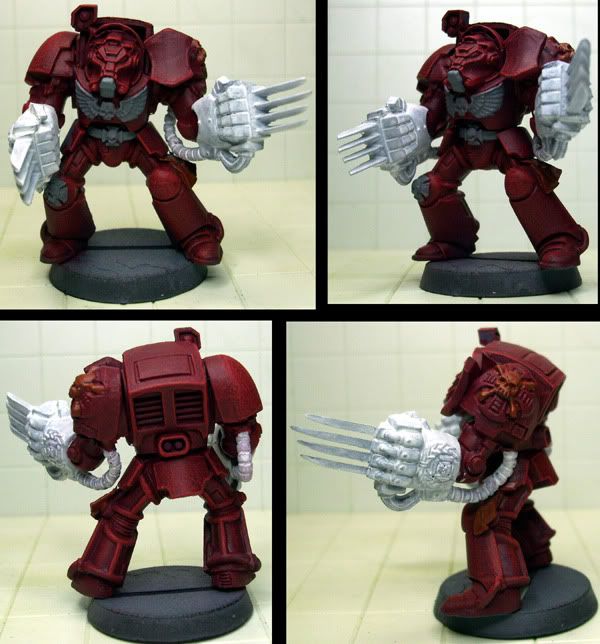
Basecoat of Vallejo Gore Red on all armor areas. Followed by a 1/1 mix of Baal Red/Badab Black wash over all armor. Followed by a series of quick dry brush steps in the following stages:

Gore Red
1/1 Gore Red/Blood Red
Blood Red
2/1 Blood Red/Fire Orange (Really light)

Unlike the last terminator I painted, I stopped at this last dry brush step because this time, all I wanted was to be able to barely highlight the details without altering the base color too much. All the top end highlighting will be done just with blending and layering.

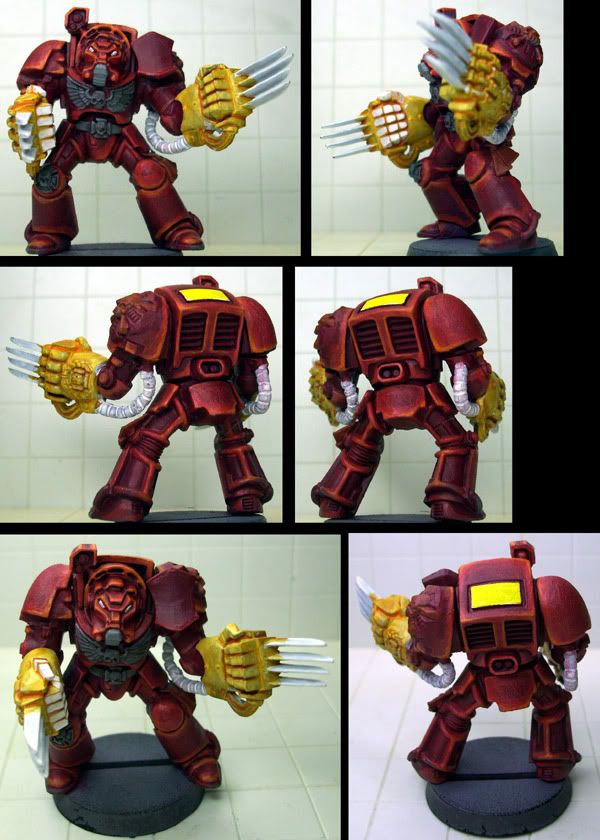
Next I base coated the chest plate, belt and knee badge with Codex gray.

Then I base coated the skull and cross bones on the left shoulder pad with Vermin Fur.

Next I base coated the lightning claws and power cables with a really thinned out Skull White... two coats

And that\'s it for now.... I\'ll post another update in a couple days. (or tomorrow if my progress is faster than I think)

Comments and suggestions welcome.
 

IronKobra

New member
The colour scheme looks nice and dark but I personally think the base coats are looking as though they have a \'powdered\' effect. This can happen with drybrushing large areas.

I would suggest instead of drybrushing your base coats simply use 2-3 thinned down layers and build up the colour. I know you mentioned practicing for the new hulk minis and a dry brush base coat would be much more difficult on minis with so much extra detail on the armour and they would look so much more cherished and maintained as the Blood Angels would keep their armour.

good luck and regards
 

CaelynTek

Color Blind Artist
Armor Highlighting almost done. I can\'t decide if I want to throw a red wash over it or leave it.. If I red wash it, I\'ll have to go through and re-add the top end highlights, and I don\'t want to have to do that.

BR_LC_WIP3.jpg
 

CaelynTek

Color Blind Artist
Ohhh... I ended up doing a watered down Baal Red wash over the armor and re-invigorating the highlight with a watered down Fire Orange.

I also washed the grey chest wings and the other grey parts with Badab Black.

And since I had the Baal Red wash out, I went ahead and used it again after doing the armor and added a little bit of old school yellow ink to the red wash...and a little more water to make a thinner orange-ish colored wash.

I used that on the power gloves and lightning claw handles, leaving the blades themselves white... mostly. I\'m not sure yet what I\'m going to do with the blades, but the power gloves are going to get the \"glowing\" treatment like I did on my last terminator power glove, hopefully a little better this time.

I had JUST started going back over the flat spots on the gloves with white when i took a break and took this picture:

BR_LC_WIP4.jpg
 

ColtheReaver

New member
The red looks great on this but the yellow doesnt look right. Maybe try and tone it down a bit with a few washes of gryphonne sepia or even devlan mud. Looking good though.
 

CaelynTek

Color Blind Artist
WIP_BR_LC_5steps.jpg


This is the step by step Work In progress of the Mini I am currently working on. Each level of the photo is one step.

I\'ve already posted everything up to level 4, so....


Level 5: Chest eagles - Based with Codex Gray, Washed with Badab Black, Highlighted with thinned Codex Gray, highlighted again with very thin White (Vallejo)

Shoulder Skull - Based with Vermin Fur, washed with brown ink, highlighted with several stages of Vermin Fur, Bleached Bone and Skull White. Shoulder badge, highlighted with Fire Orange and Sunburst yellow, detailed with Skull White.

Respirator - Mixed Boltgun Metal with some white and re- basecoated, washed with Badab Black.

Base: Created the Space Hulk floor panel base and primed it black. Floor panels are from a styrene model floor tile sheet, glued on the standard 40mm GW base.

This mini is NOT done.... There\'s a lot more to do but I wont post any more WIPs...when I post this mini next it will be a final.
 

mud duck

New member
Firstly, What Chapter is this guy going to be in?

Second, the shield on the left shoulder could use some highlighting. From My perspective you have some nice zenith lighting going on except for that. I would think that it should be somewhere in the basecoat color on most of it, if not closer to the highlight color. If that makes any sense at all...
 

CaelynTek

Color Blind Artist
Originally posted by mud duck
Firstly, What Chapter is this guy going to be in?

Second, the shield on the left shoulder could use some highlighting. From My perspective you have some nice zenith lighting going on except for that. I would think that it should be somewhere in the basecoat color on most of it, if not closer to the highlight color. If that makes any sense at all...

Blood Angels

I haven\'t yet decided what I\'m going to do with the shield yet, so I\'m leaving it blank until I do. I will most likely be putting some kind of hand painted logo on it, and the right shoulder pad too.

Thanks for the comments.
 

CaelynTek

Color Blind Artist
Done. The clearcoat kinda made it look worse than it did before the clearcoat. I hate it when that happens.

img4ae2869ce9bdc.jpg
 
Back To Top
Top