marrak
New member
Hello there! I've lurked on CMoN for a while now, and have always been amazed by the paintjobs I've seen here. This is my first post, so I was looking to get some advice for how to go about a certain highlight effect for painting brown on my tyranids.
This...
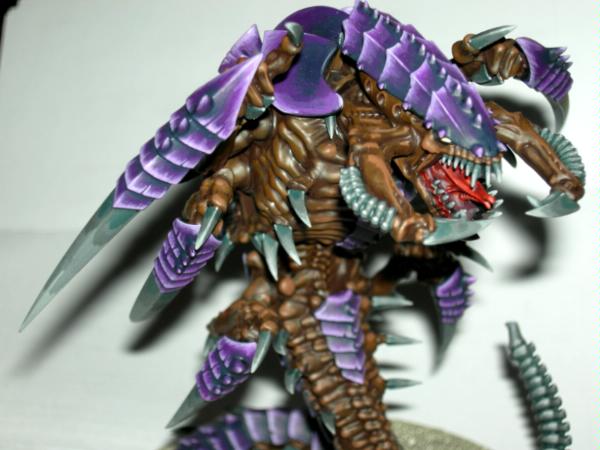
...is my best work thus far, but I want to mute down the brown highlights to something that looks more natural.
Now yes, before you mention it, I know my nids look a great deal like the zerg from Starcraft; this was actually unintentional, but ironically I did get the concept from another blizzard game.") But... they make the best reference point, so here goes!
But... they make the best reference point, so here goes!
View attachment 14891
View attachment 14892
Those are the two best examples for what I'm looking for out of the brown. Currently my mix uses P3 paints, going from Umbral umber, bloodtracker brown, to rucksack tan. The shade is done with a wash of exile blue and umbral umber mixed and thinned into the recesses. The highlights, however, are where I'm unhappy, and I'm not certain I'm utilizing the correct paints. I've seen some tutorials that call for a bone, rather than tan, to highlight the brown, but the colors in those images look like more of a blueish-gray than bone coloring overall, but I do see some hints of bone in there as well.
I'm wondering what direction people think I should move foward with for improving my painting and getting the effect I'm desiring. Any comments are indeed welcome and eagerly sought. Thanks in advance!
This...
...is my best work thus far, but I want to mute down the brown highlights to something that looks more natural.
Now yes, before you mention it, I know my nids look a great deal like the zerg from Starcraft; this was actually unintentional, but ironically I did get the concept from another blizzard game.
But... they make the best reference point, so here goes!View attachment 14891
View attachment 14892
Those are the two best examples for what I'm looking for out of the brown. Currently my mix uses P3 paints, going from Umbral umber, bloodtracker brown, to rucksack tan. The shade is done with a wash of exile blue and umbral umber mixed and thinned into the recesses. The highlights, however, are where I'm unhappy, and I'm not certain I'm utilizing the correct paints. I've seen some tutorials that call for a bone, rather than tan, to highlight the brown, but the colors in those images look like more of a blueish-gray than bone coloring overall, but I do see some hints of bone in there as well.
I'm wondering what direction people think I should move foward with for improving my painting and getting the effect I'm desiring. Any comments are indeed welcome and eagerly sought. Thanks in advance!
