Hi all...
After having seen loads of blue-white gradients as backgrounds for miniatures, I wanted to find something else. Diego Ruina\'s scroll-like backgrounds had been impressing me for a long time (over there), so I tried to get something similar in Photoshop. Well, here is my attempt anyway. With the steps detailed...
1. The photograph I used for this...

Now that\'s not the version out of the camera. It\'s been resized (it\'s hard for your computer to work on full-size pics...), the lighting fixed (see Spacemunkie\'s excellent tutorial to see how to do this).
2. The goal will first be to select the miniature and remove it from the white background. I\'ll present there another way than Spacemunkie\'s one, using a useful function of Photoshop\'s.
It creates a selection, in the color tones that you wish. You do this from this menu:
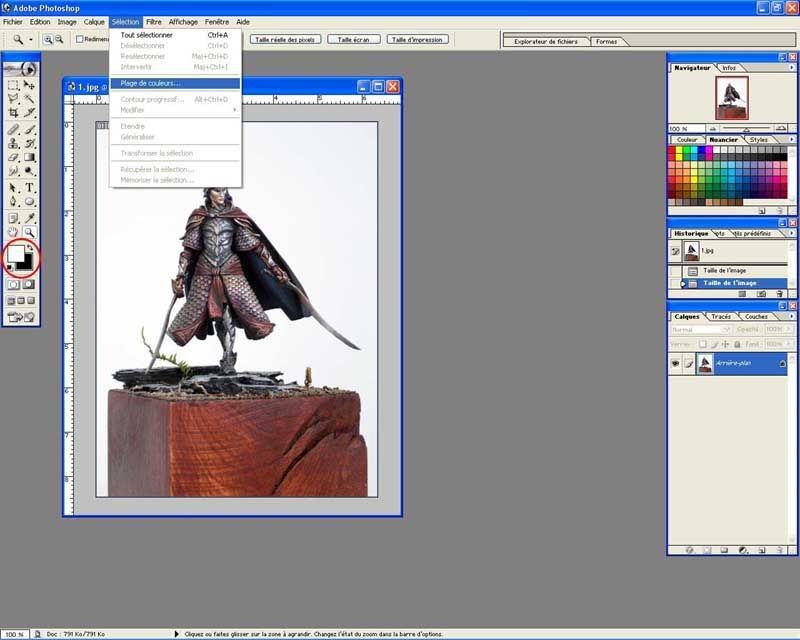
Be sure to have white selected as your foreground color, as shown in the red circle, as it\'s this foreground color that we will now select in the picture.
Once you\'ve clicked on this, you should come up with this:

Check that the settings are similar to mine. You can tweak with them, it\'s better if you keep the \'pipette\' option though (in English, it\'s called \'sampled colors\').
If you change the \'tolérance\' (fuzziness), it\'ll change the amount of color selected. The greater that value is, the less precise the selection will be. Here, the trick is to find a good value, that will select enough of your background without taking away too much of your miniature.... We will fix the parts that are not good enough later on, so don\'t worry to much over this step.
On the preview, the black parts are the ones that will be left unselected, the white dots, the ones selected.
Hit OK...
You should get this:

It\'s far from perfect, we\'ll now fix that.
Using any tool fit for selecting areas, with the ALT key hit, draw selections around the parts of the miniatures that are to be kept later on. It will remove these parts from the global selection.
Once this is done (only the background is lleft selected), hit Ctrl+Shift+I to invert selection... The miniature is now selected.
To prevent an unesthetic halo from apprearing later on, contract the selection form this menu:

One or two pixels should do the trick...

You\'ll then see if you haven\'t forgotten parts when you cleansed the first selection.... If it\'s the case it\'s not too late to fix.
Hit Ctrl+J to duplicate selection in a new layer. Now we can create the background...
3. It\'s time to make a new document. Make it at least twice as big as your previous picture, to have freedom to choose the parts you like later on.
Once you\'ve got it, go to Filter -> Render -> Clouds, as shown here:

You\'ll get this (well, not exactly... It\'s a random function, it should look like this. From now on, read \'looks like\' when I say you got something.") )
)

Go to Filter -> Render -> Clouds by difference
If that\'s not the name, anyway it\'s there:

Hit Ctrl+F to repeat operation untill you get somthing you like... I ended up with that:

The problem is now that all this has been done on the background, and it\'s treated as a very particular layer by photoshop... You can\'t do much to this layer in fact, so we have to fix this.
Double click on \'Background\' in the layer to bring up another window, like this:

Hit OK, now we can tweak things in the layer.
5. Hit Ctrl+Shift+N to bring up the New layer Window. Hit ok.
You have to change the blending options of the layers... Select \'multiply\' mode from there (see step 6 for detailed instructions...):

Hide the layer 0 by clicking on the eye next to it. Using these settings, greate a circular gradient on the new layer (the one we just created):

Display again the layer 0, then hit Ctrl+E to merge the two layers.
It\'s too dark, we\'ll now fix that...
Create a new adjustment layer as shown there:

This window will appear, select these settings:

Now the contrast should be fine, bring up the luminosity in the window that appears next... (sorry, forgot to print screen there)
You should get this:

EDIT - That\'s suited for a miniature on a wooden base.... I think the final result would look a bit strange on a mini whose base you see fully (typical plastic base). You then need to add another layer, with its mode set to \'superposition\' (screen), as there :

Then simply fill it with a normal black-white gradient to get somthing with a side where the color is uniform, and where you will be able to put the base without it looking like it\'s floating before the scroll. Black is the neutral color for this mode.

6. Time to add color!!
Select colors you like in the gradients options... I used colors FFEB6F as foreground and 900D0B as background there. Create a circular gradient on the picture, in the gradient options, \'Product\' mode MUST be selected.

Since I forgot to detail how to create a layer with the multiply mode before, I\'ll do it there.
Hit Ctrl+Shift+N and this is brought up, select the following options:

Now, draw another gradient on this layer (normal or multiply mode, won\'t change anything...). This one made a nice result:

You get this, too dark again, lacks contrast... Time to fix it, as in step 5.

These settings looked fine on my screen...
Hit Ctrl+Shift+E to merge all layers. You\'ve got your background...
Now crop it, resize it, get the part you\'re interested in.
7. Once it\'s done, copy and paste it in the first picture. Put it behind the layer one, before background... You can even delete the background if it annoys you.
Final result...

Well, what do you think of it?
If someone has the English names for the French ones I left inside... Please tell them to me so that I can edit.
I hope you liked this!
After having seen loads of blue-white gradients as backgrounds for miniatures, I wanted to find something else. Diego Ruina\'s scroll-like backgrounds had been impressing me for a long time (over there), so I tried to get something similar in Photoshop. Well, here is my attempt anyway. With the steps detailed...
1. The photograph I used for this...
Now that\'s not the version out of the camera. It\'s been resized (it\'s hard for your computer to work on full-size pics...), the lighting fixed (see Spacemunkie\'s excellent tutorial to see how to do this).
2. The goal will first be to select the miniature and remove it from the white background. I\'ll present there another way than Spacemunkie\'s one, using a useful function of Photoshop\'s.
It creates a selection, in the color tones that you wish. You do this from this menu:
Be sure to have white selected as your foreground color, as shown in the red circle, as it\'s this foreground color that we will now select in the picture.
Once you\'ve clicked on this, you should come up with this:
Check that the settings are similar to mine. You can tweak with them, it\'s better if you keep the \'pipette\' option though (in English, it\'s called \'sampled colors\').
If you change the \'tolérance\' (fuzziness), it\'ll change the amount of color selected. The greater that value is, the less precise the selection will be. Here, the trick is to find a good value, that will select enough of your background without taking away too much of your miniature.... We will fix the parts that are not good enough later on, so don\'t worry to much over this step.
On the preview, the black parts are the ones that will be left unselected, the white dots, the ones selected.
Hit OK...
You should get this:
It\'s far from perfect, we\'ll now fix that.
Using any tool fit for selecting areas, with the ALT key hit, draw selections around the parts of the miniatures that are to be kept later on. It will remove these parts from the global selection.
Once this is done (only the background is lleft selected), hit Ctrl+Shift+I to invert selection... The miniature is now selected.
To prevent an unesthetic halo from apprearing later on, contract the selection form this menu:
One or two pixels should do the trick...
You\'ll then see if you haven\'t forgotten parts when you cleansed the first selection.... If it\'s the case it\'s not too late to fix.
Hit Ctrl+J to duplicate selection in a new layer. Now we can create the background...
3. It\'s time to make a new document. Make it at least twice as big as your previous picture, to have freedom to choose the parts you like later on.
Once you\'ve got it, go to Filter -> Render -> Clouds, as shown here:
You\'ll get this (well, not exactly... It\'s a random function, it should look like this. From now on, read \'looks like\' when I say you got something.
)
Go to Filter -> Render -> Clouds by difference
If that\'s not the name, anyway it\'s there:
Hit Ctrl+F to repeat operation untill you get somthing you like... I ended up with that:
The problem is now that all this has been done on the background, and it\'s treated as a very particular layer by photoshop... You can\'t do much to this layer in fact, so we have to fix this.
Double click on \'Background\' in the layer to bring up another window, like this:
Hit OK, now we can tweak things in the layer.
5. Hit Ctrl+Shift+N to bring up the New layer Window. Hit ok.
You have to change the blending options of the layers... Select \'multiply\' mode from there (see step 6 for detailed instructions...):
Hide the layer 0 by clicking on the eye next to it. Using these settings, greate a circular gradient on the new layer (the one we just created):
Display again the layer 0, then hit Ctrl+E to merge the two layers.
It\'s too dark, we\'ll now fix that...
Create a new adjustment layer as shown there:
This window will appear, select these settings:
Now the contrast should be fine, bring up the luminosity in the window that appears next... (sorry, forgot to print screen there)
You should get this:
EDIT - That\'s suited for a miniature on a wooden base.... I think the final result would look a bit strange on a mini whose base you see fully (typical plastic base). You then need to add another layer, with its mode set to \'superposition\' (screen), as there :
Then simply fill it with a normal black-white gradient to get somthing with a side where the color is uniform, and where you will be able to put the base without it looking like it\'s floating before the scroll. Black is the neutral color for this mode.
6. Time to add color!!
Select colors you like in the gradients options... I used colors FFEB6F as foreground and 900D0B as background there. Create a circular gradient on the picture, in the gradient options, \'Product\' mode MUST be selected.
Since I forgot to detail how to create a layer with the multiply mode before, I\'ll do it there.
Hit Ctrl+Shift+N and this is brought up, select the following options:
Now, draw another gradient on this layer (normal or multiply mode, won\'t change anything...). This one made a nice result:
You get this, too dark again, lacks contrast... Time to fix it, as in step 5.
These settings looked fine on my screen...
Hit Ctrl+Shift+E to merge all layers. You\'ve got your background...
Now crop it, resize it, get the part you\'re interested in.
7. Once it\'s done, copy and paste it in the first picture. Put it behind the layer one, before background... You can even delete the background if it annoys you.
Final result...
Well, what do you think of it?
If someone has the English names for the French ones I left inside... Please tell them to me so that I can edit.
I hope you liked this!
