Ok, so as promised here is my battle report.
I placed second with Two wins and one Draw that my opponent was ahead on the tie-breakers.
Couple of notes:
- I\'m a beginner, and so, learned quite a bit and made quite a lot of mistakes. Especially the last game could have been totally different if I knew what I was up against beforehand.
- It\'s not a turn by turn description because I don\'t remember everything and didn\'t keep notes. The diagrams are just to help visualize what is going on with the pictures.
We are a group of players from Rio de Janeiro, Brazil. It was a 1000pts tournment, and since we have absolutely no support from GW in here we are just a bunch o players getting toghether to enjoy our hobby as best as we can! (would be nice to have ANYTHING from them though, we\'ve been playing like this for years now!)
Ok, first off, my list:
Necron Lord - Res. Orb, Phase Shifter, D. Body + Warscythe
20 Necron Warriors
5 Necron Wraiths
3 Necron Destroyers
4 Flayed Ones
General plan was to have the Lor dand Wraiths charge in and engage with support from the Destroyers. Flayed Ones outflank for a nice surprize and the Warriors just sit at objectives.
##########################################################################################
1st battle
Enemy: Imperial Guard
Deploy: Spearhead
Mission: Annihilation
His list, from memory:
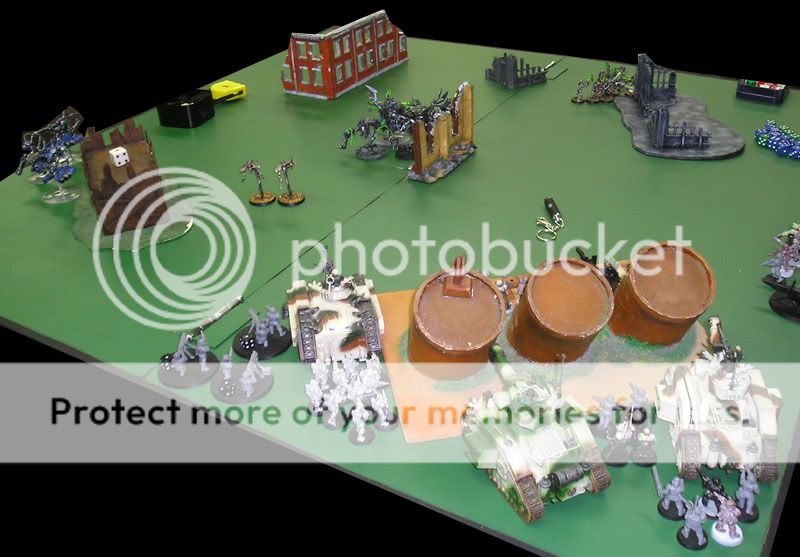
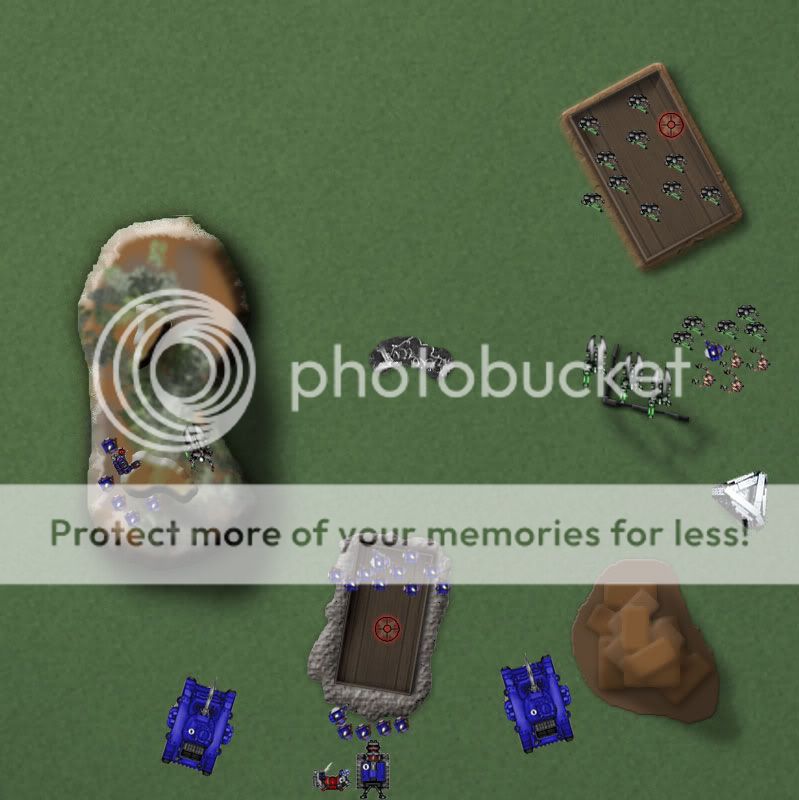
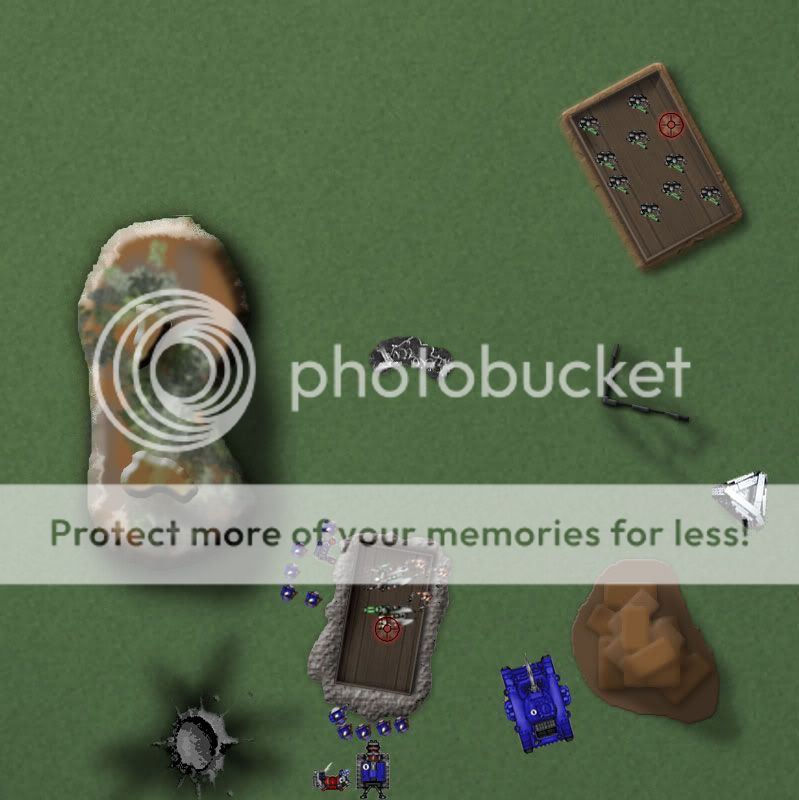
I won Initiative and chose to go first. Since it was Spearhead I knew I\'d get to him fast and deployed my Wraith wing right at the center of the table (I know in the diagram they are right in the middle, but they where actually 12\'\' away from the center)

He deployed his tanks behind the big barricades and spread his troops on his table edge. A heavy weapons teams was placed in a favorable posittion and his Karskin right behind his Chimera.
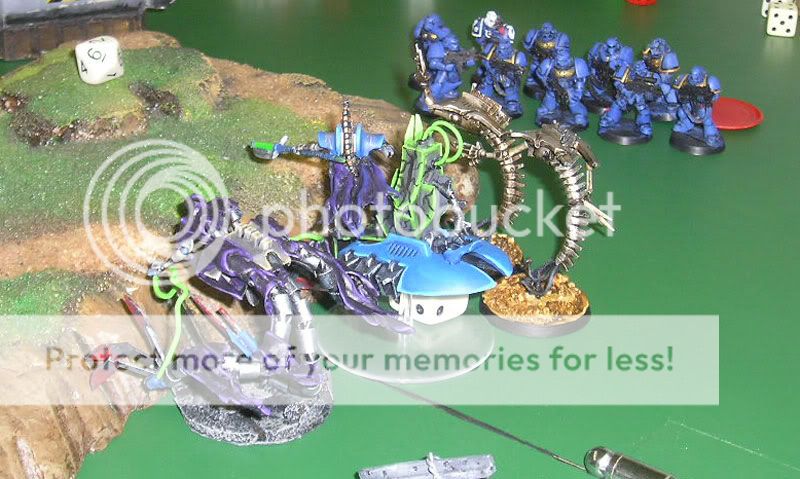
Here are pics of the very first moves:

I had turbo boosted my Wraiths and moved the destroyers behind some cover as well as advancing with my Warriors. In his turn he embarked the Karskin on the transport and moved towards my destroyers as well as moving his tanks up and shooting at my Wraiths.
At this moment he rolled a hit and a wound on each wraith. \"No problem - I thought - they have 3+ armor.\" Well I fail miserably and roll 1, 1 and 2. There 3 Wraiths dead in the first enemy shooting phase >_<
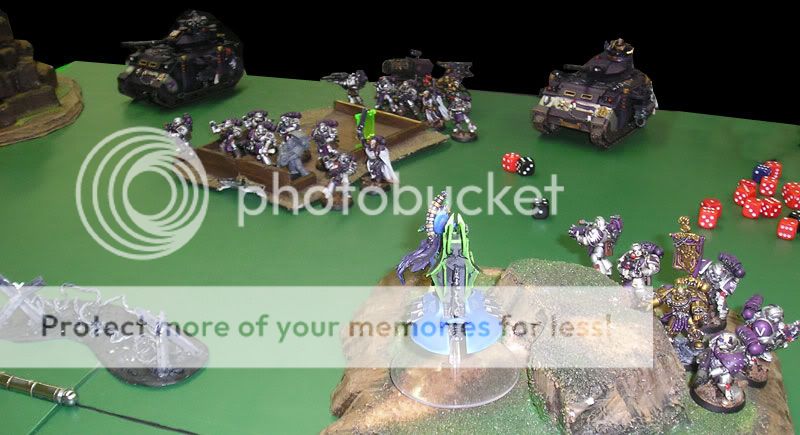
Luckly I managed to get 3 of the downed wraiths back up and charged forward, blowing up the Chimera with my destroyers, I then craged and exploded one of the Leman Russes as well as killing and sweeping a guard unit with the Lord and killing two of his Heavy Bolters.

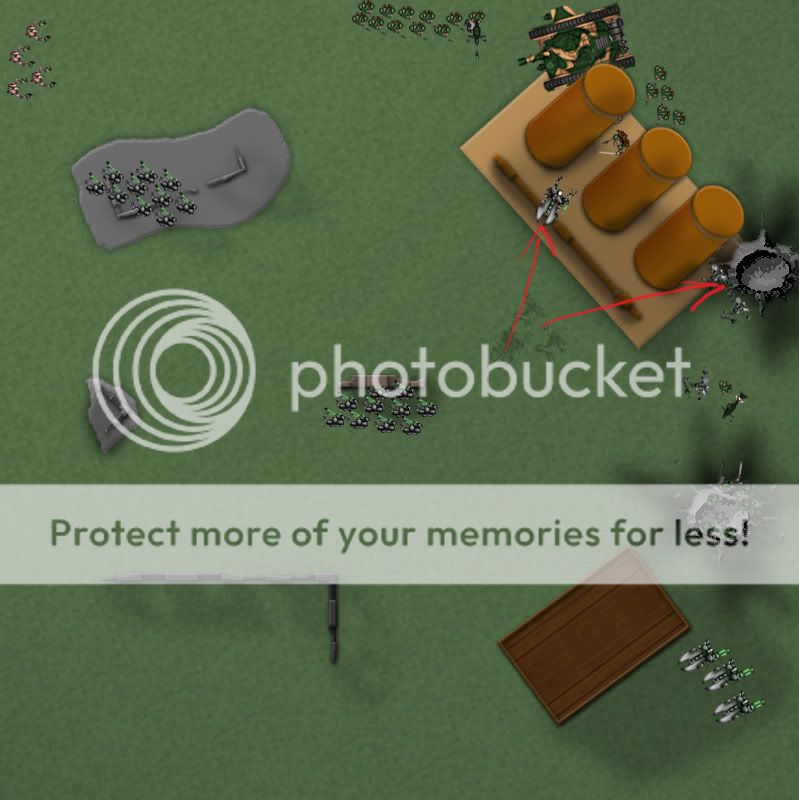
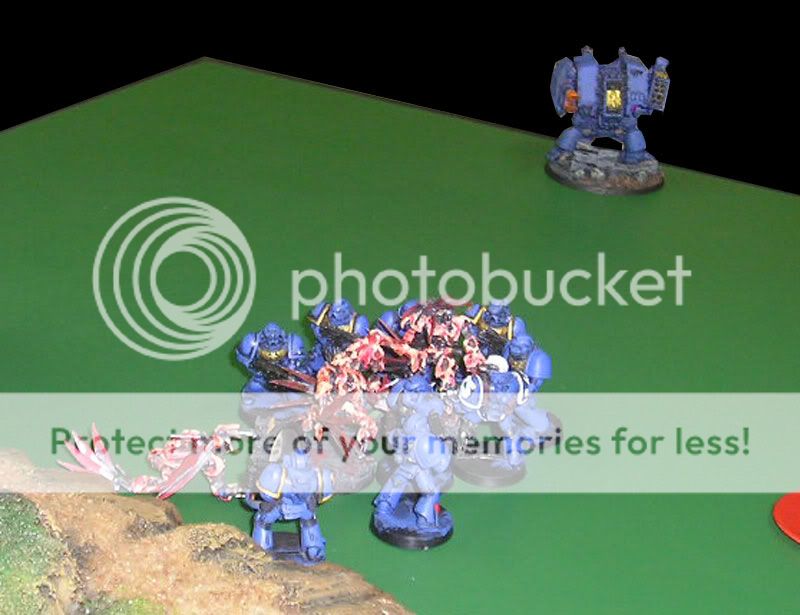
Here are a couple pics of the action:

He then attempted to shoot some more of my stuff but failed. When my turn arrived and I started declaring Rapid fire on his guardsmen he conceded. Since the game was Killpoints and I already had my Lord with his Warschythe ready to take down the second Russ as well as the Wraith chargin in on his HQ, there was little he coul hope for.
It was an easy victory and I was sorry that my opponent got such a bad match-up on his very first game. Not only the deployment and mission where on my favor, he was rolling very lousy and the dice betrayed him a couple of times.
Lessons learned: Wraiths are can openners by nature. The 4 S6 attacks against rear armour can make short work of anything really fast.
##########################################################################################
2nd battle
Enemy: Space Marines
Deploy: Pitched Battle
Mission: Seize Ground
His list, from memory:
This time I knew I\'d see how good Wraiths really are against the 3+ saves of Marines. Since they lack any upgrades that would let they ignore armour I was counting on hitting first and with many S6 attacks before they could retaliate.
My opponent won initiative and deployed first. He kept his Dreadnough in reserves and placed him in a drop pod with a missle launcher (His dread had a twin-linked Lascannon and Missle Launchers). He had 3 tactical squads (one with a Lascannon the rest with H.Bolters) a Whirlwind and a chapter master that he deployed in the cover area by one objective. Then he placed the other squad on the other side. When it was my turn to deploy I made the first mistake of this battle by placing my Wraith wing bunched up on a corner near the bulk of his forces. I really should have placed them in the middle where I could possibly get in assault range in turn 1 if I was lucky.

He then started out by dropping the pod with the missle Launcher and dread on the far side of the table, safe from my Wraith.

He shot a few things but did little damage, especially with his orbital bombardment that only put one wound on the Lord. On my turn I turbo-boosted to try and get to his Dread while shooting the Destroyers at his Whirlwind side armor and scoring a shaken glancing result.

On the next turn he rained death on the wraiths that stood their ground for a good amount of time. He literally shot every single unit he had on them to try and take them down, finally suceeding and leaving the Lord without his retinue.
On my turn the Flayed Ones arrived outflanking and charged his Marines drawing them away from the objective marker. The Destroyers started shooting at the Lascannon unit as well as the Warriors nearest to the drop pod Glanced it and destroyed it\'s weapon.


It was now turn 5 and there was the possibility of the game ending. I had two objectives held and I knew that if my Destroyers survived this next round I could Boost them to contest one of his objectives. But my opponent decided to try and charge the remaining warriors on top of the hill and failed to make it due to difficult terrain. Because of this he was now one objective short, and if the game ended I would win. Surely that if turn 6 was played he would then destroy my warriors on the hill and have one point ahead of me, but he was ahead on killpoints (the first drawbraker) and he could play for a draw. With my mouth shut I watch as he makes the final error that cost him the game when his marines did not have range to charge my warriors.

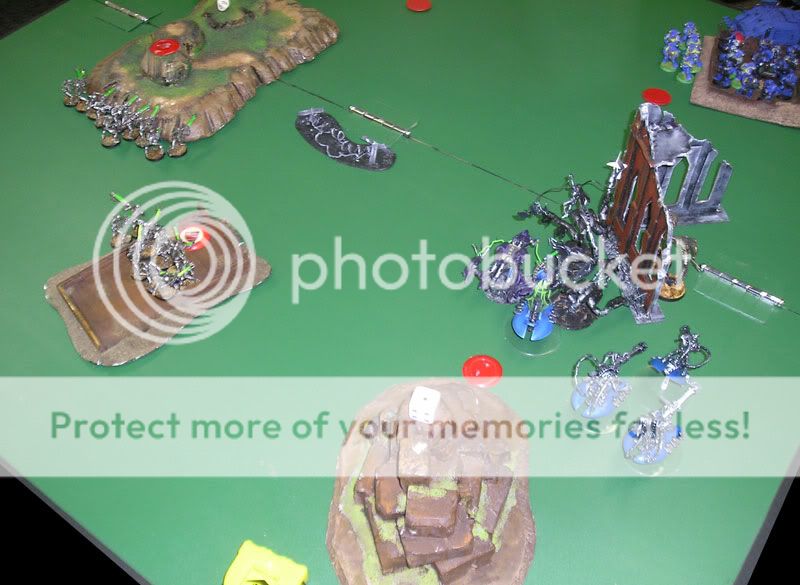
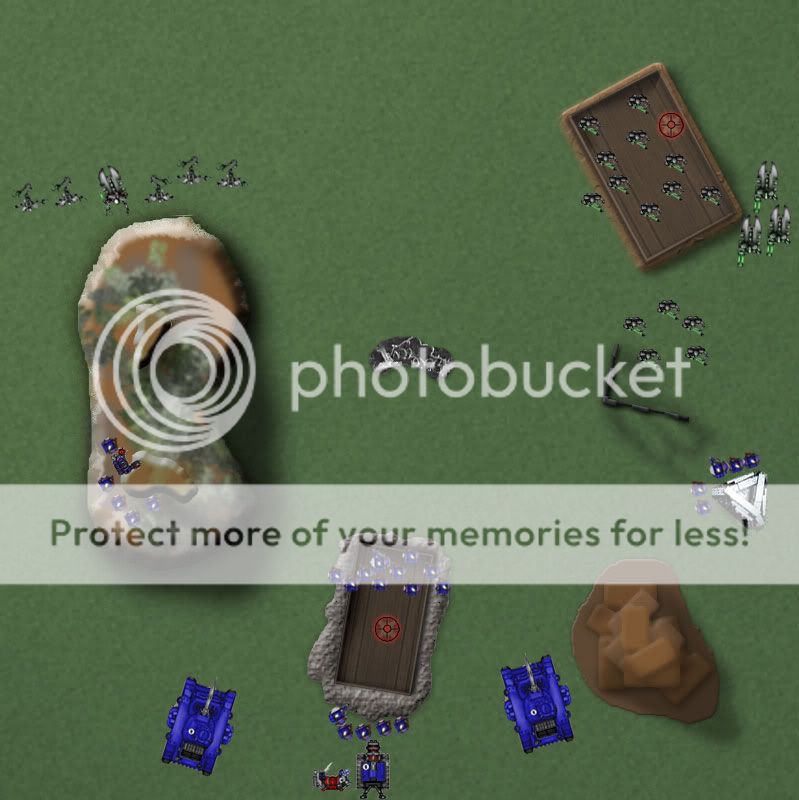
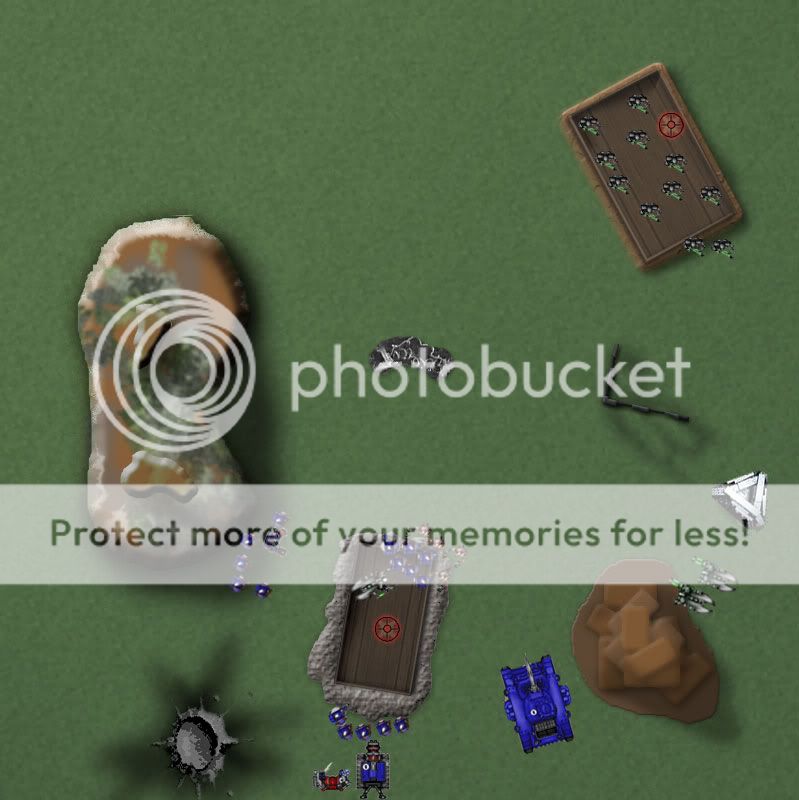
Here is the board at the end of turn 5. My win!

I was bummed that I did not have a chance to charge with my Wraith, but then he had to put so much firepower to finish them off, it was impressive. He made the final mistake that cost him the match but I had made quite a few more, and the game might have been easier if I had not made them. The first one was deploying the Wraith to the side, where his drop pod could easily avoid it as he did. My Wraith and the Lord would have made short work of the drop pod and Dread if I had done that, freeing up warriors to shoot at his Marines. The other mistake was spending the first two turns shooting the Destroyers Gauss Cannon at the Whrilwind, as I only managed to get a crew shaken and immobilised results. I bet they could do much more damage had they fired at marines.
On the other hand I was really impressed at the Flayed Ones, and even if he kept barely making his test for the Horrifying Visage they managed to kill off a couple of marines and tie them up for two full turns.
Learned: Wraiths are tough bastards to take down!
##########################################################################################
3rd battle
Enemy: Space Marines
Deploy: Dawn of War
Mission: Capture and Control
His list, from memory:
Well here I was. My very first tournament, hell my fifth 40K game ever, and I was on the final! And to boot with Necrons, yeah outdated codex and all that jazz. Well I was sure I could make it if I played right.
This one was going to be though. I knew that this guy had also beat two other armies, and I knew that my last victory was very much earned because my opponent made a critical mistake.
This guy\'s list consisted of his Chapter Master, 2 tactical Marines loaded with meltas and Plasma cannons, a Sternguard on a drop pod, two Predators and a Thunderfire Cannon that proved to be my downfall. If I knew beforehand what this baby could do I would have moved differently and would have tried to take it down with my Heavy Destroyers.
He won initiative and set up his Chapter Master and Tactical marines around the map denying me a good part of my half. I made the first mistake by deploying my two warrior squads when I should have brought them from the table edge denying him the first turn onslaught.
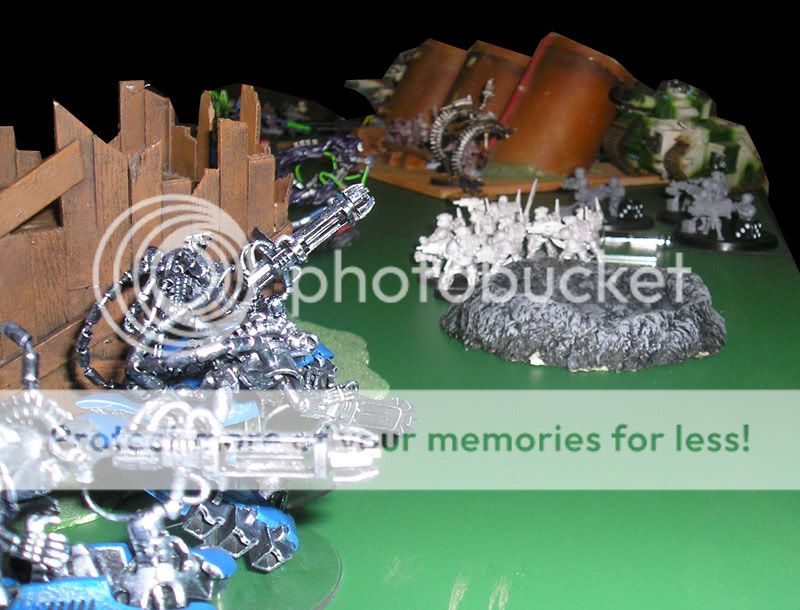
Here you can see the deployment and the troops that arrived on his turn:

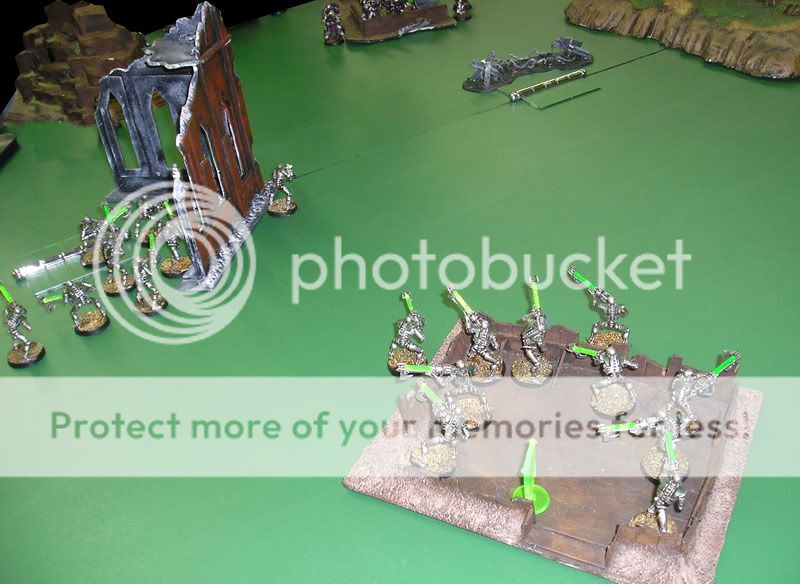

As you can see he dropped a pod with his Sternguard right on top of my Warriors and managed to kill quite a few (but losing 2 or 3 of his own with weapon overheat). He forgot to use the first Predator\'s searchlight and nightfight prevented it from firing, but then he used his second one and continued to kill off my warriors. When it was my turn I sent the Wraith wing towards the hill to his commander hoping to make my way to the predators and score some easy kills.
My mistake again was to place my two units of wraith nicely set up so his Thunderfire Cannon could rain down dozens of hits. In the end of his phase I had but the Lord left again >_< but he did have to use every single shot on his army to do it and he successfully denied me WBB rolls on my second turn.
On my second turn the Flayed ones arrived to join the Warriors that where engaged by his sternguard in CC. The Destroyers moved up ignoring the melee and shooting at his troops on his objective, my plan now was to try and resist as best as I could and send everything I had to contest his objective. I knew that my Warriors would not go down easily and I was pretty sure that I could draw his entire force to his side of the table with the menace of my Destroyers, Flayed ones and Lord, so I ignored his Master and marines and turbo boosted towards his Objective, it was my only chance!

The surviving two warriors from the CC retreated towards my objective: I wanted to make sure I had enough models there not to Phase out and to hold my objective. The Lord managed to get back up after being shot down and charged one of his Predators. Since it was still turn 3 I had to survive one full turn before I would congregate with everything on the middle and hope for the best. The Flayed ones slumbered forward as the Destroyers hid behind a hill and fired at the unit at his objective!

His shooting was concentrated on killing the Warriors on my objective with the Thunderfire and shooting the Lord and Flayed Ones. Apparently my opponent was not yet aware that if I managed to survive with those contesting units the game could end with my win. All my forces stood their ground with good Saves as I closed my trap. On my turn I shot with the Destroyers on the unit by his objective and charged with the lord and Flayed Ones!
He finally woke up as we started turn 5. He sent everything now towards the center, failing to engage on the fight due to a bad Difficult terrain roll with his chapter Master. I was ready to win if the roll went on my favor! Even the surviving Destroyer Boosted forward to claim terrain!

Sadly, his shooting saw the death of the Destroyer and Flayed Ones, leaving the Lord alone at his objective.
He finally charged with his chapter master. His marines failed to hit the Lord at all and I still had the three Warschythe attacks of the Lord. Sadly only one wound, not enough to take down the chapter master who\'s Powerfist crushed my visions of glory as the living metal phased out on an eerie green glow...
Learned: Thunderfire hurts! Spread out and don\'t let it hit 2 units or those wounds stack up fast! Also, the lord is a beast to take down with T6 and Phase Shifter!
I placed second with Two wins and one Draw that my opponent was ahead on the tie-breakers.
Couple of notes:
- I\'m a beginner, and so, learned quite a bit and made quite a lot of mistakes. Especially the last game could have been totally different if I knew what I was up against beforehand.
- It\'s not a turn by turn description because I don\'t remember everything and didn\'t keep notes. The diagrams are just to help visualize what is going on with the pictures.
We are a group of players from Rio de Janeiro, Brazil. It was a 1000pts tournment, and since we have absolutely no support from GW in here we are just a bunch o players getting toghether to enjoy our hobby as best as we can! (would be nice to have ANYTHING from them though, we\'ve been playing like this for years now!)
Ok, first off, my list:
Necron Lord - Res. Orb, Phase Shifter, D. Body + Warscythe
20 Necron Warriors
5 Necron Wraiths
3 Necron Destroyers
4 Flayed Ones
General plan was to have the Lor dand Wraiths charge in and engage with support from the Destroyers. Flayed Ones outflank for a nice surprize and the Warriors just sit at objectives.
##########################################################################################
1st battle
Enemy: Imperial Guard
Deploy: Spearhead
Mission: Annihilation
His list, from memory:
HQ
- Comissar, Vox Master, couple guys with plasma guns?
Troops
- 10x Guardsmen (lasguns, one grenade launcher and a Lascannon)
- 10x Guardsmen (lasguns, one grenade launcher and a Lascannon)
Elites
- 10 Karskin (sergeant, stronger issue of a lasgun and a Plasma gun)
Fast Attack
- Chimera
Heavy Support
- Heavy weapons squad (3x Heavy Bolters)
- Leman Russ (Battle cannon, Heavy bolter sponsons, Heavy Stubber)
- Leman Russ (Battle cannon, Lascannon sponsons)
I won Initiative and chose to go first. Since it was Spearhead I knew I\'d get to him fast and deployed my Wraith wing right at the center of the table (I know in the diagram they are right in the middle, but they where actually 12\'\' away from the center)
He deployed his tanks behind the big barricades and spread his troops on his table edge. A heavy weapons teams was placed in a favorable posittion and his Karskin right behind his Chimera.
Here are pics of the very first moves:
I had turbo boosted my Wraiths and moved the destroyers behind some cover as well as advancing with my Warriors. In his turn he embarked the Karskin on the transport and moved towards my destroyers as well as moving his tanks up and shooting at my Wraiths.
At this moment he rolled a hit and a wound on each wraith. \"No problem - I thought - they have 3+ armor.\" Well I fail miserably and roll 1, 1 and 2. There 3 Wraiths dead in the first enemy shooting phase >_<
Luckly I managed to get 3 of the downed wraiths back up and charged forward, blowing up the Chimera with my destroyers, I then craged and exploded one of the Leman Russes as well as killing and sweeping a guard unit with the Lord and killing two of his Heavy Bolters.
Here are a couple pics of the action:
He then attempted to shoot some more of my stuff but failed. When my turn arrived and I started declaring Rapid fire on his guardsmen he conceded. Since the game was Killpoints and I already had my Lord with his Warschythe ready to take down the second Russ as well as the Wraith chargin in on his HQ, there was little he coul hope for.
It was an easy victory and I was sorry that my opponent got such a bad match-up on his very first game. Not only the deployment and mission where on my favor, he was rolling very lousy and the dice betrayed him a couple of times.
Lessons learned: Wraiths are can openners by nature. The 4 S6 attacks against rear armour can make short work of anything really fast.
##########################################################################################
2nd battle
Enemy: Space Marines
Deploy: Pitched Battle
Mission: Seize Ground
His list, from memory:
HQ
- Chapter Master with power weapon
Troops
- 10x Tactical Marine Squad with sargeant and Heavy Bolter
- 10x Tactical Marine Squad with sargeant and Heavy Bolter
- 10x Tactical Marine Squad with sargeant and Las Cannon
Elites
- Dreadnough with a Missle Launcher and Twin-linked Las Cannons
Fast Attack
- Drop pod with Whirlwind missle launchers
Heavy Support
- Whirlwind
This time I knew I\'d see how good Wraiths really are against the 3+ saves of Marines. Since they lack any upgrades that would let they ignore armour I was counting on hitting first and with many S6 attacks before they could retaliate.
My opponent won initiative and deployed first. He kept his Dreadnough in reserves and placed him in a drop pod with a missle launcher (His dread had a twin-linked Lascannon and Missle Launchers). He had 3 tactical squads (one with a Lascannon the rest with H.Bolters) a Whirlwind and a chapter master that he deployed in the cover area by one objective. Then he placed the other squad on the other side. When it was my turn to deploy I made the first mistake of this battle by placing my Wraith wing bunched up on a corner near the bulk of his forces. I really should have placed them in the middle where I could possibly get in assault range in turn 1 if I was lucky.
He then started out by dropping the pod with the missle Launcher and dread on the far side of the table, safe from my Wraith.
He shot a few things but did little damage, especially with his orbital bombardment that only put one wound on the Lord. On my turn I turbo-boosted to try and get to his Dread while shooting the Destroyers at his Whirlwind side armor and scoring a shaken glancing result.
On the next turn he rained death on the wraiths that stood their ground for a good amount of time. He literally shot every single unit he had on them to try and take them down, finally suceeding and leaving the Lord without his retinue.
On my turn the Flayed Ones arrived outflanking and charged his Marines drawing them away from the objective marker. The Destroyers started shooting at the Lascannon unit as well as the Warriors nearest to the drop pod Glanced it and destroyed it\'s weapon.
It was now turn 5 and there was the possibility of the game ending. I had two objectives held and I knew that if my Destroyers survived this next round I could Boost them to contest one of his objectives. But my opponent decided to try and charge the remaining warriors on top of the hill and failed to make it due to difficult terrain. Because of this he was now one objective short, and if the game ended I would win. Surely that if turn 6 was played he would then destroy my warriors on the hill and have one point ahead of me, but he was ahead on killpoints (the first drawbraker) and he could play for a draw. With my mouth shut I watch as he makes the final error that cost him the game when his marines did not have range to charge my warriors.
Here is the board at the end of turn 5. My win!
I was bummed that I did not have a chance to charge with my Wraith, but then he had to put so much firepower to finish them off, it was impressive. He made the final mistake that cost him the match but I had made quite a few more, and the game might have been easier if I had not made them. The first one was deploying the Wraith to the side, where his drop pod could easily avoid it as he did. My Wraith and the Lord would have made short work of the drop pod and Dread if I had done that, freeing up warriors to shoot at his Marines. The other mistake was spending the first two turns shooting the Destroyers Gauss Cannon at the Whrilwind, as I only managed to get a crew shaken and immobilised results. I bet they could do much more damage had they fired at marines.
On the other hand I was really impressed at the Flayed Ones, and even if he kept barely making his test for the Horrifying Visage they managed to kill off a couple of marines and tie them up for two full turns.
Learned: Wraiths are tough bastards to take down!
##########################################################################################
3rd battle
Enemy: Space Marines
Deploy: Dawn of War
Mission: Capture and Control
His list, from memory:
HQ
- Chapter Master Pedro Kantor
Troops
- 10x Tactical Marine Squad with sargeant, Heavy Bolter, Multi-Melta, Plasma Guns
- 10x Tactical Marine Squad with sargeant, Heavy Bolter, Multi-Melta, Plasma Guns
Elites
- Techmarine with full harness
- Sternguard Veterans with a miriad of weapons and ammunition choices
Fast Attack
- Drop pod
Heavy Support
- 2x Predator
- Thunderfire Cannon
Well here I was. My very first tournament, hell my fifth 40K game ever, and I was on the final! And to boot with Necrons, yeah outdated codex and all that jazz. Well I was sure I could make it if I played right.
This one was going to be though. I knew that this guy had also beat two other armies, and I knew that my last victory was very much earned because my opponent made a critical mistake.
This guy\'s list consisted of his Chapter Master, 2 tactical Marines loaded with meltas and Plasma cannons, a Sternguard on a drop pod, two Predators and a Thunderfire Cannon that proved to be my downfall. If I knew beforehand what this baby could do I would have moved differently and would have tried to take it down with my Heavy Destroyers.
He won initiative and set up his Chapter Master and Tactical marines around the map denying me a good part of my half. I made the first mistake by deploying my two warrior squads when I should have brought them from the table edge denying him the first turn onslaught.
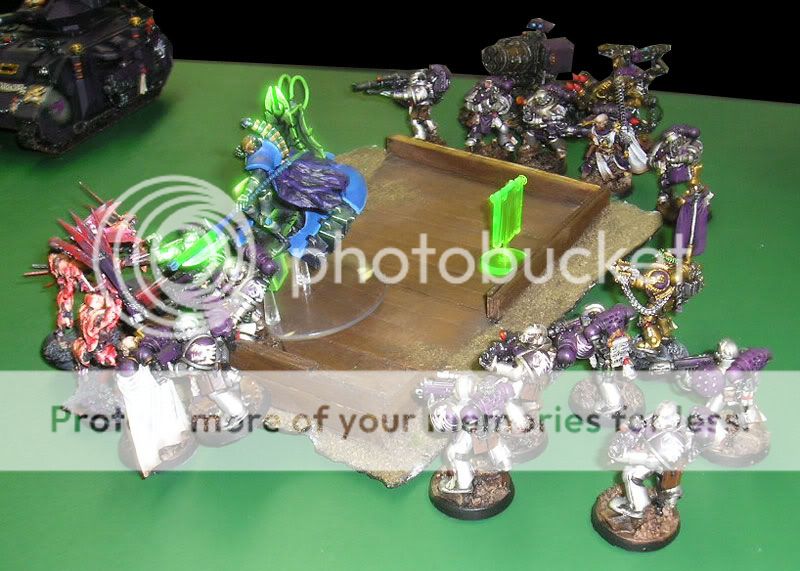
Here you can see the deployment and the troops that arrived on his turn:
As you can see he dropped a pod with his Sternguard right on top of my Warriors and managed to kill quite a few (but losing 2 or 3 of his own with weapon overheat). He forgot to use the first Predator\'s searchlight and nightfight prevented it from firing, but then he used his second one and continued to kill off my warriors. When it was my turn I sent the Wraith wing towards the hill to his commander hoping to make my way to the predators and score some easy kills.
My mistake again was to place my two units of wraith nicely set up so his Thunderfire Cannon could rain down dozens of hits. In the end of his phase I had but the Lord left again >_< but he did have to use every single shot on his army to do it and he successfully denied me WBB rolls on my second turn.
On my second turn the Flayed ones arrived to join the Warriors that where engaged by his sternguard in CC. The Destroyers moved up ignoring the melee and shooting at his troops on his objective, my plan now was to try and resist as best as I could and send everything I had to contest his objective. I knew that my Warriors would not go down easily and I was pretty sure that I could draw his entire force to his side of the table with the menace of my Destroyers, Flayed ones and Lord, so I ignored his Master and marines and turbo boosted towards his Objective, it was my only chance!
The surviving two warriors from the CC retreated towards my objective: I wanted to make sure I had enough models there not to Phase out and to hold my objective. The Lord managed to get back up after being shot down and charged one of his Predators. Since it was still turn 3 I had to survive one full turn before I would congregate with everything on the middle and hope for the best. The Flayed ones slumbered forward as the Destroyers hid behind a hill and fired at the unit at his objective!
His shooting was concentrated on killing the Warriors on my objective with the Thunderfire and shooting the Lord and Flayed Ones. Apparently my opponent was not yet aware that if I managed to survive with those contesting units the game could end with my win. All my forces stood their ground with good Saves as I closed my trap. On my turn I shot with the Destroyers on the unit by his objective and charged with the lord and Flayed Ones!
He finally woke up as we started turn 5. He sent everything now towards the center, failing to engage on the fight due to a bad Difficult terrain roll with his chapter Master. I was ready to win if the roll went on my favor! Even the surviving Destroyer Boosted forward to claim terrain!
Sadly, his shooting saw the death of the Destroyer and Flayed Ones, leaving the Lord alone at his objective.
He finally charged with his chapter master. His marines failed to hit the Lord at all and I still had the three Warschythe attacks of the Lord. Sadly only one wound, not enough to take down the chapter master who\'s Powerfist crushed my visions of glory as the living metal phased out on an eerie green glow...
Learned: Thunderfire hurts! Spread out and don\'t let it hit 2 units or those wounds stack up fast! Also, the lord is a beast to take down with T6 and Phase Shifter!
")
