Ork Battlewagon by Sukigod

Sukigod

Member
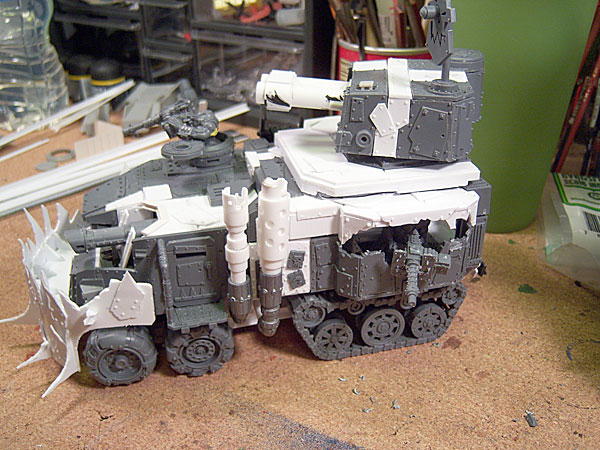
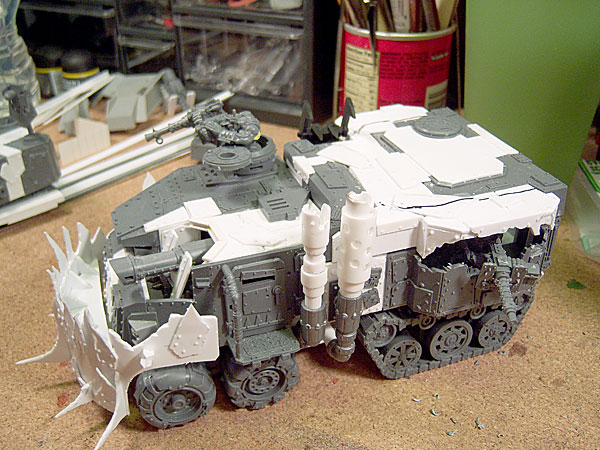
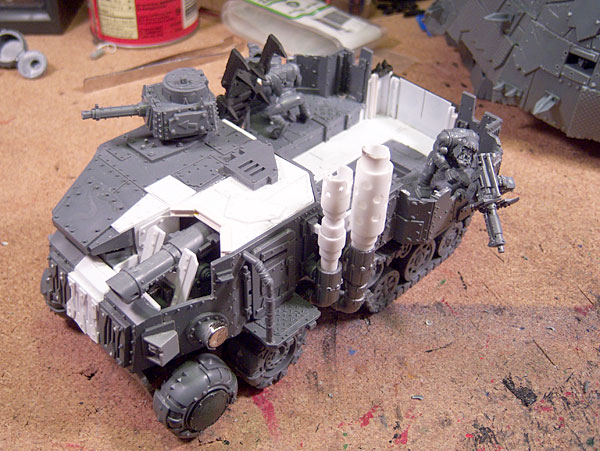
Small update, not much work done this week on the new battlewagon. Did get some of the samll details and the exhaust stacks done. A bit more beefier that the stock pipes (looted from bikes, it looks like).

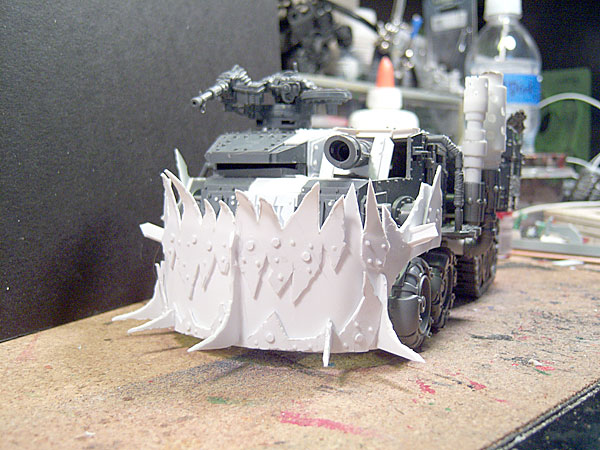
Of the three main things I need to finish before painting, I started on the front ram. The only thing I didn\'t like about the new design is the gob/ram. Granted, it does look really cool and it\'s neat and all, it just doesn\'t go with this particluar design. Too many compound curves. I really like the dagger/cut off spikes of metal that\'s pictured in the codex. Like it\'s been made only straight panels, cut and welded together. The only surface curve is the one that wraps it around the front of the vehicle.

My only concern is now that I\'ve widened out the body and cab, does the particular design in the codex hold up to the new width? I\'ve made a paper mockup to see how it would look and I\'m not sure yet. I can\'t quite decide if something\'s off or not. I\'ll sleep on it and see what happens. Untill then, here\'s the resulting paper ram....

nbw18.jpg

nbw19.jpg

nbw20.jpg

nbw21.jpg


Later!
 

uberdark

New member
sukes: two meks burnin the midnight oil you and i. hehe. as for the ram... i dotn know, something about it is not working for me. it seems too rounded. maybe a bit too weedy. i would try using the other one from the kit and possibly put some plasticard on it like i did on my looted wagon, course it would be more uniform. at least thats what i would do to it.

cheers

uber
 

Sukigod

Member
OK, made the ram today based on the codex image. Not sure if I like it. it\'s different than most I\'ve seen but not sure I\'m in love with it. Good thing is it attaches in sucha way that when you remove it, there\'s no indication that anything else goes there, except for the magent mounts on the side of the cab - these will eventually be covered in any event.

So here it goes... pics!


nbw22.jpg

nbw23.jpg

nbw24.jpg

nbw25.jpg


I think this will be one of those things that I\'ll have to see how I feel afte it\'s painted before I make a final decision to keep it. I might still make a dozer-style blade/ram anyway, just to have the variation.

ps - after looking again, I think I\'ll bend the upper teef a bit straighter - they\'re looking a little too curved for my liking now.
Later!
 

Sukigod

Member
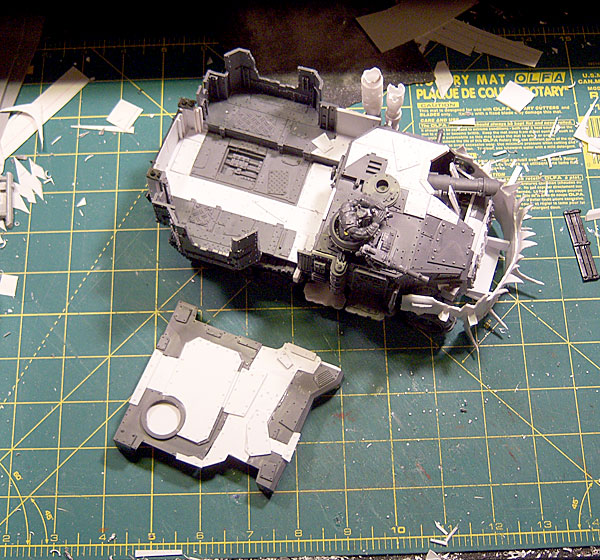
Got some time in this weekend and put most of it into fixing the \'ard case. Lots and lots of time spent fiddling around with paper cutouts to get the spacing/sizing right so the four corners fit in the same places, but it\'s done. THe open center hatch area on the original has been closed off fo a couple of reasons. One, it\'s supposed to be enclosed, it\'s hard topped. Two, it makes it easier for me to just paint something there and drop the Kill Kannon on top as well without having to worry about the open spaces caused by my expansion.

I know there\'s a lot of other stuff I haven\'t attended too yet - the details behind the ram, the edges of the \'ard case need something as they\'re pretty flat and boring next to the rest of the surfaces. The back end is in desperate need of some detailing as well. I\'m going to dig through the bitz box again for something jaggy to put there like some kind of steel awning/overhang to give the troops firing out the back some cover.

So much talk, more pics!

nbw26.jpg

nbw27.jpg

nbw29.jpg

nbw30.jpg


I\'ll most likely use the turret assembly that came with the battlewagon for the kill kannon but I\'m not sure what I\'ll do for a barrel. I\'ve got a barrel from a Baneblade that I might use, or I might scartchbuild a fat, short barrelled thing. We\'ll see when I get there.

Later!
 

Jericho

Consummate Brushlicker
If you use the stupid-ass turret assembly from the stock kit, make sure you put something on the underside of the \'ard case. That thing wouldn\'t just be sitting on top of the flimsy armored top without any supports or any mechanism showing underneath. Silly design, really, even for Orks :p
 

Sukigod

Member
Now tell me how you really feel, Jericho.... lol

I agree, the absurd gap they\'ve created in the stock kit is silly and adds hight where it isn\'t needed (or easily fixed for that matter). I just wish I had a better way of cutting skate/turret rings from plastic.

I\'ll be looking for a lower slung approach to the kill Kannon. Someone on another forum gave me the idead of making it a double barrelled affair, which sound interesting to me. I\'ll keep ya\'ll updated.
 

Sukigod

Member
Progress.... slowly.

I shored up the backside of the ram.

nbw31.jpg


Here\'s the inside of the battlewagons troop compartment. Notice the little metallics circles in the corners? Uh huh, yep.....

nbw32.jpg


They match the ones on the end of the support beams for the \'ard case - magnets! Of course.

nbw33.jpg


And I\'ve decided on a turret setup for the Kill Kannon. This is very preliminary as I need to add the plating/sides that connect the turrets deck to the \'ard case but this is where it will sit.

nbw34.jpg


It\'s starting to come together. After I get the magnets for the Kill Kannon turret deck and sides in place, it\'s just a matter of detailing the rest of the beast back up to standards. Oh yeah, I almost forgot - I\'ll have to paint it sometime too.

Later!
 

uberdark

New member
i really like your build randy..... its all coming together, i just feel as if the gob in front is too thin... it seems too weedy. i think its due to the top which just looks like it could get ripped off with a gust of wind. i dont know, the rest is top notch and i honestly dont have much to say. possibly cutting the gob at the top and making it flat could improve it....its just feeling like too many details in one place. thanks again for all your help earlier in my thread. and i hope it works out for you in the end. :beer:
 

Sukigod

Member
&#$@#! Penelope and Oddballz - keeping me honest and shameing me into not being so lazy and just slapping the BB turret on there....... :whip

I know it\'s all for the better. I\'ve gone and started the reconstruction on the kannon turret to represent the kill kannon. I\'ve widened it with the intention of adding a double-barrelled affair coming out of it. I\'ve got some ideas in the head of what the finished gun will look like but nothing concrete - it will be as a right mek should do it.... on the fly.

The smaller base that\'s included will be expaned to cover more area and look more proper but I needed to finish the \"footprint\" for the turret first so I know how wide to extend the edges so it looks right. I\'ll also be attempting to at an awning/cover of some sort that extends from the turret mounting base, hoping to go out over the exposed sides of the wagon bed to give the big shoota boyz a bit more cover when the big gun is installed.

The first two pics show the basic gun position now and about how long I want to make the barrells. I originally was thinking of some short, large bore gun but the profile and turret hieght really doesn\'t allow for that so I\'ll make it up with two barrels to convey \"extra killy.\" The third one is to show a little more of what the front facing prfile will look like. A little more balanced I think, thanks to everyones input.

nbw35.jpg


nbw36.jpg


nbw37.jpg


Again, thanks for the input and encouragement to make this much better than I was going to let it.

p.s. Yes, I\'ll address the ram too. I love the look now but do wish I would have used a thicker stock from the start - I think that would have solved a lot of the weedy-ness issues that are being mentioned. Oh Well.
 

Sukigod

Member
Alright - nothing like a fresh start. I took an hour today and cleaned up my work area. I had so much crap and scrap from a nomber of projects piling up I was getting over whelmed. So, a fresh start...

nbw38.jpg


My focus today was the turret with the kill Kannon in it. I think I did alright. The double barrels look good and I agree with ya Oddballz, it looks better with them together rather than spaced out. Here\'s the progression from yesterday. Barrels, spacers, shrouds and recoil slides (in the far back of the barrels). I only built what was going to be visible so there wasn\'t any need to build a complicated breach assembly.


nbw39.jpg


Here\'s a quick \"as it looks now\" shot from the front right and a shot showing detilas of the turret back. Now I\'ll work on the baseplate the turret rests in. I need to make that bigger, just not taller, so it\'s in scale and provides some extra metal awning type extentions going over the big shoota mounts in the bed area.


nbw40.jpg


nbw41.jpg


After that it\'s the details from back to front and addressing the ram (I\'ll take a couple more days break from thinking/working on that too much).

Later!
 

uberdark

New member
your build is really making me want to build my battlewagon next....but i must stop and keep with the plan....or da boss will put a spork in me. hehehe

you have proven me wrong again...your build improves it immensely. keep it up. uber
 

Sukigod

Member
Thanks Uber! This is a complicated kit if you\'re doing anything other than just straight from the box. Maybe I\'ll pick up another around Christmas and build it regular style for fun :D.

Got a little more work done this afternoon, but not much. I started the turret mount/deck plate framing. I\'ll be adding a layer of metal plating for that \"3D\" effect with all the appropriate rivets and more gubbins and such to make the entore thing blend better into the \'ard case topside.

The thing that bothers me is the space created between the upper deck and the outer extentions wher ethe big shootas sit. It\'s too open in my book and I\'ll be looking into a way to create some kind of overhead cover that doesn\'t block the viewer totally from the insides. My inital idea is a sort of metal awning that juts out from the edges of the turret mounting plate - but obviousely one that doesn\'t look like an awning.

Here\'s couple of views with the turret off and on so you can see where everything sits. It\'s kinda tough at this point to see exactly what the deck plate does but trust me, it blendes the turret into the \'ard case pretty well - it also removes that silly gap issue with the turret.

Onto the pics.

nbw42.jpg


nbw43.jpg


nbw44.jpg


Later!
 

Sukigod

Member
Finally figured out/fixed the issue with the \'ard case. I think this works much better. I\'ve also started the armor plating on the Kill Kannon base. The tricky part here will be making it mesh well enough with the next level down. I\'ve got some ideas using a bit of angle iron, we\'ll see how it goes.

And the last photo will explain why I took a week off of the Battlewagon...for comparison (hehe).

nbw45a.jpg


nbw46a.jpg


nbw47.jpg


nbw48.jpg


I\'m out of town for a couple of days so no updates or even a chance to do any more work until Sunday.

Later!
 

COG

New member
been lurken for a bit cause you do such a fine job. the only thing that i can say anything about is ...did you put the little spikes on the stompa to look like you can can walk/Swing your way up the stompa using them? or was that just coincidence? maybe its a trick of the camera but the ones on the left look down right like stairs.
other than that cant wait to see what you have in store for the stompa :eek:
 

Sukigod

Member
Originally posted by Jericho
No kustom job on the Stompa?! Blasphemy :p

You\'re not the first one to voice this.... (I\'ll hang my head in shame here as well.....)

I need the stompa for a game next week so time is of the essence. I did magentize the head and arms for future modifications. I will add a belly gun down the road (I just LOVE the stats on that thing) and will eventually make some changes - just not right now.
:)
 

kulandini

New member
Nice work Sukigod!
I especially like the \'ard case it looks really cool.
I can\'t wait to get my hands on the stompa aswell.
cya later!

Kulandini
 

Sukigod

Member
Had a chance to sneak some time in this morning waiting for the new internet provider to show up and install our new service - yay! Faster speeds at acheaper price.

I managed to finish off the entire \'ardcase/turret base/turret assembly and can finally move on to other things. I still need to dress up the back of the entire wagon as it\'s a tab boring. There\'s to be some sort of overhang, just above the back tailgate and the backside/sides (does that make sense?) need some details as well - glyphs, plates, rivets - whatever, just something.

The other finishing work is to complete the ram. I\'ll be shoring up the backside with additional plates to thicken the walls - if that fix doesn\'t how it looks (too weedy still), I\'ll make a new dozer style ram for it. On to the pics!

The first two are showing the completed turret mounting plate and the turret on the plate. The other show it completely in place from different angles. I\'m totally convinced cutting off the top edges of the big shoota stations was the way to go - thanks for everyone who talked/coerced/shamed me into doing it this way. I also took the photos in natural light so the details on the white plasticard didn\'t get washed out - now you can see what was taking so long! Rivets!

nbw49.jpg

nbw50.jpg

nbw51.jpg

nbw52.jpg


Later folks!
 

Sukigod

Member
Baring a few errant rivets, I\'m finished with the build on this new battlewagon. Here\'s a break down of all the parts before painting and a few shots showing different angles with different loadouts. I\'ll prime it and start painting next week. Expect at least a month for me to get close to finishing the paintjob as I\'ve got some freelance work that needs attention for the next couple of weeks.

Thanks for watching and I\'ll post updates when I start painting.

Later!

nbw53.jpg

nbw54.jpg

nbw55.jpg

nbw56.jpg
 
Back To Top
Top