Steve Myers (aka Cajur)

cajur

New member
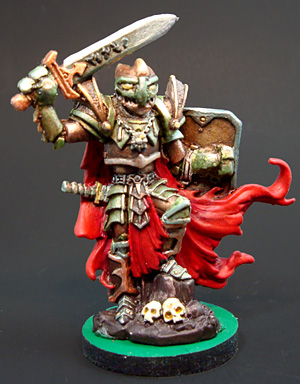
I have painted miniatures since 1993, but have only been sculpting for a year or so. I have done a few conversions and a from-scratch sculpt or two. Below is a link that shows one of my conversions.

Converting an Undead into a Dragonborn

I made my own sculpting tools for this project, since I couldn't find clay shapers ("rubber brushes") at my local hobby shop. So far, I have found these home-made tools to work extremely well in the limited sculpting I have done since making them. This link describes the process of making your own sculpting tools.

Make Your Own Sculpting Tools

I look forward to seeing how each of our sculpts progress. Thanks again to Cybersquid for his offer to help us get better at creating physical representations for the boogums and baddies that exist only in our heads... also known as sculpting. :)

Cheers!
Steve Myers (aka Cajur)
 

funnymouth

Active member
ooooh! i really like your idea for making our own shaping tools. i have some metal dealies and was looking for something along the lines of the clay shapers cybersquig linked, but frankly i cant justify the (albeit cheep) expense. ill make a few tools of my own! thanks for sharing.
 

cybersquig

Dangerous when wet
I have to say (because your blog doesn't have somewhere for me to comment) that I'm really chuffed you've come up with a cheaper alternative. I've tried to make this as cost effective as I can to take on, this is why I'm limiting myself to only a few tools for the duration of the project, but I'm aware that my hobby related budget doesn't stretch far each month, so I have all the sympathy in the world for those baulking at the expense. Hopefully this will help some people and encourage them to get involved where they weren't before.

James
 

cajur

New member
First Use of Homemade Sculpting Tools

I used my homemade sculpting tools to convert this miniature from a Reaper skeletal warrior into a D&D Eberron Warforged (like a living robot). BTW, if you can't find a mini with a face you like, if you can find a nice sculpt of a skeleton figure, you can add the face you want with a little Green Stuff. In this case, I also had to re-do the hands, since Warforged have 3 fingers on each hand, rather than 5.

warforged-conversion-step-5_300x.jpg


With the smallest amount of lubricant (WD-40 spray), these home-made tools worked like a charm. When I can get some more of the soft-handled tools from which I made the tools I created, I want to make a few more sculpting tools, modeled after the shapes of the riffler files I use to remove flash and to prep miniatures for priming, which are great for getting into hard-to-reach places.

I wish my photography skills would come up to speed with my painting, so I could better show off the paint job I did on this miniature. It came out incredible, but I think I used too much light and I got too much shine in the photo and the colors didn't come out right in the picture. If anyone has good tips on photographing minis, I'd be very grateful for advice, especially on lighting.
 
Last edited:

cajur

New member
Armature Done

Well, I decided I'd sculpt Dr. Horrible, of Dr. Horrible's Sing-a-long blog.

I got the armature done. I'm using a thin wire-feed welding wire, which is pretty stiff, but it works great when bent with needle-nose pliers. I don't like the more flexible floral wire because, for me anyway, it tends to bend too easily to hold the shape I want. I use this wire to pin my multi-part miniatures as well. Pick up a spool of this stuff at your local hardware store and it will last you a lifetime.

I'll try to get some pictures taken of my progress so far. This has been a lot of fun. Thanks for all the time you're putting into this, Cybersquid!
 
Back To Top
Top