StraightSilver tries to finish an army...

StraightSilver

New member
Hey everybody,

I have been a long time lurker on CoolMini, but have never summoned up the courage to post anything here.

I have posted a fair bit of my stuff on other forums, but thought it was about time I posted here so that I could get some feedback on my minis and hopefully learn a thing or too.

I have been painting now for about 20 odd years, and suppose I paint in the Games Workshop style, as I am a keen 40K player and worked for GW for quite a while a long time ago.

But the trouble is I feel that whilst I have gone about as far as I can go using the things I have learnt along the way, there is more I could learn, and a lot of the newer techniques have passed me by.

I tend to steer clear of wahes and blending, and use a lot of layering on my models.

I would like to learn some different techniques, and also learn to improve my photography.

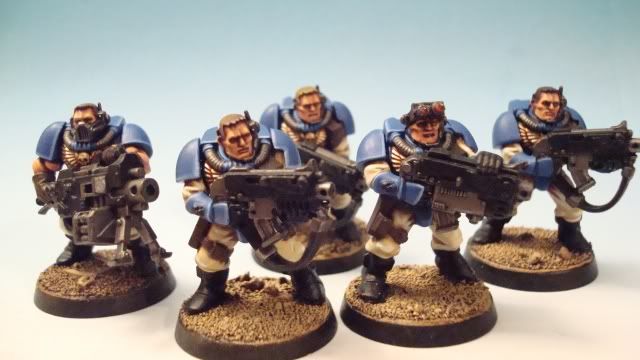
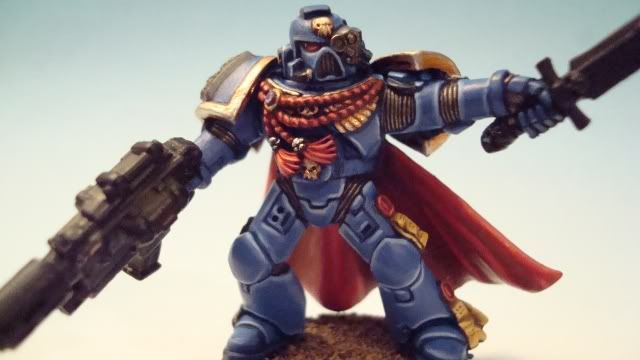
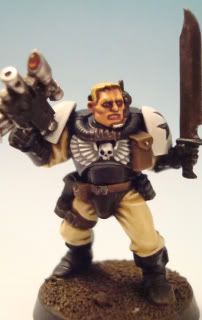
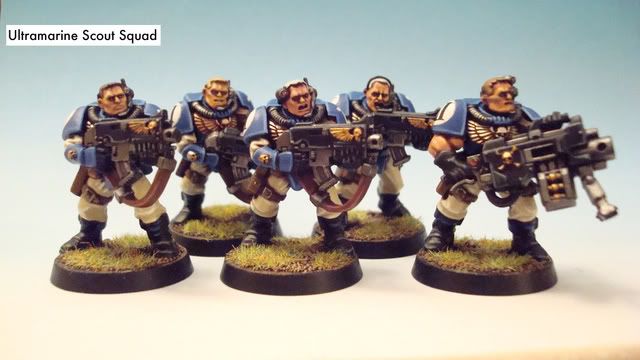
Here are some exaples of some of my work, all of which is painting in progress, and some of which dates back to about 4 years ago. I am notorious for not finishing projects and am a very slow painter!

Anyway, I hope to keep this as an ongoing record of my work (I\'m currently building a Black templar and Ultramarine army) and would appreciate any feedback or help.

Picture008.jpg

Picture009.jpg

Picture001.jpg

40k025.jpg

scouts005-1.jpg

Picture004-1.jpg

Picture007-1.jpg

Picture017-1.jpg

Picture015-1.jpg


Thanks for looking, comments and criticisms very welcome.

Cheers. :)
 

nick232

New member
they are really nice.

but one thing that bugs me is the boltgun on the gaurd sargent

but appart from thar GREAT!
 

ZapotekE

New member
that is some high gaming standard, looks very good! \'eavy metal stylish but almost better... post more and keep up the good work
 

StraightSilver

New member
Hi guys,

Thanks for the positive comments so far, hopefully by the end of the year I will finally have a finished army.

And yes nick232 you are right, that boltgun is just too big, it looked ok at first but now looking at the photos it is a bit daft! Think I may change it soon, probably a plasma pistol or something?

Anyway painting has been rather slow of late. My girlfriend unfortunately has been very unwell and so painting had to take a back seat, but I do have some stuff to show.

Still Ultramarines though I am afraid, this time another Scout Squad and the beginning of my army commander, a Space marine captain.

DSC00405.jpg

DSC00407.jpg

DSC00408.jpg

NewImage-2.jpg
NewImage3.jpg


DSC00402.jpg

DSC00403.jpg

NewImage5.jpg


Still obviously a lot more to do on these guys yet, but they are getting there.

And I also forgot to show one of my Black templars last time so here is the first of my neophytes:

Neophtye4.jpg


Thanks for looking.
 

Gilvan Blight

New member
My main suggestion to get your painting to the next level is to add more layers. Your transitions are very harsh and I can clearly see where one layer ends and another starts. If you look at the Article section there is lots of information on things like Layering with transparent paint (Juices), wet blending, etc.

One thing I don\'t like at all on your minis is the edge highlighting technique. It\'s just not realistic. When I look at something in real life it is not lighter on the edges. I find this particularly evident on your shoulder pads. You can actually see where the light falls on them (at the top, fading as you go down) and it doesn\'t match at all where your highlights are. The Marine pads are the worst of the lot as there is a highlight where there should be a shadow, in the crevace where the edging meets the pad.

I realize that this is one of the GW styles that is out there, and that some people must like it, but personally I can\'t stand it.
 

Dragonsreach

Super Moderator
Staff member
Well as has been said you have a very crisp clean style well suited to Very high quality tabletop armies.

Taking your work to the next level will, as has been suggested, mean stepping away from the \"traditional\" GW styles and working on smoother increments between shadow, midtone and highlights especially in terms of Highlight placement.(Otherwise know as Directional Lighting or sometimes referred to slightly erroneously as Zenithal Lighting.)

As has been suggested there are a wealth of Articles available, Especially here on coolminiornot\'s article section, Read through them and DON\'T be afraid to ask for help.
Most people will respond, some of us might even be helpful. :D
 

tidoco2222

Active member
Some great painting there for an army. Can\'t really add much to the advice already given but I am impressed with what you are doing so far.
 

StraightSilver

New member
Thanks everyone, one of the reasons for finally posting here is that I think I have gone as far as I can go using the traditional GW method of painting, and I hope to be able to move away from that style and try some of the more advanced techniques.

I am also a total luddite and a tecnophobe, so have only just managed to find the articles section (me hate compoota!) which so far looks very informative, but don\'t worry I will be asking LOTS of questions. ;)

I think my biggest setback is that I have been painting in the GW style for over 20 years now, and much as I try to break away from it I seem to be conditioned to it like Pavlov\'s Dog!

The most pronounced issue is as has already been said my lighting, or rather the placement of my highlights.

I know they are wrong, but have difficulty working out where they should go.

I tend to be more of a \"copy artist\", in other words I learn by mimicking, but also am a creature of habit, so once I\'ve learned somthing by rote I have difficulty relearning if you know what I mean.

I also wonder a little if it is because these days I only really paint GW miniatures. Perhaps if I tried to paint something less \"cartoony\" then my style would also be less cartoony.

I think a lot of reading is in order for me, as I do really want to improve my painting, and would like to get beyond gaming standard (although I do use these figures for gaming so am happy with them in that respect).

Are there any tricks for learning about lighting (obviosly I will read through the articles but just wondered if there was a quick fix)? I can see where the light should go when I light it from above (off centre) with my lamp to give the Zenithal effect, but obviously the minute I pick the mini up to paint it that changes. Plus once the colours start to go on the mini doesn\'t always reflect the light enough to be able to see.

Is this something that eventually comes with practice?

Anyway I will no doubt be back on after reading through some articles with a ton of questions.

My aim is to eventually get my painting hopefully to a high 7 or even an 8. But as has been said I think I need to take more time on my layering and maybe start using some other techniques such as wet blending etc. I also probably need to go back to a white undercoat and try out some of the newer paint ranges and products, like drying retardants etc.

Cheers guys, I do really appreciate the feedback, and will let you know how I get on with the articles section. :)
 

danny77

New member
DR is right he has been helping me improve my transitions between highlights and shadows, it is very easy to go with what you know, i find myself going back to my old methods still (well ten years is a long time of painting in GW style:)) I think the scouts look great, but could benefit from some weathering, there are some great articles on here that can really help
 

DarkStar

New member
Originally posted by StraightSilver


Are there any tricks for learning about lighting (obviosly I will read through the articles but just wondered if there was a quick fix)? I can see where the light should go when I light it from above (off centre) with my lamp to give the Zenithal effect, but obviously the minute I pick the mini up to paint it that changes. Plus once the colours start to go on the mini doesn\'t always reflect the light enough to be able to see.

If you wanted to just practice a bit, I\'d say a good place to start is to always choose where your main light source is first and take it from there.

Keep in consideration while painting where the light is hitting the mini from, usually just one good solid light source from above, slightly off to the left or right somewhere, like the sun. An imaginary light source that is stationary in the sky and illuminating the mini from the same consistent angle as you paint it.

Go back to the basics in terms of looking at a sphere and watching how light falls over it, (visual art is ...light and it\'s relation to everything else, cant\' stress how important light is) then trying to look at your mini in terms of basic shapes.

Once you get an idea of what shape an item is, an arm is a basic cylinder for example as is a leg, you can look at a cylinder under the light conditions you have imagined and watch it closely, looking at a few key roadmaps.

Where the shade is, where the strongest area of highlight is, how smoothly the gradient works itself out over wide areas, or how tightly it compresses itself over curvature. Then finally look at the reflected light of the environment around the cylinder, notice how the light on the floor the cylinder is resting on is also subtly shown on the cylinder nearest the floor where it\'s resting.

Then ...without getting too far ahead, you can start to worry about all sorts of things like specularity of an object, reflectivity, wear and tear and all that sort of thing, but having a good grasp of the basics of shape and the way light works over it will help to give off a convincing look to all those other techniques later on.

They always start you out with looking at an orange for example, when trying to both learn to draw and learn to paint and shading it being careful to observe where the areas of shadow are and how your highlights are going to look regarding the light source, with that sort of thing in mind you can approach just about anything 3d armed with the basics and try to apply that.

Space Marines are actually a good choice to learn on because they really can be broken down into basic shapes quite easily, your bog standard tactical marine for example.
His legs? Cylinders. Arms? Cylinders. Shoulderpads? Quarter Spheres. Fingers? Mini cylinders...

Now it\'s more difficult than all of that of course, just trying to put the basics into words. You really would be realistically looking at things in the light of the model as a whole first, then taking it down to individual components, as nothing on a piece exists in a vacuum and should \"work\" well together with the rest of the piece.

There is no shortage of light source material on the web, two seconds with google and you will be set for life with so much information you will never read it all, so practice what you can when you think you\'ve grasped a certain concept and don\'t read too much heh. :)

Last thing in that giant wall of text, keep in mind that this method is considerably slower than the way you\'re used to painting. If you\'re going after large armies of tabletop pieces painted up to the next \"level\" you might want to make sure you are ready for your output to slow down.

One of the reasons GW is doing it like this is well, because it\'s a fast way to paint, not worrying too much about the subtleties while still producing effective models that look great on the table, like you have here.

But yeah working on improving your painting is alot of fun, something I\'ll probably never stop doing. The old saying of complacency with your painting means you\'re ignorant or something like that heh. It takes about 10 seconds of browsing some of the submissions on this site to shake anyone out of any kind of complacent attitude they may have adopted, either that or give up all hope entirely, fine line between the two sometimes.
 
Back To Top
Top