Sukigod\'s AoBR Warboss

Sukigod

Member
Started on my next project, the Assault on Black Reach Warboss. I\'m going to try a few things I haven\'t before, like greenstuff, so I\'m learning things here and if you folks have any tips/hints/help along the way, it\'s more than appreciated. the AoBR warboss is a bit static (if you haven\'t heard, hehe) so I\'m amking some chanegs, although subtle. I want t ochange the angle of the powerklaw arm and change the angle of his head. The will be an easy one, the arm, not so much.

Here\'s the base warboss parts - all washed up. The reports are true, the new AoBR models are greasy! Normaly I don\'t wash my plastics but you can actually feel the grease/oils on these so after awash in warm soapy water and a drying, time to start cuttin\'!
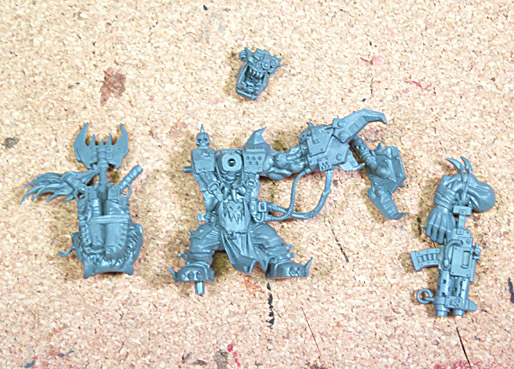
wb1.jpg


First, I remove the ribbed hose, just cut that sucker right off, them trim the remaining plastic off the powercord to the klaw. Because of the way I\'ll be bending the arm, I won\'t be able to twist both bits and hav eit look right so I\'ll replace the ribbed hose with some guitar string after the arm is reattached. Then I sever the arm as close to the shoulder guard as possible.

wb2.jpg


I then CAREFULLY use a candle to heat up just the wire that\'s holding everything together. This takes some getting used to and you can\'t rush it for a few reasons. Thin plastic melts QUICKLY! The other factor is heat will have a tendancy to make the plastic swell and loose it\'s shape/detail, even in the surrounding areas. I slowly warmed the plastic and bent/twisted the arm so I could get at the stump to sand a different angle into it.

wb3.jpg


When I put the angle I wanted on it (which ended up being a moot point) I reheated it and put into the angle ai wanted and let it cool.

Here\'s the new angle compared to the other untouched warboss model.

wb4.jpg

wb5.jpg


My first greenstff. tricky stuff that greenstuff. I read a lot before using it and I know it\'ll take a little time/experience to make it work better but I have to learn sometime, right? I think my next attempt will be better.

wb6.jpg

wb7.jpg


I picked up these dental tools at an antique store for $2 a piece. Glad I did!

wb8.jpg


Now it\'s time to replace that hose I sliced off earlier. We\'ve got a few electric guitars around the house so having wound strings for this was second nature. If you don\'t have a guitar picker around the house it pays to stop buy any music store and get a pack of cheap strings, any size will work ad you\'ll get two strings, roughly 3\' long. That\'ll make a lot of hose.

I start by making a pilot hole for the drill bit by using a new Exacto plade point to mark where the holes center should be (left). Twist the blade in place making a tiny hole in the middle (right). This will keep your drill bit from \"wandering\" as you start your hole.

wb9.jpg


It\'s also a good idea to pick up a rounded needlenose pliers (poorly pictured bleow) as these is perfect for shaping and benind guitar wire around without causing kinks to appear.

wb11.jpg


And here\'s the new boss with his arm adjusted the way I want him and new hose in place.Not bad for a nights work.
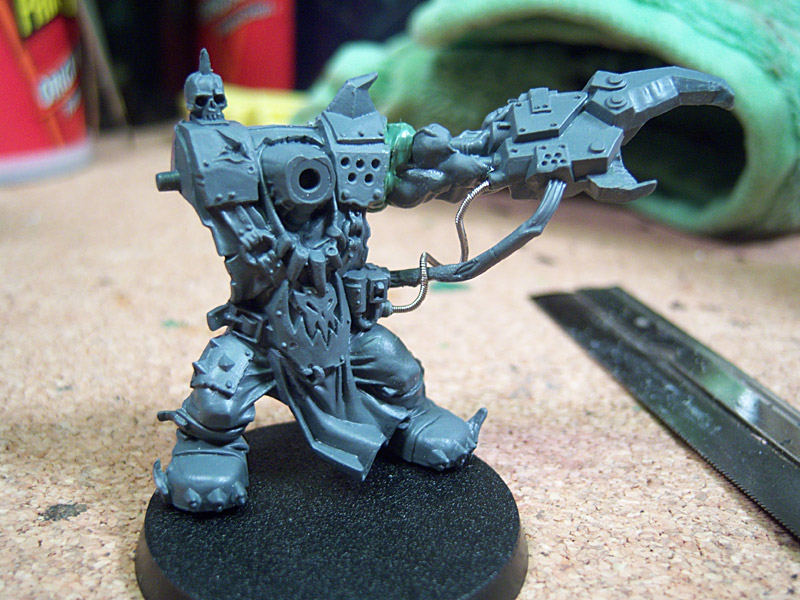
wb12.jpg
 

nightsword

New member
That looks promising. I don\'t see why you went to all the trouble with heating the wire when you could have just cut it off too and replace that with guitar string. But it does look good.

Are you going to be positioning the head to face in the same direction as the power klaw?

The other thing that bothers me slightly is the guitar string hose. It\'s kinks and positioning seem a little unnatural. If it had been me, I\'d have threaded it behind the plastic wire.

Nice work, I\'ll be keeping an eye on this.
 

Sukigod

Member
Originally posted by nightsword
That looks promising. I don\'t see why you went to all the trouble with heating the wire when you could have just cut it off too and replace that with guitar string. But it does look good.

Are you going to be positioning the head to face in the same direction as the power klaw?

The other thing that bothers me slightly is the guitar string hose. It\'s kinks and positioning seem a little unnatural. If it had been me, I\'d have threaded it behind the plastic wire.

Nice work, I\'ll be keeping an eye on this.

Thanks nightsword! To your questions - as for chopping both lines from the powerklaw, I wanted to keep the \"torn wire insulator/wrap\" look that\'s already there, looks better than what I can sculpt right now;). Yes, I\'ll be repositioning the head to be looking down the arm and up a little - more attitude.

The hose is one of those things where you put too much thought behind it and then someone points out something simple (like you did hehe). I had all these reasons for why the tube would bend this way and that way and..... just over thought it I guess - I do that a lotlol

I probalby won\'t replace it now though since I would have to cut more and rebuild more stuff to make it work (it\'s already superglued in place) so I\'ll live with it for now. I\'ll keep it in mind though when I do the other warboss on a bike.

Thanks for checking it out!
 

Sukigod

Member
Made a snazzy new base for my new bass-ass Red Jack warboss.

wb13.jpg


I think the angle of the debris adds to the menace factor, really making him look much more animated. Here he is sticky-tacked to the base and compared to a \"Barry\" and the stock AoBR warboss. Not much to do now but tidy up the greenstuff mess on his shoulder and then it\'s prime time!

wb14.jpg
 

nightsword

New member
Boss looks badass, base is fab too. I\'d recommend checking out the troll forged forum for sculpting tips for greenstuff. There\'s some good stuff on it.

Nice work,

N.
 

Sukigod

Member
Over the years, I\'ve had quite a few people ask me how I do my ork skin. After a few failed attempts to document, I\'ve finally succeeded. Here\'s how I do my orks...

how-to-orks.jpg


A few notes: Ork hide is a great replacement for Dark Angels Green. I didn\'t stop using it all together, just differently. The Dark Green Ink (which they no longer sell...) has been replaced with the DA Green, but as a wash between the Goblin and Scorpion Greens. I prefer the color transition this gives better than the inks did. The paint based wash also dries faster!

I don\'t use straight water to thin my paints - no, not snobbery, just that I have a premixed bottle of some additives taht do things to the paint and I don\'t have to measure each out all the time. Although I usually add more water through the brush as I\'m painting, adjusting as I go depending on what the paint is doing on my palette.

Here\'s my mix... 50% Water, 25% Golden (brand) Acrylic Flow Release and 25% Magic Wash MIx (4:1 Water/Mop-n-Glow).
I thin the paint down about 1:2 or 2:1 (Paint/Mix) as a starter, then adjust w/water untill it flows from the brush nicely.

The rest is pretty much standard. In the darker greens I paint almost the entire muscle by grouping, leaving the small areas in the deepest recesses primer black. When I get to Golbin Green Istart leaving the bottom of the muscles alone, concentrating on the tops and middle of the muscle. Buy the time I get to the Scorpion Green, I\'m only hitting the very tops of the muscle, where direct overhead light would hit it. All of these layers are put down at least twice. If your paint is thinned and applied correctly, it dried fairly fast.

The final step is the Dullcote layer. It\'s a flat spray sealer from Testors. If you\'re in the US you can find it in almost any hobby store. The UK recently banned it due to the tolune content but sounds like there\'s a non-tolune based version in the works. The two most important things to remember about Dullcote is #1: everything will be duller, including all highlights. I always bring my higlights up at least one step past where I want it. Notice how in the photo above, the Scorpion Green is not as bright as the second to last step. And #2: Dullcote is your friend bacuase it can do some of your \"blending\" of layers for you. I think the diffusion of the matte layer helps fool the eye a bit into thinking two close colors are smoother than they really are.

Hope you enjoyed this little tutorial about my ork skin. When I do my special units like Warboss, Big Mek, etc. I use these same steps but with many, many more steps and thinner layers to mke a more gradual change in the colors. I\'ll try to show you on my current warboss project (if I remember to take pictures!)

Sukigod
 

Sukigod

Member
Got the skin painted on the warboss face tonight, I might get the eyepiece done as well, we\'ll see how much longer I paint.

wb15.jpg
 

Sukigod

Member
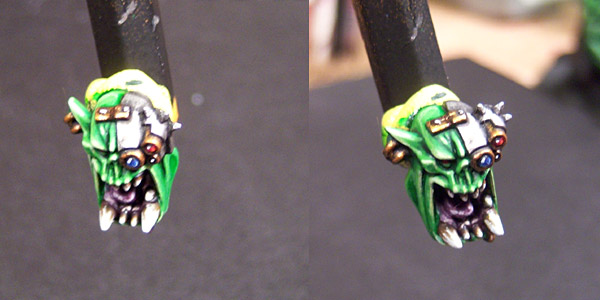
Finished up the head tonight - didn\'t get much time in but hey, it\'s a start and many small steps...

I tried the purple look that\'s featured in the GW Masterclass article for the Warboss mouth interior. Close but not quite as crisp as the article. Dang thing reminds me of my painting shortcomings.... aslo gives me somethign to strive for. The metallics are washing out due to the lighting, they\'re much darker in real life - that\'s metal based paint for ya.

wb16.jpg
 

Sukigod

Member
Progress has been pretty slow lately due to other engagements and I\'m suffering a little today from a coworkers wedding yesterday:drunk::drunk::drunk: so I don\'t trust myself with a brush!lol

I\'ve painted most of the back piece for the warboss, not sure what to do with the tube coming out from his side and what color I\'m going to paint the fringe/tassel on the bosspole - I\'ll let inspuration strike me later.

wb18.jpg

wb19.jpg

wb20.jpg


I should make pretty good progress next week as I don\'t have many plans during the week.
 

Sukigod

Member
Made some more progress on the warboss last night, half way done with the skin. It\'s kinda tough to get an idea of what the finished product will look like when you paint it in parts but now that I see the parts (skin anyway) together, it\'s starting to com together.

wb21.jpg


Ein (jamsessionein, depending on forum) pointed out a perfect resource for buzzsaws for us ork players to add some killy deff to out deff koptas. I ordered some and here\'s what they look like for reference/scale. Pretty dang spot on. I\'m simply going to chop off the pole and magnetize it to where the engine intake is located between the skids - it\'s a perfect fit. (ok, I\'ll most likely convert some with extensions from different zoids bits I got in the bitz box...)

wb22.jpg


I also started assembling the boyz from the Black Reach box set. I\'ll use some of these to fill out a \'ard boyz mob (adding shoulder pads, iron gobs, etc.), the rest just go for the grist mill and Green Tides. Sometimes I wonder who is more intimidated by this. The person who faces it across the deployment zone or the person who assembles/paints it?

wb23.jpg
 

Sukigod

Member
Originally posted by uberdark
where did you get the buzzsaw from?

Here...Bionicle Buzzsaws

Ein (jamsessionein) found it and posted it at The Waaagh! Great find. I ordered these from a guy in the Netherlands and it didn\'t take long to get\'em. (I got 9, I\'ll need three more soon:twisted: )
 

uberdark

New member
Originally posted by Sukigod
Originally posted by uberdark
where did you get the buzzsaw from?

Here...Bionicle Buzzsaws

Ein (jamsessionein) found it and posted it at The Waaagh! Great find. I ordered these from a guy in the Netherlands and it didn\'t take long to get\'em. (I got 9, I\'ll need three more soon:twisted: )

i knew i had seen those before!!! my son has a ton of bionicle. time to raid the boys stuff....hey i\'ll buy him a star wars figure.

muwahahahaha.
 

Sukigod

Member
Red Jack is coming along slowly, but surely. Finished the back piece, started the shoota arm and made progress on the shirt, straps and pants.

wb24.jpg


Another problem of being a packrat mekboy is I always seem to find more projects, even when I\'m not looking. Came across this the other day for $10 and could\'nt pass it up. Everything about this is screaming LOOT ME! It\'s also got the thinner profile and looks a bit similar to the image int he Ork Codex in the Battlewagon entry.

wb25.jpg


wb26.jpg


Just the idea of looting a garbage truck makes me smile. :D

p.s. It makes grinding and dumping noises when you \"empty\" the dumpster in the front arms...
 

Sukigod

Member
Finished off the AoBR Warboss today. Not as well as I would have liked. I made major blunder that I\'m not going to go back and fix. I forgot that superglue accellerants effect paint and plastic and mussed up the face in the process. I\'ll live with it though.

I also tried my new lightbox for photos and it\'ll take a while to get used to it and what settings will work with my camera but I\'m not going to experiment much now - some other day. I will get ti to work so I can use the super duper professional setup though and post it for voting.

Here\'s the new Red Jack.

wb27.jpg

wb28.jpg

wb29.jpg

wb30.jpg


i\'m not sure what will be next. It\'s either 40 sluggas, speed painted (heh, that\'s kinda funny) or five nobs, or a few SPace Marines for testing.
 

Sukigod

Member
Alright, after looking at the photos I took, I realized I didn\'t like\'em and know I can do better. Here\'s the better\'s!

wb31.jpg

wb32.jpg

wb33.jpg


I\'ll pots the pro-photos here after I take them.
 
Back To Top
Top