Sukigod's All-In-One Painting Log

Sukigod

Member
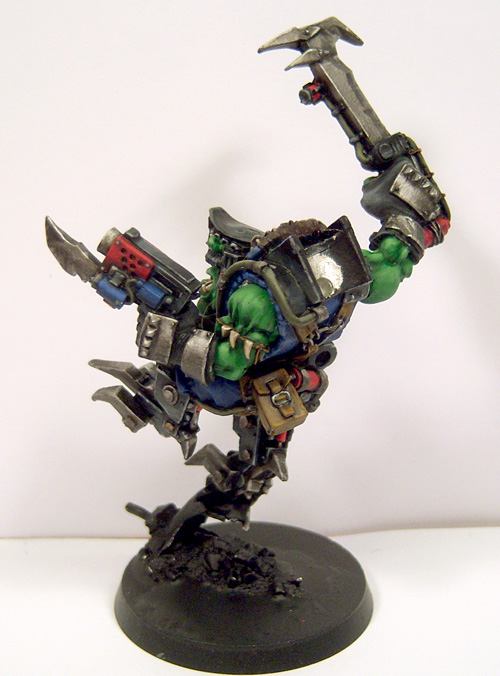
Started work on what I think is the most difficult part of this model for me. I've never tried this but I'm looking for a shaded black for the upper legs. I'll be going slow and I'm in no rush - I've got til the end of Jan to finish for the tourny - so here's the first whack at the shading part.

zag13.jpg


zag14.jpg


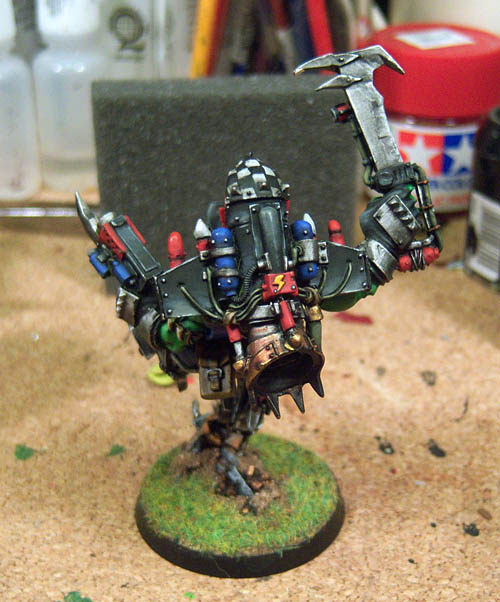
Now, this is a pretty advanced technique for me, shading into different colors. I've gone from Chaos Black to a bit of Codex Grey. Then I shaded the top of that with Chaos Black mixed with Space Wolves Gray to give it a little color and blue shade the black. Then I went over it with a very blended (hopefully) application of a small touch of Choas Black mixed with Kommando Khaki to give it a dusty, shaded appearance.

The photos at my workbench do an abysmal job of showing the shading as it's a fairly subtle application. I think it looks a bit messy at the moment but I will be adding a highlight along most of the edges to give the legs much more definition. I plan on doing the skull on the one knee white, the other knee will receive the checkerboard treatment and the rivets/bolt heads in actual metals.

I'm also going to attempt something I've read about on the feet. A NMM in metals technique. Maybe not literally, but that's the idea. I like the idea of the feet really standing out in the lower half so I'm hoping it works out.

Later!
 

Sukigod

Member
OK. Spent some time tonight with Zaggy's legs. Got the large portions of the legs and feet finished. I've got a few small areas to clean up and smaller details to paint like the rivets/pins for the legs (which will be done in metals), the hydraulics and some selective grease and dirt in the hinge/scissors joints areas.

The first two pics show the highlighting on the upper legs and the others are varying views of the finished feet. It's tough getting a decent picture of the lower half of this guy from more than one angle and the reflective metals aren't helping either!

zag15.jpg
zag16.jpg


Finished metals on feet - I think they turned out rather well. They stand out nicely from the "black" uppers and will jump out even more after basing.

zag17.jpg

zag18.jpg

zag19.jpg


Later!
 

Sukigod

Member
Quick update. Doesn't look like much more got done but I spend three hours tidying up and doing small stuff. I can start on the upper half of the torso next.

zag20.jpg

zag21.jpg

zag22.jpg


Later!
 

DannyBoy2k

New member
I have to say that they look spliff!

And also that I REALLY liked that upper left picture. The angle made it look like just a head on top of two legs at first. Looked really NEAT. :)
 

Sukigod

Member
Spent some more time on Zagstruk today, small update. Finished the main body and started the left arm. I wish the colors would photograph correctly at my workbench as some are off abit and nearly impossible to color correct in p'shop. The blues are quite muted compared to what's showing, the red on the Big Red Button is a much brighter and richer red - here it comes off a bit orange. HIs skin isn't quite right either.

Alright, I'm done bitchin', here's the shot for today

zag23.jpg


At least when I'm finished I know I've got a pro setup at work to do the finals.

Later!
 

uberdark

New member
you know on a word about where to photo at. i photograph in my classroom with all the flourescent lights and direct light coming in through the windows. then when i photoshop it, it almost always turns out perfectly. you might want to try it at your workplace to.
 

Sukigod

Member
Thanks for the suggestions guys. I was just whining though. There are limitations to me local setup and they've been giving me issues for years. I just finally did some outward bitchin last night, I'm over it.

I know in the end I'll get really good photos, just not currently at my workbench. I'm not hauling them into work to shoot in process shots, too much work.

Someday I'll have a dedicated space to leave up a mini lightbox nearby and no one will have to hear me complain... (someday).

:)
 

Sukigod

Member
More Zaggy!

Finished both arms today. I've got the jetpack and the hose/controller bits to but down and then basing. I'm sooooo close it's hard not to rush things. These photos are the closest to the actual I've gotten so far so I'm pretty happy how he stands so far.

zag24.jpg

zag25.jpg

zag26.jpg


Later!
 

exilesjjb

New member
you have a few stray hairs caught on his face, have been there on the last few updates, or I have hair in my eyeballs...!!! wheres yellow pages.... how do you spell optom"£$$ist:dont-know:
 

SkelettetS

New member
dont worry exilesjjb, i see the hair in his face too :D

its indeed bloody easy to rush things when almost finished. one thing i somewhat miss is some colorvariation on the metals, matter of taste perhaps. but he's looking really cool!
 

Sukigod

Member
you have a few stray hairs caught on his face, have been there on the last few updates, or I have hair in my eyeballs...!!! wheres yellow pages.... how do you spell optom"£$$ist:dont-know:


Cats. Eight of 'em. I saw them after I sealed it last time and thought to myself "ya know, I should take them off there..." And then promptly forgot about them. They should get removed tonight (if I remember :) )
 

Prophecy07

New member
Cats. Eight of 'em. I saw them after I sealed it last time and thought to myself "ya know, I should take them off there..." And then promptly forgot about them. They should get removed tonight (if I remember :) )

I got one and I thought he was a problem...

Beautiful figure there. Really love all the weathering.


eight... I can't imagine.
 

Sukigod

Member
Update for Zagstruk tonight. Sooooo close, but I don't want to rush it and ruin that last few details so I'll continue tomorrow. To finishe: the controller stick, the connecting wires to from the controller stick to the rokkit pack, and the base. I'm not planning on adding much more to the base as I don't want to really "upstage" Zaggy - he's a pretty impressive model as it is.

zag27.jpg


zag28.jpg


zag29.jpg


zag30.jpg


Here's how big this model is. Also remember my burna boy shown along side for scale is on top of a large washer as well, giving him a little bit of extra height. This is one big special character!

I now have two other burnas to paint instead of one, before the tournament. Somehow I've had one go AWOL in the last week or so. Looked all around the house, at the game store and in my truck. No show, so I'll be "speed painting" two more burnas to finish for the tournament next week. Oh well.

Later!
 

Sukigod

Member
OK - had a little bit of a breakdown today. I've recovered though and here's my story.

I finished the painting of Zagstruk proper this morning so I went on to paint the base this afternoon. I got all the base colors down and turned to reach for something....... and knocked Zagstruk off the workbench and down onto the floor.

I've spent the last three weeks handling him like he's made of the most fragile glass, making sure not to rub off paint where I'm done and very, very carefully manuvering him around to get to parts after glueing him all together. This is the final leg to completion. And I dropped him.

I looked down at the floor. It's carpet, there's hope - he's gone. I get down on all fours and search under the cabinet. There's Zagstruk in his component parts, spread around under the cabinet. The rokkit pack stayed on, as well as the joystik and attachment wires and his head. The left klaw and both arms broke off, and not cleanly either. I haven't had the impulse to actually do some kind of structural damage to something out of anger in a loooong time (it's not like I have a problem with it either, I'm just sayin'). If I hadn't had a house full of family, all hell would have broken loose.

Ok, so, he's fixed. The hard part is he landed on his foot, bending the toes making it nearly impossible to put back into the original possition - he landed pretty hard on it and the angle was juuuust right. The arms were a *#@&$^ to repaint as the original paint flaked off a considerable degree so I had to match that as well so there wasn't such a glaring "Step" effect where I did the paint repair.

So after all is said and done, Zagstruk is finished. His left foot is a bit messed up. I wish I had time to really do those toes correctly but I don't. The arm patching isn't perfect either but it's not so bad. Maybe they won't look that[/i/ close when judging painting for the tournament next week. Here he is all finished.

zag31.jpg


zag32.jpg


zag33.jpg


I'll do some really pro photos in the next week or two at work and post them in the usual places.

I've also started the two burnas to round out my 2k list. I should be able to wrap them up easily since they're not quite special characters.

After that I'll be scares for a couple weeks as all of my attention will be squarely placed on the 50 Hour Trivia Marathon coming up on Feb 12th.

Later!
 

BPI

New member
Aaaargh, missing Burnas & dropped Zagstruk :( What a horrible week, I feel for you. Congrats on a neat repair, he's looking great still. Well done for not just jumping up & down on him! Cheers, B.
 

mud duck

New member
I don't see it Suki. It's busted up where and how? I think that you have a artistes view of your project and every little thing is messed up. Well let's just say that I wish my "hardcore painting" was as good as your repairs. :big smile:

In other words, looking good.
 
Back To Top
Top