Sukigod's All-In-One Painting Log

Sukigod

Member
Thanks everyone!

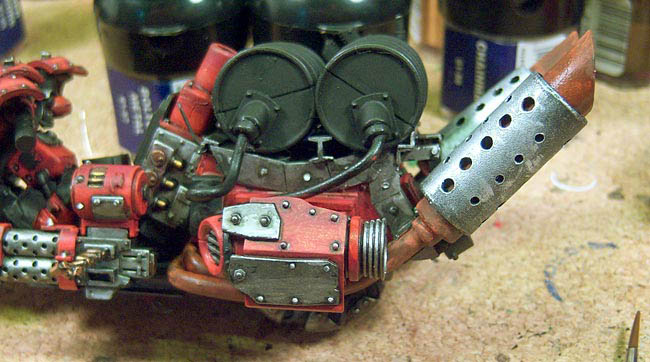
I love the comments and feed back, very much appreciated. Addressing the comments about "It's not dirty/rusty/greasy enough..." I know the nitty gritty realistic way of painting orks is all the rage right now but my modus operandi has always been to achieve a high table top standard that really stands out on a table top - whether you're close or far away. The gritty trend that's going around, while looking really, really good in photography, lacks punch on the table top which is my main goal. Someday in the future I will start doing some models strictly for painting and not gaming and then I'll look at the more advanced weathering and detailing for the army models.

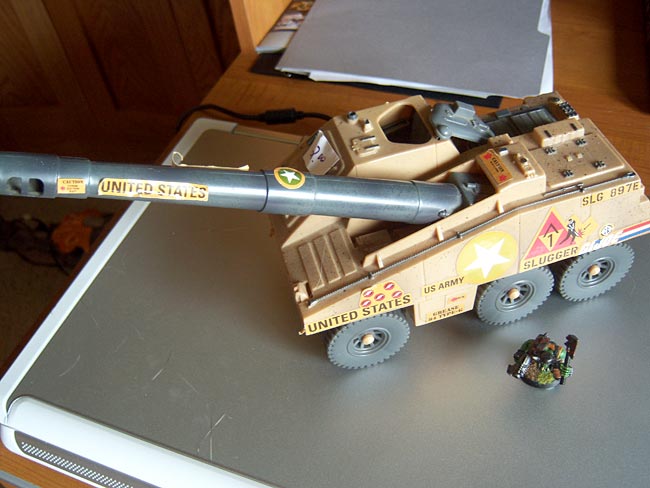
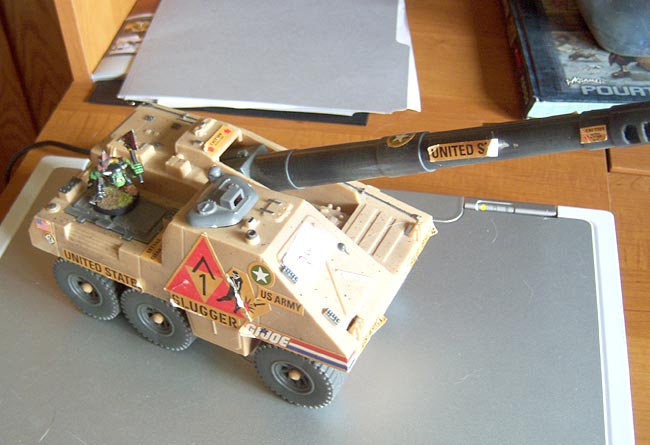
OK, enough of that, let's take a look at what has recently invaded short attention span Sukigods workbench....

grots1.jpg


Hehehe, yes my little pretties. The grots are coming, the grots are coming!

Now I have three projects to bounce around to working on whichever I wish. I like not having to be working on something for a particular list - it's creatively liberating.

Later!
 

doyme

New member
I agree with your comments Sukigod. There are two length scales to consider when painting a miniature, the 5inch and the 5ft scales. I've looked at some incredibly well painted models from 5ft away and thought they were really badly painted. As I've moved closer I've realised that the model is extremely detailed with loads of realizm and rust/dirt/wear/damage effects. I like your Orks the way you paint em. It looks old school but a very well executed old school.
 

SkelettetS

New member
for the table this standard is way high i say, not many people paint whole armies in nmm for example (at least not goodlooking nmm). im very curious how you will execute these last little green guys!
 

Sukigod

Member
GROTS!

grots2.jpg


I can't help it. They're fun to paint. I've decided to see exactly how long it takes me to paint a mob of 10 to see if I can add another 20 in a timely manner.

Here's where I'm at and the steps I'm taking...

Assembly and prime: 1 hr

Dark Angels Green Base: .8 hr

Snot Green: 1 hr

Goblin Green + Dark Angels Wash: 1 hr

Goblin Green re-highlight: .33 hr

Goblin Green/Rotting Flesh: .45 hr

Rotting Flesh + Rotting Flesh/Scorpion Green highlights: .7 hr

Total hours for skin alone: 5.28 Hours

I was hoping to get close to 10 hours for the box (minus the herder) but I'm not sure if I'll make it. Sure lets me know I'd never make a living at it!

Later!
 

Sukigod

Member
OK, the grots are done. - whew! One of my quickest turn around times as far as start to finish.

grots3.jpg


Here's the breakdown of the rest of the time involved...

All scorched brown and leather: 1.1 hour
Fur: .35 hr
Pants: .35 hr
Shirts and loincloths: 1 hr
Metallics and wash: 1.25 hr
Teef and Claws: .5 hr
Final irregular parts and details: 1 hr
Basing after Dulcoting: .5 hr

Giving me a grand total of 11.3 hours of from opening the box to finished for 10 grots. Roughly 1.1 hours per gretchin, pretty close to what I was after now that the little blighters are finished I can paint up the Runt Herder (kind like a reward for finishing the grots)

These aren't the best but they'll work for me on the tabletop. They do have tons of character and are a really nice return to the 2nd ed style grots.

I think I'll alternate now between the runt herder and Gazghkull for while to give myself a change of pace.

Later!
 

SkelettetS

New member
nice little green fellas, and very good for 11h (1h per mini, not bad!).

...i guess id still be cleaning mouldlines after 11hrs :D
 

Sukigod

Member
Thanks guys!

I've kinda slacked off on my painting and scratch building as the inspiration bug has drifted away as of late. Don't worry, it'll be back and I'll be doing more work on Gazzy and the paired Looted Wagon, Mega Wagons. For now though a complete mindless and stock-from-the-box build of the GW Battlewagon is enough to keep my army plans moving forward.

Now since this is a straight build, I normally wouldn't post picks until painting time but a few people (as well as myself) wondered what the size difference is between the stock kit and my "bigified" version I biult last year. Well, now we know...

bwscale.jpg


This'll be painted in Goff-ish black that will match the trukk I intend on finishing sometime in the next 5 years. :grin I'll do another comparison shot with all the acoutrements with both when I've finished assembling the GW BW.

Later!
 

Sukigod

Member
Just another silly comparison shot tonight. You know, these things go together a LOT quicker when you're not modifying every last part? Probably spent 2 hours on it so far.

sbw1.jpg


I'm priming right now and will start lazily painting it over the next couple of weeks. Yay - another new project!

Later!
 

mud duck

New member
No Deathroller? For shame....

Nice to see a comparasion shot between the two. Althought yours makes the stock model look all weedy and whatnots.
 

Sukigod

Member
Just had to post it... One of the "holy grails" of toy looting.

joe.jpg


joe1.jpg


Yep - that little sticker says $2. I love garage sales!

Later
 

Sukigod

Member
I'm duplicating this here so it stays within my normal WIP log and doesn't get lost after the Wazdakka Challenge is over...

Ok Kids! Tutorial Time!

(remember this when you're voting, did uber ever give ya tutorials? Hmmmm?)

Figured I'd give the Forgeworld rusting exhaust technique a whirl. I love them for giving good step by step instructions. I hate them for making it look so damn easy! I gave it a shot and learned a few things along the way, I'll try to impart what learned here.

There are a few things listed in the Forgeworld Masterclass book that I didn't have on hand so I made do with what I had laying around. First and foremost was the weathering powders. I plan on getting some eventually but for know I used the pastel chalks I picked up a few years ago.

waz50.jpg


I think $12 at the local Michaels craft store. The book calls for rust colored weathering powders but I couldn't find one close enough so I made my own from three of the colors I did have. Back scraping the chalk sticks with an xacto made short work and lots of powder.

waz51.jpg


I "mixed" these three colors together in a small wax paper cup to give me the final "rust" colored weathering powder.

waz52.jpg


Forgeworld used Scorched Brown (which is really the same as Burnt Umber as I found out later) as a base color and mixed the weathering pigment right into the paint. It did lighten it up a bit and make it look more "rusty" but not in the orangey rust way.

waz53.jpg


BTW: This looks almost exactly like the Testors rust colored enamel paint I've been a fan of for nearly 35 years. Very nice to see I can do this now in acrylic.

Here's the pipes on one side completely painted in the new pigmented mix. I didn't apply this super carefully or evenly as I'm assuming this will give the rust color some variation to break up the monotonous rust tone along the length of the exhausts.

waz54.jpg


After this layer has dried Forgeworld uses a Burnt Umber oil wash to wet down the area and bring some definition to the shadowed areas - and to give the weathering powders something to stick to when adding the rust details. I didn't have any oil so I used, ta da, Scorched Brown as the wash. I added a little bit of matte medium to it to give it some longevity on the model as you're supposed to put the powder down on a wet surface and then blend it in. This seemed to work ok for me. I did this in sections to make sure things didn't dry up too soon. Here's the finished results from one side...

waz55.jpg


Just enough orangey breakup to make it a little interesting. Too bad I will completely obliterate this with the airbrush later (oh well, one of my lessons learned today.)

waz56.jpg


Now, even though it happened over the course of two hours or so, I completely forgot to take pics of the next 3 steps. (yes, I can be quite the dumbass sometimes) Boltgun and Mithril silver is dry brushed over the shrouds. I realized a little late that my paint was way too thick when I did the dry brushing. Another lesson learned.

Next, They use a series of yellow, red and purple inks to impart the heat coloring effects on the outer exhaust shrouds. I did this, layer by layer, over the course of two hours since inks dry very slowly and the humidity is high here today (raining out now).Soooooo, it comes to longer story shorter.

I heat treated the exhaust shrouds with the inks then man handled my borrowed airbrush for the first time and airbrushed the exhaust soot over the ends of the pipes.I finished this off with a stippling of Chaos Black on the very ends of the pipes and a light stippling of Scorched Brown and Vermin Brown to add a bit of rust and flaking to the outer shrouds. Here's the finished results...

waz57.jpg


waz58.jpg


waz59.jpg


There are a few things I wished had worked better. The drybrushing mistake is kinda noobish (for me) and the inks are tough to work with when their so thin they always gravitate down - in this case, all the color kept pooling up on the underside of the pipe instead of sitting on top. Not sure if I thinned it down too much or what. I eventually ended up mixing the inks with a little matte medium to try and add a bit of "stick" to the color.

I also learned a few things about airbrushing that I won't go into here - for another post.

Well, off to do more details, I hope you enjoyed the tutorial.

Later!
 

mud duck

New member
Nicely done, there Suki!
Two questions for you.
1. Are you planing on adding more scorching to the pipes around the rocket boosters?
And 2; Is the split lines on the barrels as noticeable on the model as they are in the photos? Any plans to cover them up? Or will the paint do the job for you?
 

Sukigod

Member
Nicely done, there Suki!
Two questions for you.
1. Are you planing on adding more scorching to the pipes around the rocket boosters?
And 2; Is the split lines on the barrels as noticeable on the model as they are in the photos? Any plans to cover them up? Or will the paint do the job for you?

1. Yes. haven't gotten there yet.

2. I patched the barrel seams yesterday. One of those things you mean to do before priming/painting and then forget until someone on a thread points them out :)
 

BPI

New member
Looking good Sukigod :good: Thanks for the step-by-step on the exhaust, interesting stuff.

Cheers, B.
 

Sukigod

Member
(sssshhhhhhhhhhh! don't tell uber I'm over here and not working on Wazdakka !!!)

Actually, I did spend some time on Wazdakka tonight, I got most of the body painted. While I was waiting for parts to dry I decided to give the airbrush I borrowed a try. I'm using my stuck battlewagon as a test bed for airbrushing and to get me prepared for painting some Apocalypse sized toy conversions scheduled for later this summer.

Tada!

sbw2.jpg


A Badger 150 and a little Badger compressor to go with it.

Carefully masked lower half - I haven't masked off a model in over twenty years!

sbw3.jpg


After doing some online research I found out the Mechrite Red tends towards the pink side when airbrushed to I decided to add a bit of Scorched Brown to try and counter act that. I now have a perfect use for all of the old, used paint bottles I've been saving! I mixed this up as Mechrite Red/Scorched Brown/Water - 3/1/2. I was guessing/going on what some other people had suggested for a thinning ratio and it seemed to work at about 1/3 water, for a while....

sbw4.jpg


Here's the first coat - not too bad. The Mechrite didn't go pink on me so I feel it worked out alright.

sbw5.jpg


Then a thinned 3/1, Red Gore/water was sprayed on.

sbw6.jpg


For some reason the rest of my outdoor photography went to crap, not sure why. The colors are easily seen though. Then a spray of Blood Red.

sbw7.jpg


I deliberately sprayed the Blood Red from an upper angle, not caring too much about getting a full, even coat as this is supposed to give some zenith shading to the color - a bit of a fade.

Back inside the house under some better lighting and more steady shooting, here's the final result...

sbw8.jpg


sbw9.jpg


I'm in love with the airbrush. Now I just have to figure out how to keep the nozzle from clogging (with experience, I know). It didn't happen until half way through the second color. It seems as though the tiny nozzle was gathering paint waaaaay deep inside where I couldn't clean it easily. Some people suggest "back blowing" tip until bubble appear in the feeder cup but the tip on mine has a crown shape top so I can't get a perfect seal over it - the air will always come out.

Besides the smooth, even coverage, the thing I'm most blown away with is how much detail is left. It's almost as if there wasn't any paint on it at all. I'm imagining the washed will sit deeper and be more crisp and the dry brushing I'll apply later with really stand out against all the crisp definition.

OK, back to Wazdakka until he's done. I promise!

Later!
 
Back To Top
Top