You are using an out of date browser. It may not display this or other websites correctly.
You should upgrade or use an alternative browser.
You should upgrade or use an alternative browser.
Sukigod's All-In-One Painting Log
- Thread starter Sukigod
- Start date
Sukigod
Member
mud duck: pretty bog standard. Looking to build slowly through the Allies thing. Bring in some troops, a squadron of Russ's or Bassies and some Emplacements (Skyshield and Bastion).
Progress!
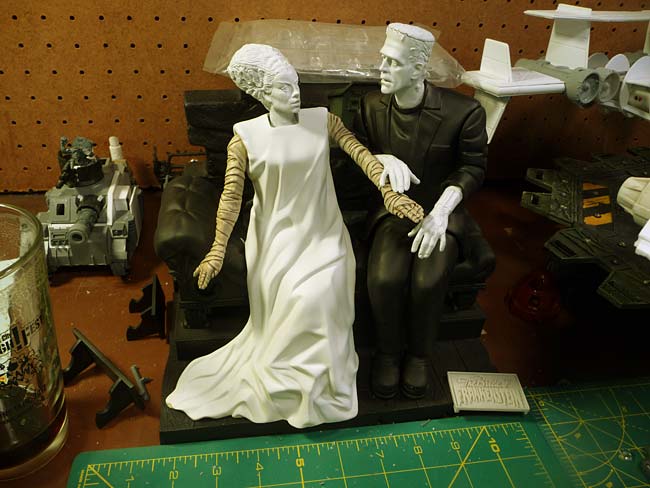
Did some work on the Bride and IG trooper tonight. You can't see it from the photo but I airbrushed a coating of Bleached Bone over the entire gown, then do a white zenithal highlight from the top to let the Bleached Bone be my shadowing. It's very subtle so nearly impossible to see in the pic. I've also done the bandaged arms.
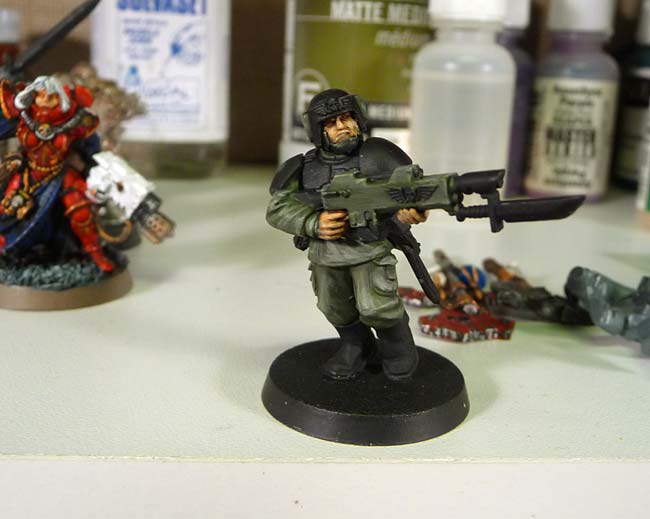
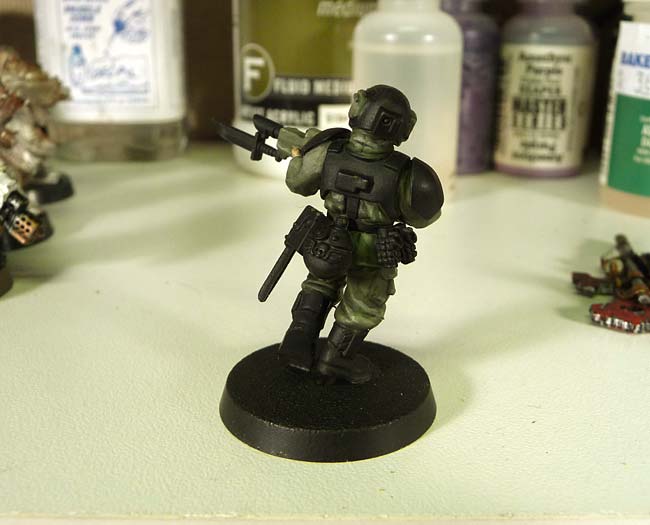
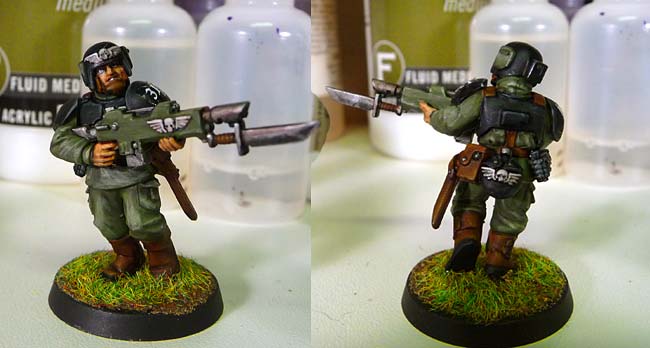
I'm looking for a color scheme for my new guard army too so trying something on a trooper. The idea is a medium green cloth with black carapace armor and brown boots. Nothing too fancy, they're army, errr, guard! I think I've got too much highlight area as the medium green is disappearing. This is also the first time I've every done human faces so it's gonna take a little time to master that.
Now I'm off to research painting these guys eyes, they're even smaller than orks!
Later!
Progress!
Did some work on the Bride and IG trooper tonight. You can't see it from the photo but I airbrushed a coating of Bleached Bone over the entire gown, then do a white zenithal highlight from the top to let the Bleached Bone be my shadowing. It's very subtle so nearly impossible to see in the pic. I've also done the bandaged arms.
I'm looking for a color scheme for my new guard army too so trying something on a trooper. The idea is a medium green cloth with black carapace armor and brown boots. Nothing too fancy, they're army, errr, guard! I think I've got too much highlight area as the medium green is disappearing. This is also the first time I've every done human faces so it's gonna take a little time to master that.
Now I'm off to research painting these guys eyes, they're even smaller than orks!
Later!
Is it just me or does Adam there look more like Herman Munster then the original Frankstein monster. I'm thinking that you may wish to push the shadows a little more on her dress or maybe a shear look, if your feeling jumpy. The picture makes it look more of the carved side.
Would it be possible to get a couple of shots of the killa tank that's in the background? Thanks.
Would it be possible to get a couple of shots of the killa tank that's in the background? Thanks.
Sukigod
Member
mude duck: The lighting in those photos is really bad, the fabric looks for cloth-like and flowy in normal daylight conditions. I'm not against pushing them deeper though, I can give it a shot.
As for the tank in the back...
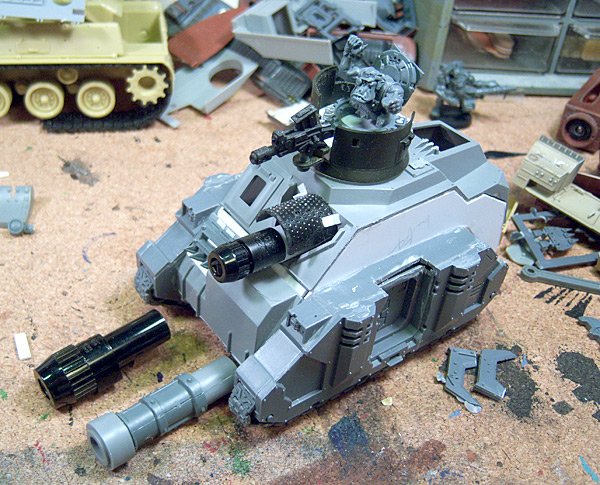
This is something I starter over year ago. I'm hoping to get his half-finished thing into my working cue.")
So I sliced my finger good (or bad, depending on how you look at it) the other day. It's still thumping sore but works gotta go on, right? Here's the cut...
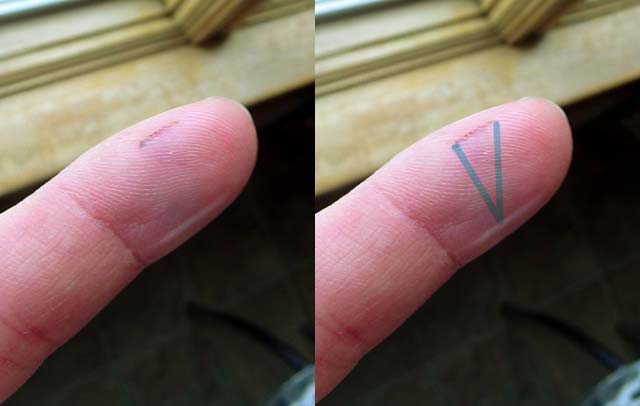
Doesn't look like much in the photo at left, a small cut. What you can't see very well in the photo is the deep slice and blood bruising in the perfect shape of a #11 Exacto blade, outlined in light blue. Going to be interesting to see how long this takes to come all the way to the surface.
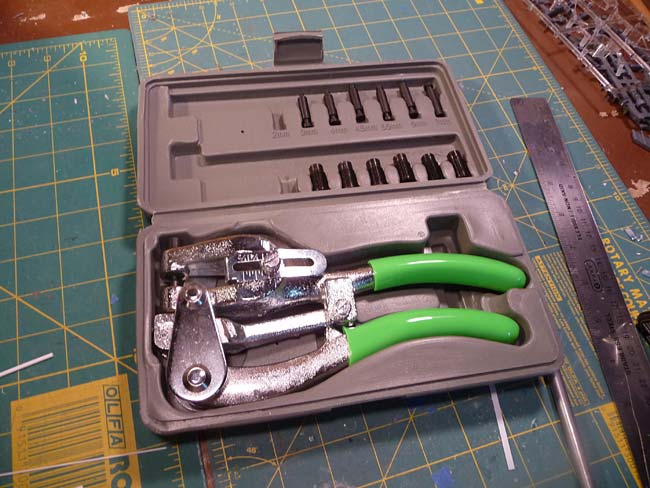
In other news, I purchased a new tool. A 1 ton aircraft steel punch! I got this for making rivets since my old punch all of a sudden went bendy-wendy on me, not sure why/how. This has various plug/punch dies that fit into it so I can make a few different sizes I'll be using this soon on the bomma and I'll let you know how it works.
On the modeling front I did get some of that worked on today. First up, my test scheme for the new 'umie force I'm starting as an alliance. I like how he turned out except the green uniform is a little light in my opinion, I want something a little more towards an olive drab green. I know how to fix that, just didn't go back to change this whole thing. I also tried the decals from the box and was sorely disappointed. I think I'll just go with some freehand of some sort. I might also play with the gun color, changing it to black as I think there might be a bit too much green going on and a little more black should balance that out.
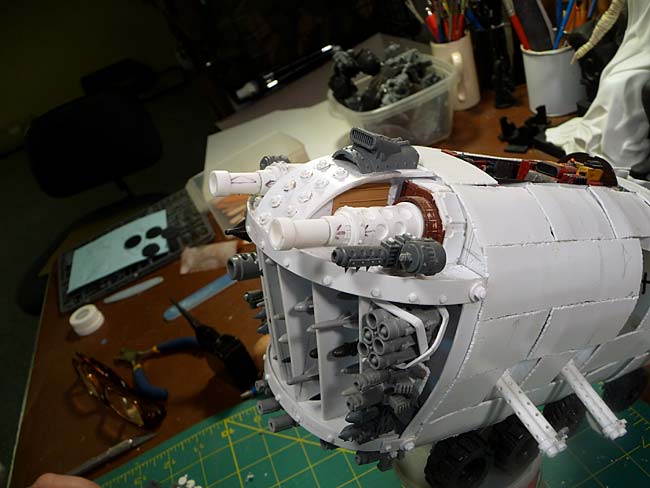
I also dragged the blasta bomma out of mothballs finally and started work on that. After putting the dakkajet together I figured out how I was going to do the turret gunners on top - grot gunners from the burna bomma parts! I just need another dakkajet and I'm good to go there. I started by wrapping up the detailing on the nose/deff arsenal section. Added the banding to "strengthen" the look and bolts/rivets to the bridge of the nose and new banding.
Felt good to start cutting and gluing again. I'm hoping to keep working at a steady pace and completing this by the end of next summer. We'll see!
Later
As for the tank in the back...
This is something I starter over year ago. I'm hoping to get his half-finished thing into my working cue.
So I sliced my finger good (or bad, depending on how you look at it) the other day. It's still thumping sore but works gotta go on, right? Here's the cut...
Doesn't look like much in the photo at left, a small cut. What you can't see very well in the photo is the deep slice and blood bruising in the perfect shape of a #11 Exacto blade, outlined in light blue. Going to be interesting to see how long this takes to come all the way to the surface.
In other news, I purchased a new tool. A 1 ton aircraft steel punch! I got this for making rivets since my old punch all of a sudden went bendy-wendy on me, not sure why/how. This has various plug/punch dies that fit into it so I can make a few different sizes I'll be using this soon on the bomma and I'll let you know how it works.
On the modeling front I did get some of that worked on today. First up, my test scheme for the new 'umie force I'm starting as an alliance. I like how he turned out except the green uniform is a little light in my opinion, I want something a little more towards an olive drab green. I know how to fix that, just didn't go back to change this whole thing. I also tried the decals from the box and was sorely disappointed. I think I'll just go with some freehand of some sort. I might also play with the gun color, changing it to black as I think there might be a bit too much green going on and a little more black should balance that out.
I also dragged the blasta bomma out of mothballs finally and started work on that. After putting the dakkajet together I figured out how I was going to do the turret gunners on top - grot gunners from the burna bomma parts! I just need another dakkajet and I'm good to go there. I started by wrapping up the detailing on the nose/deff arsenal section. Added the banding to "strengthen" the look and bolts/rivets to the bridge of the nose and new banding.
Felt good to start cutting and gluing again. I'm hoping to keep working at a steady pace and completing this by the end of next summer. We'll see!
Later
First thought with this picture; "He looks just SOOO Happy!" :smile-big:
Thanks for the picture of the tank. I think that I recognize it from Da Waaggh, or someplace earlier in this thread.
On the guard, a quick woodland camo pattern? A little brown and a touch of black? As for the lasgun a darker green, not the same as the uniform. Cloth Vs. metal green. Think that a black may be 'to much'.
Sukigod
Member
Thanks mud duck. I'm not too keen on painting a camo pattern, that's why I chose solids overall. I do like the idea (and I get it ) the cloth green/metal green thing. I think I'll try that on the next test trooper.
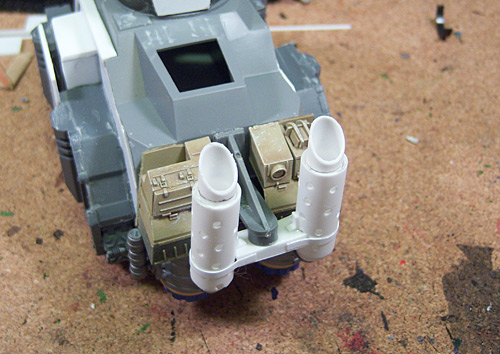
A little bit finished tonight. If I keep this up It might be done by 2013!
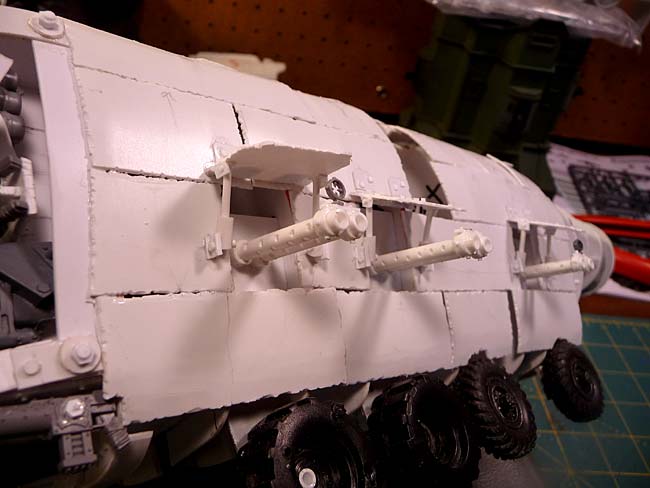
Worked on the side gun hatches last night and tonight. Not much but something.
Later!
A little bit finished tonight. If I keep this up It might be done by 2013!
Worked on the side gun hatches last night and tonight. Not much but something.
Later!
Sukigod
Member
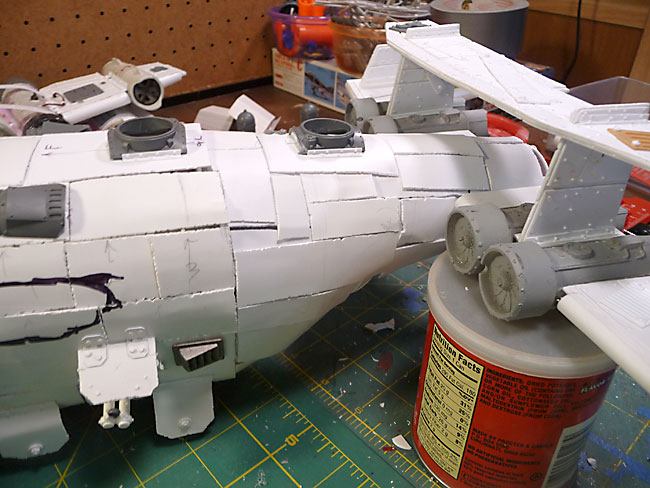
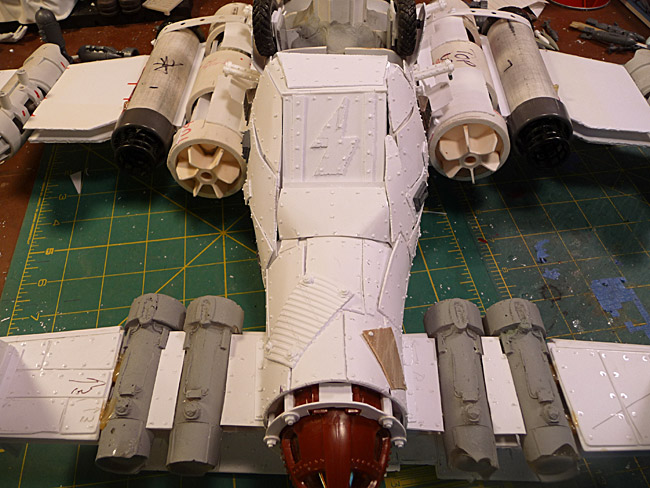
Howdy folks! I've been putzing all week on the wings of the bommer but nothing worth posting. Would be pretty boring seeing one tiny thing each day...
"Put hoses on today"
"Put the engine brackets on today"
"Put panels down but no rivets yet..."
So I figured I'd save them up to show you something substantial in one post
I've completed the topsides of both wings - yay! I still need to do the space where the wings will connect to the fuselage but in general, the wing tops are finished. There are some areas that may seem a little devoid of detail but this was done on purposes to leave room for some cool paint job stuff. Nothing like super detailing and area and then putting a snazzy paintjob over it to obscure the details.
Here's the work so far...
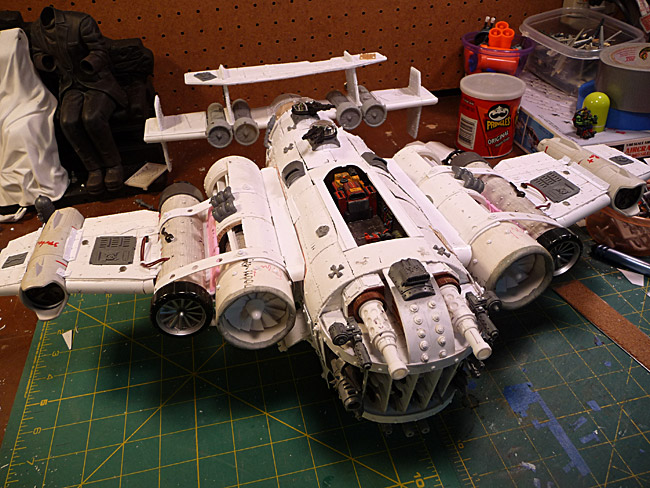
I took some pics to show the scale alongside the new dakkajet model. For apocalypse games I plan on running two fighta-bommers, two dakka jets and this bommer as my Red Skwadron.
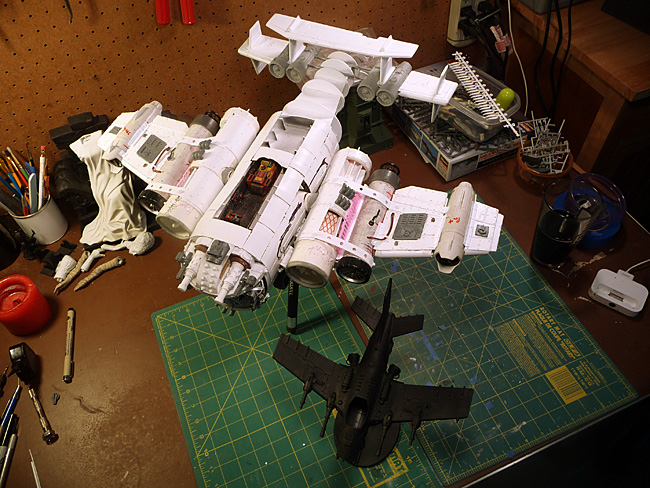
Next up will be the attachment points on the wings, then finishing the panels on the tail section. This will be followed by detailing the fuselage, finishing up the grot turret gunners, and completing the underside of the wings. If you think the deff arsenal looks dakka dakk, wait til you see what I've got in store for the wings.
Later!
"Put hoses on today"
"Put the engine brackets on today"
"Put panels down but no rivets yet..."
So I figured I'd save them up to show you something substantial in one post
I've completed the topsides of both wings - yay! I still need to do the space where the wings will connect to the fuselage but in general, the wing tops are finished. There are some areas that may seem a little devoid of detail but this was done on purposes to leave room for some cool paint job stuff. Nothing like super detailing and area and then putting a snazzy paintjob over it to obscure the details.
Here's the work so far...
I took some pics to show the scale alongside the new dakkajet model. For apocalypse games I plan on running two fighta-bommers, two dakka jets and this bommer as my Red Skwadron.
Next up will be the attachment points on the wings, then finishing the panels on the tail section. This will be followed by detailing the fuselage, finishing up the grot turret gunners, and completing the underside of the wings. If you think the deff arsenal looks dakka dakk, wait til you see what I've got in store for the wings.
Later!
Sukigod
Member
Thanks moe!
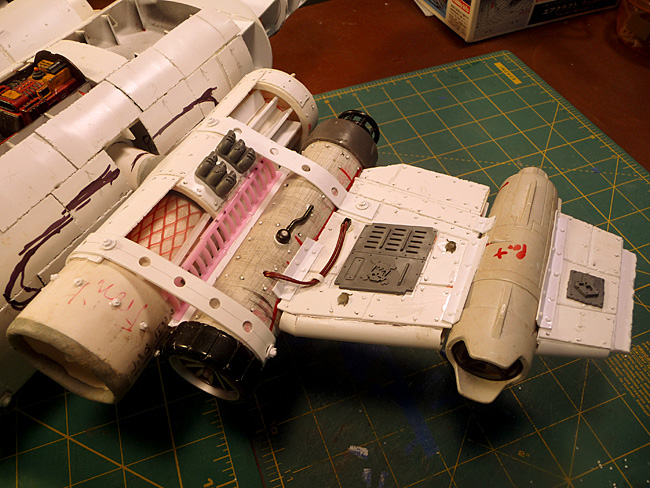
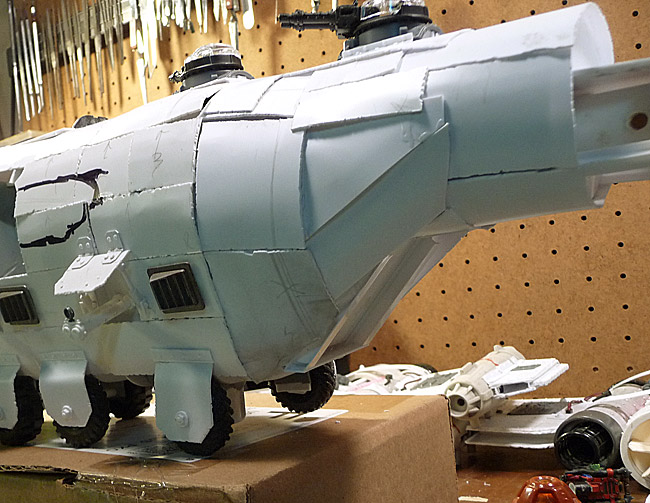
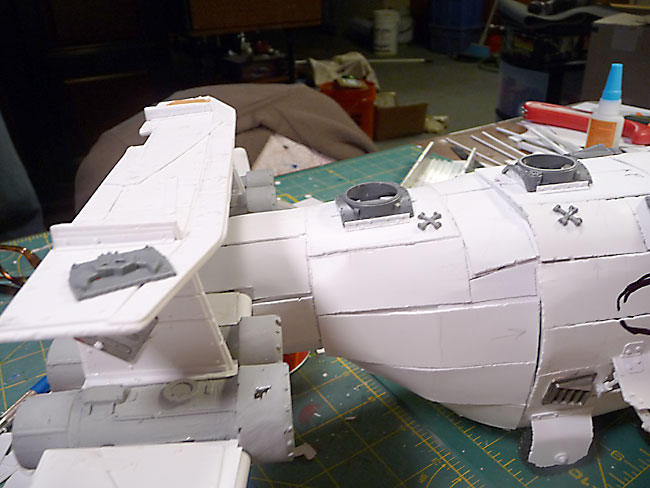
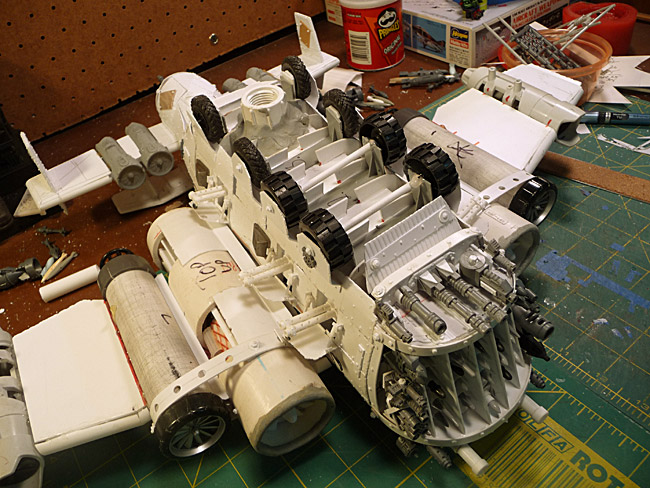
Small spurts of progress, doesn't look like much but wrapping plastic around a fuselage with compound curves is tough!
I've got more of the transition between body and tail. It needs multiple layers of pcard to get it where I need it so I can put a proppa plating on it for skinning. It's still a bit rough at this stage.
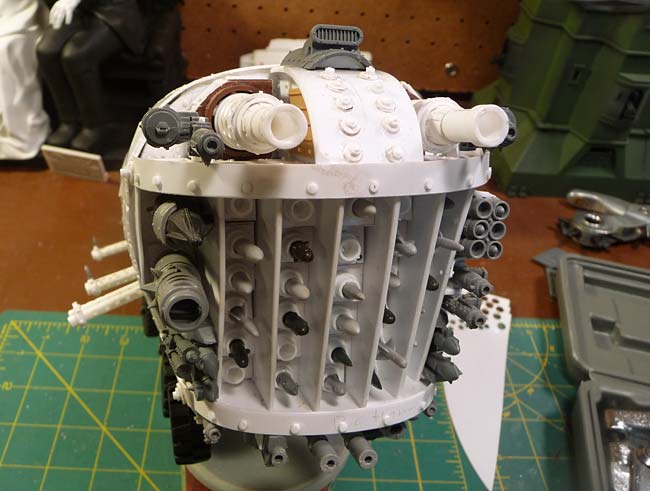
I finished up the grot gunner turrets on top.

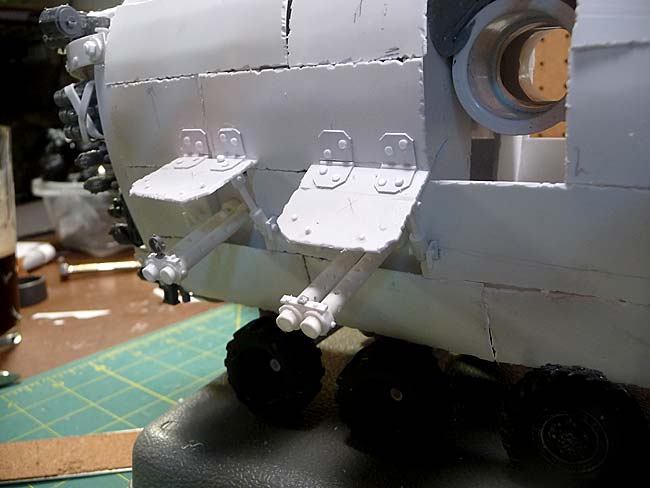
Then I did the wheel guards.
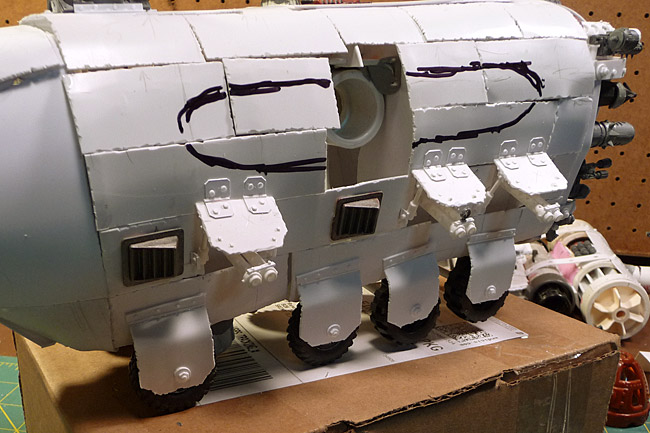
Pretty soon I'll be permanently attaching the tail as I need to plate over the seam, this will make painting a bit tricky (PiTA really). Sure, Icould have thought of many different ways to have attached the tail but I didn't think far enough in advance. Thankfully this is a once in a looong while type of project!
Later!
Small spurts of progress, doesn't look like much but wrapping plastic around a fuselage with compound curves is tough!
I've got more of the transition between body and tail. It needs multiple layers of pcard to get it where I need it so I can put a proppa plating on it for skinning. It's still a bit rough at this stage.
I finished up the grot gunner turrets on top.
Then I did the wheel guards.
Pretty soon I'll be permanently attaching the tail as I need to plate over the seam, this will make painting a bit tricky (PiTA really). Sure, Icould have thought of many different ways to have attached the tail but I didn't think far enough in advance. Thankfully this is a once in a looong while type of project!
Later!
Sukigod
Member
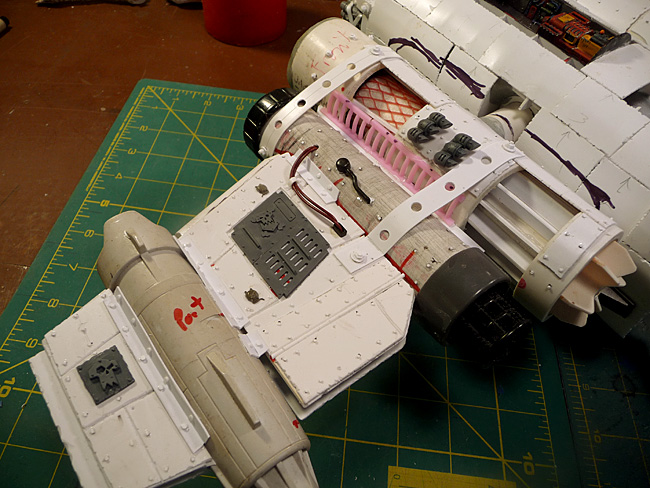
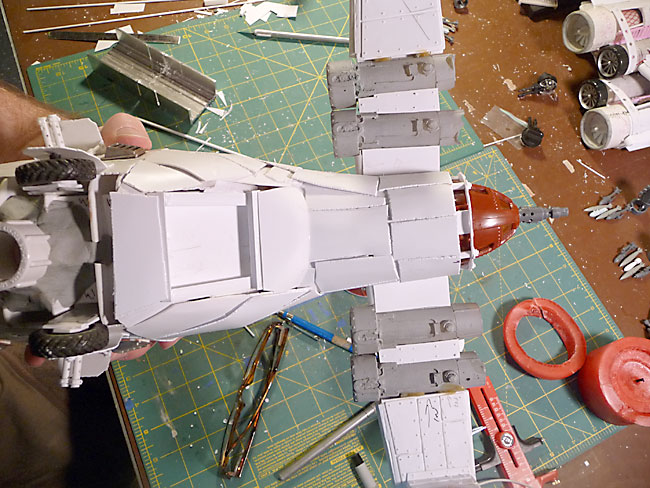
I've been doing little bits here and there again, tonight I started addressing the connection between the wings and fuselage. I've got some supports and the top panel glued in place, they'll need to cure overnight before I move to the underside. I've added some more paneling in the rear and started doing a few details like bolt on panels and glyphs - small stuff I can be doing without moving the plane.
That's about all for tonight. By the weekend I hope to have the wing attachments finished, tail wings attached, fuselage panels done (in the tail) and ready to do the "superdetailing" of the fuselage. Then the underwings!
Later!
That's about all for tonight. By the weekend I hope to have the wing attachments finished, tail wings attached, fuselage panels done (in the tail) and ready to do the "superdetailing" of the fuselage. Then the underwings!
Later!
Sukigod
Member
You are insane. Or a genius. Or both! no matter what your stuff is awesome. Where do you come up with the ideas for this stuff?
Moe
One never quite knows, do they, moetle?
As for ideas, like any good big mek, I loot from everywhere I can. I've been looking at builds and saving images for a long time. Usually it's done on the fly, although there are times where I see something specific and will copy it outright.
Sukigod
Member
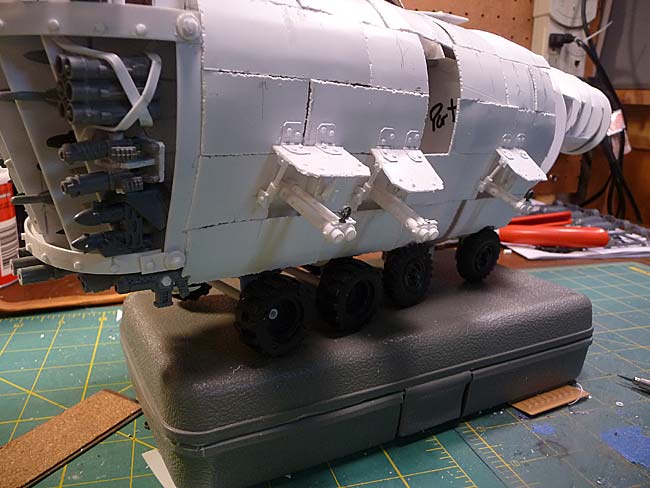
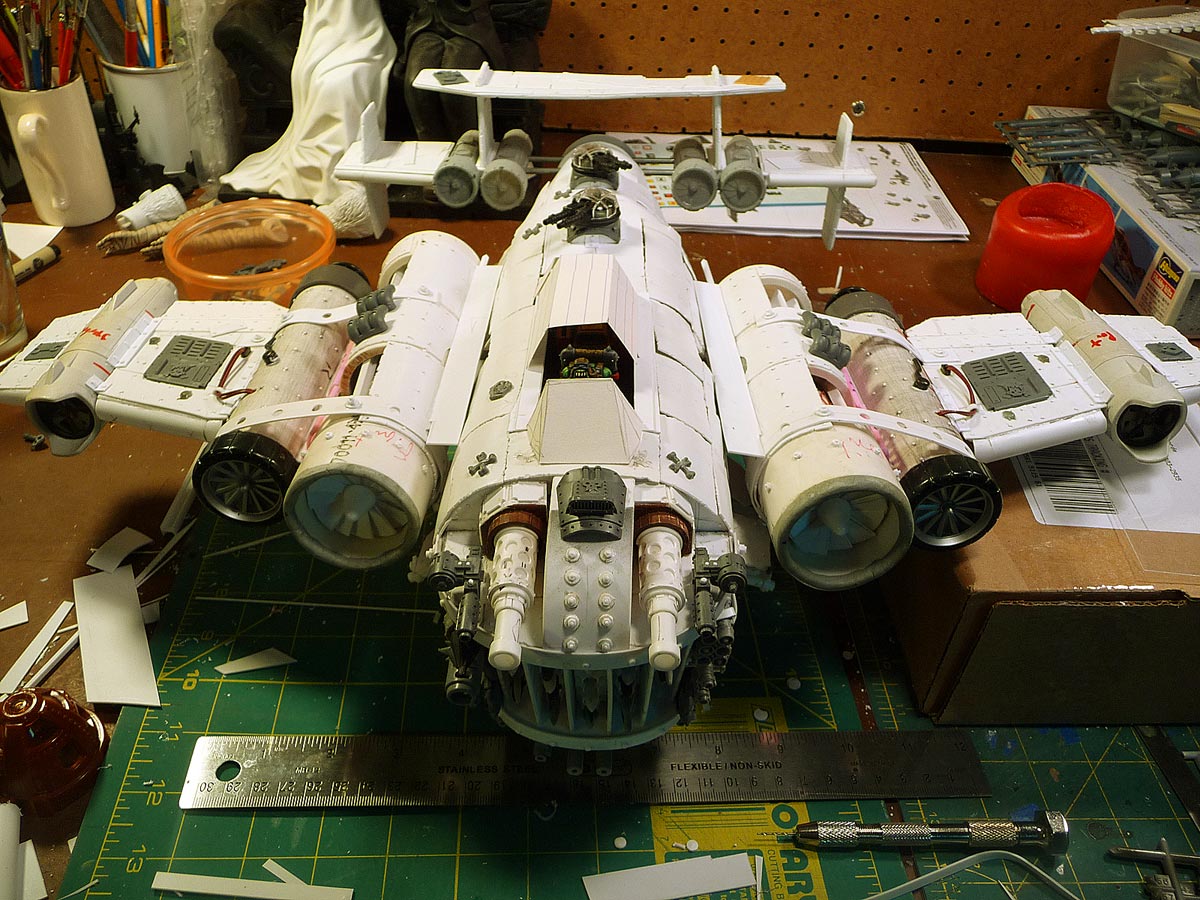
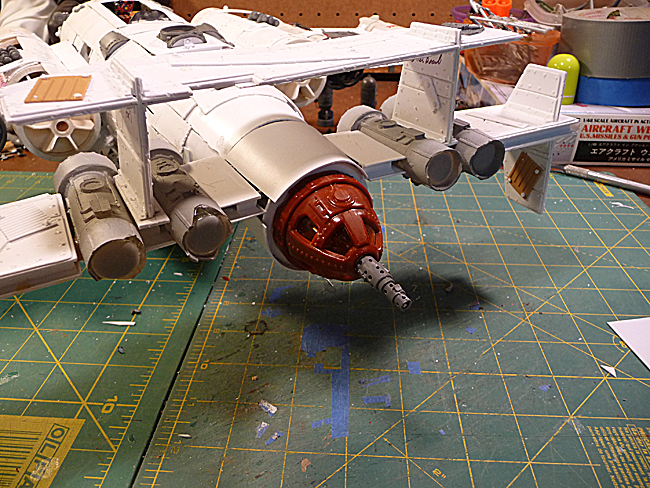
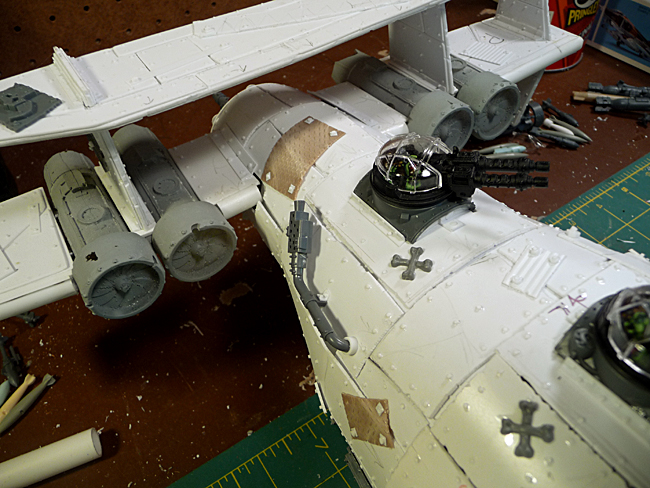
Put some time in on the bommer this week. Spent three hours doing rivets on the tail before doing the final attachment. With this in place, it's time to finish the tail section, blend in the tail wing and start finishing off the detailing. This marks the finish of the base shaping. I'll need to finish paneling sometime. Here's where it sits now...
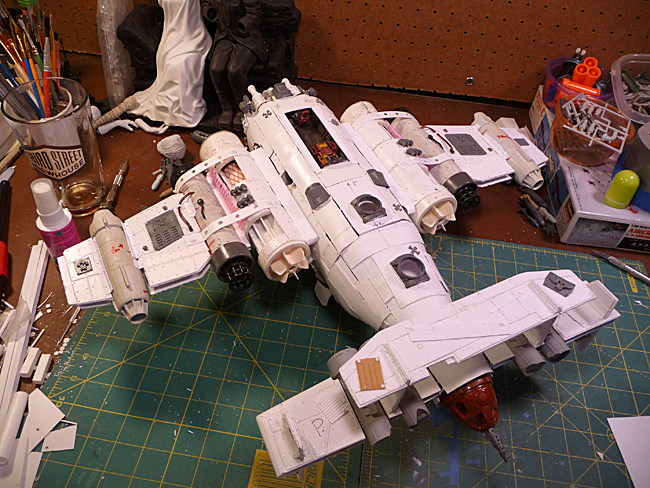
Here's the assortment of bombs I've chosen for under the wings...
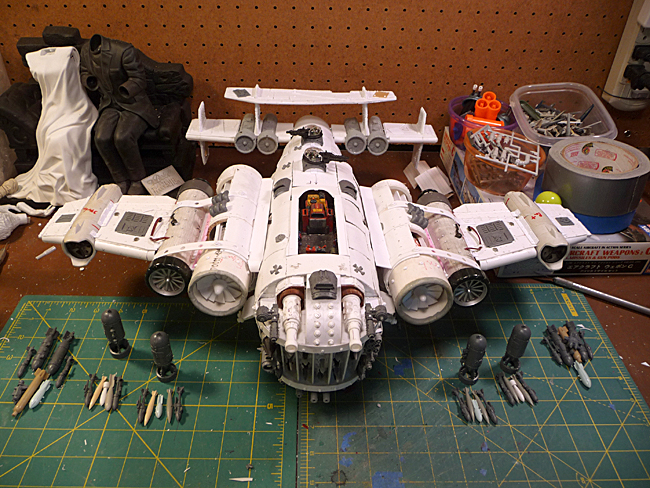
I've decided to do three sections of 6 bombs on three pylons for each wing. This will total 36 bombs. I'm going to magnetize them so I can just remove one bunch for each of the six sets of bombs I can drop per the stat sheet.
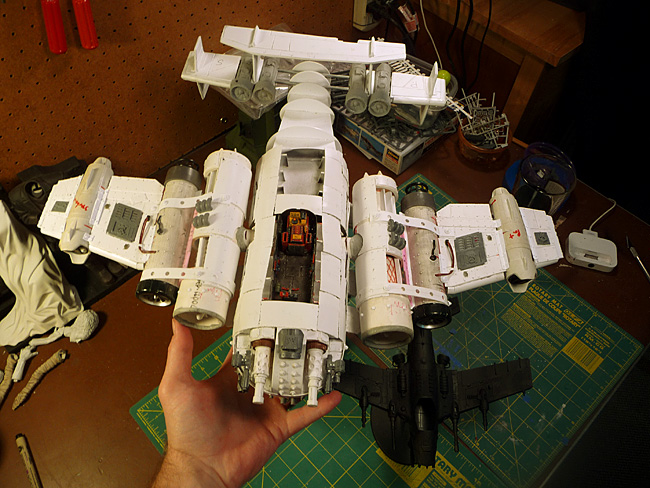
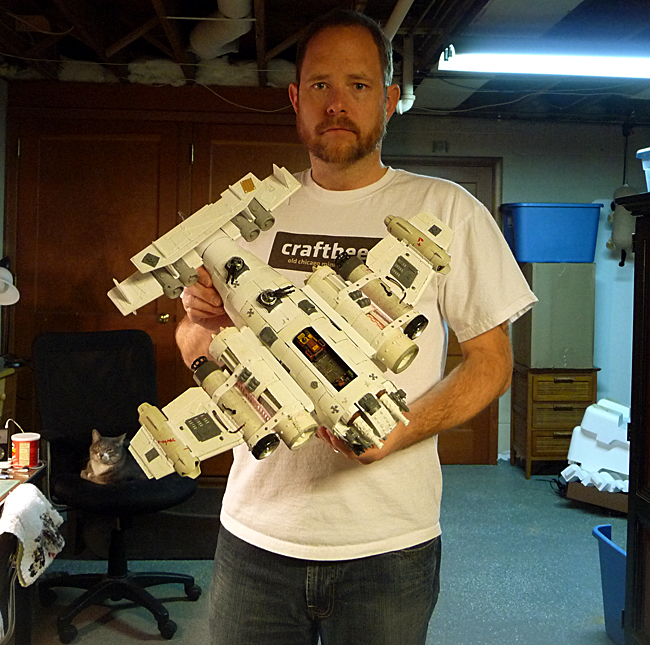
And a final "Barry", or "Randy" shot. This is similar to pox's original cale shot he did with his friend holding it. This shows how large this ended up being. (and yes, that's me).
I'm really shooting for having the build finished by the 1st of the year so I can prime it and use it in our local gamestore Apoc match on the 5th. Should be close.
Later!
Here's the assortment of bombs I've chosen for under the wings...
I've decided to do three sections of 6 bombs on three pylons for each wing. This will total 36 bombs. I'm going to magnetize them so I can just remove one bunch for each of the six sets of bombs I can drop per the stat sheet.
And a final "Barry", or "Randy" shot. This is similar to pox's original cale shot he did with his friend holding it. This shows how large this ended up being. (and yes, that's me).
I'm really shooting for having the build finished by the 1st of the year so I can prime it and use it in our local gamestore Apoc match on the 5th. Should be close.
Later!
meaty_nosebleeds
New member
awesome work mate. can't wait to see te bomber painted up
Sukigod
Member
Nice work so far. And have I mentioned you are back at the top of my I hate you list?
Someone's gotta be there, right?
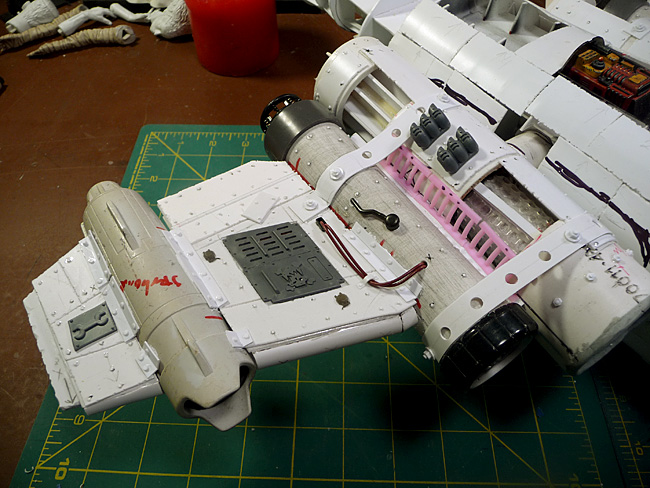
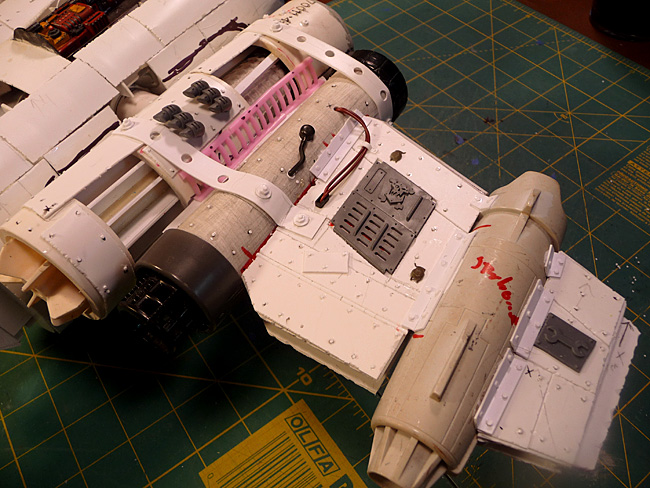
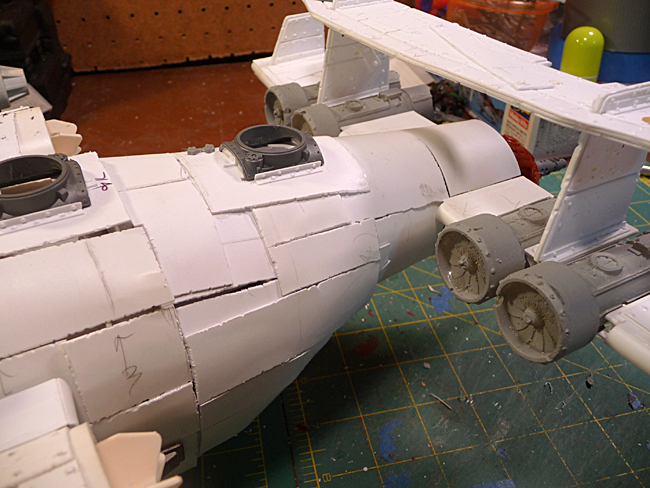
Got some time last night and forced my self to do what I've been putting off for while, the final paneling of the tail section. Because of the amount of compound curves I was at a loss as to how to do it so it looked "proppa" but not too ramshackle as I've already established a certain aesthetic with the front half of the fuselage. I pretty much just started cutting, heating and bending plastic until it fit and glued them in place calling it good.
Port
And starboard.
Here's the finishing on the tailgunner station. I was going in one direction with how to integrate this but through a lucky accident, came up with this solution.

Here's the bottom side where the back hatch is. This is a bit messy, I agree. I'm torn with spending a lot more time making it smoother or sitting back and using the excuse that "no one will ever see it (much) so screw it." I will do a snazzy hatch cover with glyphs but not sure about the rest.
Now I get to do real fun stuff with detailing the fuselage and rivets -woohoo! For reference, it took me three hours to rivet the tail alone. Thankfully there's a fully stocked bar on the other side of my hobby space!
Later!
Sukigod
Member
2,400+ rivets, and a couple hundred more left to do.
Wrapped up the tail section underside and all of the secondary plating and riveting. About 4 hours worth. I wasn't drinking this time though, I'm on cold medication instead
Here's where the beastie stands.

THe only things left to do is the canopy:
and the underside of the main wings with the clusters of bombs.
Nearly finished with the build - it's been a long trip! I'll most likely be priming this the night before the apoc game on Sat. Goal met!
Later!
Wrapped up the tail section underside and all of the secondary plating and riveting. About 4 hours worth. I wasn't drinking this time though, I'm on cold medication instead
Here's where the beastie stands.
THe only things left to do is the canopy:
and the underside of the main wings with the clusters of bombs.
Nearly finished with the build - it's been a long trip! I'll most likely be priming this the night before the apoc game on Sat. Goal met!
Later!