Jordan Peacock
New member
I know there was an official foam tray insert for the Kickstarter, but I've found that the vacu-formed plastic trays that came with the game work perfectly fine for storing my zombie horde for easy access. The trick is in getting the zombies BACK INTO the trays in orderly fashion when I'm done. The thought occurred to me to try THIS:
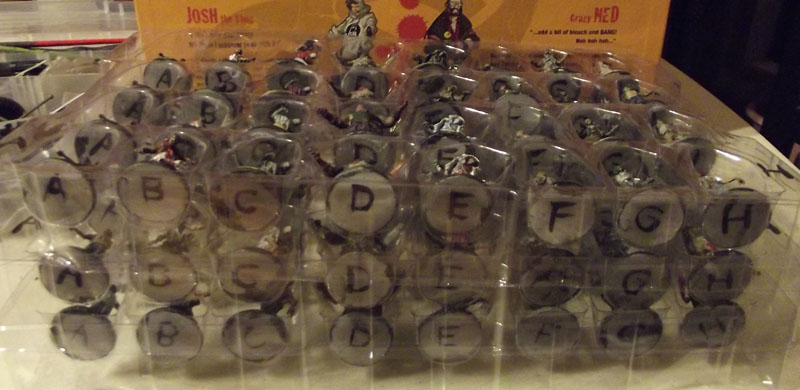
Basically, I went down the row, and lettered the bases "A" through "H" on the bottoms. I only need to see this scheme when I'm putting the minis away, NOT when playing, so I figured it'd make sense to use the bottoms of the bases. Just to make things abundantly clear (in case a friend of mine is putting the figures away for me), I painted "A" on one side of the row and "H" on the other. Using this scheme, the Fatties end up all "D," for instance.
I've done something similar for the heroes, though of course I had to "write" in smaller letters with the brush. Fortunately, most of them have very short names! ("El Cholo" is probably the longest, and that I can put on two lines.)
Another tip: One problem we've run into in our games is that, at a glance, it's not so easy to pick out the runners from the walkers when there are so many zombies on the table, it's a big table, and we've got a big group. Sure, the runners have distinctive poses, but you might be surprised how little that pops out when you've got several zombies crammed into each square. I found a simple way to deal with this was that when I painted all my zombies, I gave them all "asphalt-grey" bases ... and then I painted yellow street lines on the bases of the zombies (as if these guys are running down the MIDDLE of the street). That splash of bright yellow amid the asphalt-grey of the horde really makes them stand out.

For similar reasons, I've decorated the bases of the heroes once painting them (since I actually had trouble with a couple of players in distinguishing between player and zombie models across the table) -- basically by putting "clutter" on the bases, so that they further stand out from the "asphalt grey" dull bases of the horde.
It's a great game, and I've had friends borrowing it to play. Now that I've got it back, I'll have to get some friends together to play it again sometime soon before the holidays get too busy. I just wanted to share a couple of things I tried that might help to speed things along a little for those of you painting your miniatures.
Basically, I went down the row, and lettered the bases "A" through "H" on the bottoms. I only need to see this scheme when I'm putting the minis away, NOT when playing, so I figured it'd make sense to use the bottoms of the bases. Just to make things abundantly clear (in case a friend of mine is putting the figures away for me), I painted "A" on one side of the row and "H" on the other. Using this scheme, the Fatties end up all "D," for instance.
I've done something similar for the heroes, though of course I had to "write" in smaller letters with the brush. Fortunately, most of them have very short names! ("El Cholo" is probably the longest, and that I can put on two lines.)
Another tip: One problem we've run into in our games is that, at a glance, it's not so easy to pick out the runners from the walkers when there are so many zombies on the table, it's a big table, and we've got a big group. Sure, the runners have distinctive poses, but you might be surprised how little that pops out when you've got several zombies crammed into each square. I found a simple way to deal with this was that when I painted all my zombies, I gave them all "asphalt-grey" bases ... and then I painted yellow street lines on the bases of the zombies (as if these guys are running down the MIDDLE of the street). That splash of bright yellow amid the asphalt-grey of the horde really makes them stand out.
For similar reasons, I've decorated the bases of the heroes once painting them (since I actually had trouble with a couple of players in distinguishing between player and zombie models across the table) -- basically by putting "clutter" on the bases, so that they further stand out from the "asphalt grey" dull bases of the horde.
It's a great game, and I've had friends borrowing it to play. Now that I've got it back, I'll have to get some friends together to play it again sometime soon before the holidays get too busy.
I just wanted to share a couple of things I tried that might help to speed things along a little for those of you painting your miniatures.


