Pegazus's Pile of Pminiatures (WIP)

PegaZus

Stealth Freak
Started in on Elliwyn's hair (Sunlight Yellow 9008 with a shading wash of Muddy Brown 9028). The picture on her shows a lot streaking and splotchiness that I can't see with my eye. Guess if I looked really close with a magnification visor... which is to my left... hold on. Eh, not really there too. So, something only a camera can pick up on well. Done. It's good for a tabletop.

Elliwyn_007_zpsa5df3d88.jpg


The blacksmith also got some work done. Over his Tanned Skin, I was putting a mix of Tanned Skin (9044) and Tanned Leather (9031). Guess what doesn't show? Yup, the highlights. So, went straight in for the throat and grabbed Fair Skin (9047). Thought it looked pretty well, and decided not to press my luck and try to get him much further. I'm going to be doing some soot via pigments, so the shading will come soon enough.

Blacksmith_007_zps6d179e7e.jpg
Blacksmith_008_zpse91a6bd1.jpg


+3 pts, 246 pts total

And for those of you who enjoy it, Elliwyn's video is linked below. Should finish up processing soon, and you'll see something other than a black rectangle.


PegaZus

Stealth Freak
The demotivational demon has been haunting my paint desk for over a week, but think I've broken its spirit a bit. We'll see if it stays exorcised.

First up, got some color going onto the blacksmith. Er, if you can call black and gray. Pure Black (#9037) and Pure White (#9039). Then went over the apron with some Imperial Purple (#9023) wash that I'd mixed up for Elliwyn. Sadly, the first few layers of the black on the apron looked really nice. So I did a couple more... and turned it completely black. Thus the purple wash, to try to get it separated from the anvil. Oh well. It doesn't look that bad right now, and if I highlight the anvil with some colors along the edges and such, it should stand out better.

Blacksmith_009_zps07a1cb81.jpg
Blacksmith_010_zpsa9d56984.jpg


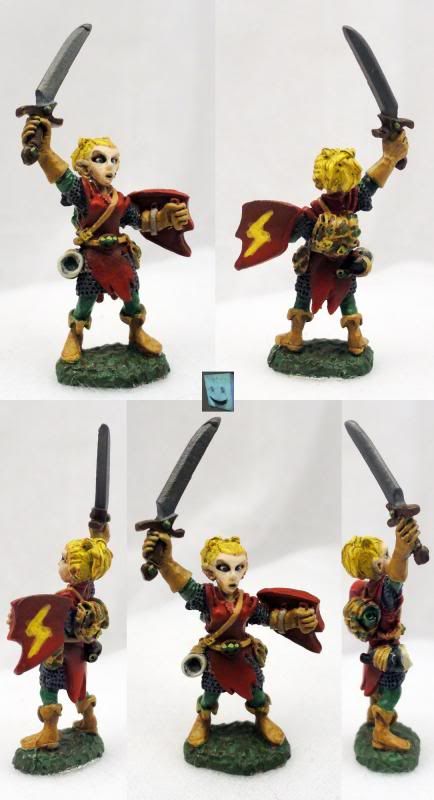
Then, the main course was Elliwyn. Uh... wait. That can be taken inappropriately, so don't. Anyway, used the same gray base and purple wash as above to do the chain mail, although I skipped the wash on the sword.

Elliwyn_008_zpsb809f106.jpg


And now for dessert, which is what broke my motivation. I call this "Over-engineering an eBay Purchase". Long time ago, okay, last October, I bid on and won some Tau Defender space ships on eBay. I know I shouldn't, but I've got a search daily for that. Even had a round this week for some Forgeworld Tau ships. Didn't win as they went to just below full retail value, except for one that went ABOVE retail. And that includes the shipping from the UK mind you! But back to the ships in question.

Got them in the mail and realized why they were cheap. Uh, yeah. Fully assembled at one time, they'd broken off the clear acrylic stands. Well, I can always buy new ones, right? I could... but, I'm cheap. Did you know I reuse my toothpicks to mix my paint rather than get a new one? I mean, box of 500 for a buck, and I'm reusing the same ones over and over, pulling the paint off when it gets too thick. Madness I say. But my madness that I live with. So, being disheartened by the shabby state, into the organizer of to-be-painted they went.

Then I've been casting about to paint something that I didn't feel obligated to put up pictures of. And I remembered them. Oh, if only there was some way that I didn't have to place an order to get new stands. And then a recent pinewood derby experience occurred to me and I realized the solution. Son and I were making a car (okay, obviously), but in the shape of a real car. And that for him meant a hood and fenders. Well and good, but I really didn't want to carve that out myself. Aha! Inspiration! My new drill press out in the garage, set to its highest setting, and fitted with a Dremel cutting bit equals poor man's (or cheap; whatevs) milling machine! Worked like a charm although a bit of a fight. But, it worked.

So... broken stands with the same setup. Pass the stands carefully across the bit and level out the broken posts. Pick up a small drill bit and drill out the inside. Quick trip to Hobby Lobby for some aluminum rods the same size, and viola! I've got stands with pins ready to go into redrilled spaceships awaiting paint. I'm so proud of myself.

Over-engineered? You bet. Had a wonderful time doing it too. The nicks and cuts aren't that deep, and should soon heal. And thus, wanted to show off one of the ships (damage to port side; will get creative there) and one of the stands. You can see a little bit of the drilled top. Not sure how much of these I'll show since I want it to be something to paint without any obligations. Strange how this WIP thread turned from something to motivate me to an obligation obstacle. Which it shouldn't be.

TauDef_001_zpsc921a75f.jpg


So, points count. +4 pts, 250 points total.

Yay! I can buy some minis guilt free! Oh shoot. My auctions are finished. *sigh* Well, maybe tonight a new batch will appear? As if I'd be willing to pay more than half of retail for them. Madness!
 

PegaZus

Stealth Freak
Yesterday was a shopping day. Went up to a hobby store that I'd only barely heard of, but turns out was much closer than the one I normally go to. My normal one was super close to my work at one time, so that's why I mainly went to it. Work much further away now, so figured I'd give this closer one a try.

It wasn't bad, but... it didn't have quite the selection that I'd become accustomed to. And unfortunately, it had a fanboi funk going on which really made the wife want to leave rather quickly.

But! Came away with my 250 pts purchase, two steampunk ships that I'd had my eye on for quite a while. I actually hadn't picked them out, just the general line that Spartan Games has for their Dystopian Wars. Picked up a Savannah Sky Fortress (link to painted on here on CMON by AndyT) and a Kagoshima Mobile Airfield (link to a painted version on Spartan's forums). These are massive resin models, each about five inches (~13cm) long at least, and filled with details. Found a few bubbles on one model's details, but in a very repairable area, so nearly flawless casts.

And while finding those links in the previous paragraph, I found their Firestorm Armada line. Spaceships. Must... resist... purchase! The shiny, candy-like, purchase! So much to love in those, and are going onto my future purchases.

Anyway, one of the surprises was the Kagoshima. I didn't actually expect it to be a legged mini! Found that out while doing some unboxing video of it and the Savannah. That's okay, I still think it looks cool, and will be a fine addition to the display cabinet. Link to the videos is at the end, in case you'd like to see exactly what I did.

I also picked up a Reaper Foo Dog. Just realized that it's their P-65 line, which is now not being made. Can still get the figure in their Dark Haven Legends, but pricier. But it's not for me! I swear! My wife wanted to buy it to paint, but didn't think she could do a good job of it, but still wanted the mini. So, into the basket it went as well. She's been interested in trying her hand at painting, but I think the curse words floating up from the basement have deterred her a little. But with both kids enjoying it (son got a hydra to paint yesterday), she's decided to join in. So, while I bought a package of Thanksgiving Mouslings (she liked it because one is holding an acorn) and Familiar Pack V (turtle, raccoon, armadillo, fox, penguin, and skunk), I'm not painting them. Yes, yes, they're in my pile, but they aren't mine! I swear, officer!

Updated the front page to add those three I mentioned, and now the vids:


PegaZus

Stealth Freak
I'm going to break this update into several posts, just for my own sanity. Managed to sneak in 20 minutes on Saturday to paint the blue jeans on the blacksmith. Well, I thought it was just twenty minutes, but it turned out that I was off by an hour when the birthday party started. Oh, well, but did blow my planning painting sessions out of the water on that day. Had to get them made up on Sunday.

Simple process here. Just Sapphire Blue (9016) on the base, then a wash of Pure Black (9037). I'm okay with those results.

Blacksmith_011_zps75e60b73.jpg
Blacksmith_012_zpsa2f62a05.jpg


It's funny, but all the pictures I've been taking lately for him seem to be from the back. Feels like I'm doing the shoot for a girl's skin magazine. Ol' Men Gone Wild!

Eeesh.

+2 pts, 252 Pts total
 

PegaZus

Stealth Freak
Now it's Elliwyn's turn. I've got video of her, but my promises finally caught up to me and had to render a video for my son instead. Might not make it up tonight, but it is on the queue.

Worked over her clothes with Blood Red (9003), then shaded with a 1:1 mix of Muddy Brown (9028) and Blood Red. Rather happy with how that turned out.

Elliwyn_009_zps0c549e16.jpg
Elliwyn_010_zps8fc20836.jpg


Still trying to figure out what I should attempt at for a freehand on the shield. Gee... maybe a Heatherlark? That or maybe a dragon head. Haven't decided and suggestions welcome. I've never tried something free hand, so I may just drop the whole idea for something simple in the interest of time.

+2 pts, 254 Pts total
 

PegaZus

Stealth Freak
And my final update for tonight is on the Tau Defenders. I'm not obligating myself at taking pictures at every stage, but since I was doing the blacksmith and Elliwyn, I figured I might as well. Felt nice to get out the restricted pallet that I have been using.

Started out with a base of Desert Khaki (9155), which was really thin straight from the bottle. Not sure if sometime in the past I've "rehabilitated" it or not, but it took three coats before it got to what I'd consider a base. But that gave me time to look at the ships closer (another plus of not videoing these as I don't have to work over and around a camera!) and I've started to pick out details for engines, panels, sensors, and other future glowy bits.

TauDef_002_zps15c528fe.jpg


Once the base was set up and dry, I was doing the black wash on the blacksmith with plenty of left overs, so washed the ships in Pure Black (9037) as well. Really happy with how those turned out.

TauDef_003_zps07211396.jpg


Now, I've only painted the undersides of these so far. I haven't come up with a good solution that would allow me to paint both top and bottom of these at the same time. My plan is to paint the undersides completely, with all the shading and panels and glowy bits and any other glorious detail I can come up with. Then, hit 'em with the gloss protective coat. At that point, I can flip them over and do the top sides. Not entirely sure that this is a good idea, but it's the best I've managed to come up with.

So, here's to a spot of painting I managed, and here's to the oldest child managing to start painting with minimal assistance! He's painting a Reaper hydra, and only needed a bit of help getting the paints rehabbed (I'm letting him use the old Reaper pot paints unfettered by my hovering).

+2 pts, 256 pts total
 

PegaZus

Stealth Freak
Really feel guilty about not doing house stuff and painting (and playing games) instead, but I cannot think of what I need to do. Good problem to have, I suppose.

Painted a bit on Elliwyn and forgot to take pictures at each stage. So, what you see here is the boots, gloves, backpack and straps painted with Tanned Leather (9031), and the start of the horn with Pure Black (9037) and Yellowed Bone (9143).

Elliwyn_011_zps2e2cf5e7.jpg
Elliwyn_012_zpsf4e6d472.jpg
Elliwyn_013_zps77617b25.jpg


Also, I took the Tanned Leather and Yellowed Bone to the Tau Defenders, but just the picture of the one. It was paint that was extra and would just dry out on the pallet, so... now the Tau have fancier ships. Figure this is a good way to do them and not have to think about it too much. Sadly, didn't find any parts of the blacksmith that could do the same... until just as I wrote this and realized the hammer could be leather wrapped AND he's wearing boots. *sigh*

TauDef_004_zpscad2ec3d.jpg


Video is recorded, but have to edit out me dropping the camera, so not yet on that. I'm just thankful that I didn't record the part where whiskey went down the wrong pipe. And I thought it burned going down the right pipe.

+4 pts, 260 pts total
 
Last edited:

PegaZus

Stealth Freak
Posted the video, then promptly forgot to actually tell anybody. My mind hasn't been fully engaged for a bit now.


KruleBear

Active member
Still not sure what I think about the Elliwyn sculpt...having problems liking it. Good paint job though and the ship is looking good.
 

PegaZus

Stealth Freak
I managed to finish up Elliwyn this morning, and while I haven't the photos yet, I do have the video up. Very nearly finished with another mini!


PegaZus

Stealth Freak
And so I'm back. Remiss a lot. Took these blacksmith pictures two weeks ago, and am just now getting them posted. I've even refilled my wash cups twice in anticipation of being able to paint, but haven't managed to get to it because of real life getting in the way. I thought finding time to paint was bad when the kids were little! Sheesh! I had no idea how much more busy I'd be when they got older. Every. Single. Day. This week. *sigh* Life of a parent I suppose.

First up, got Tanned Leather (9031) onto the boots of the blacksmith. Then, I really didn't like how the apron and the anvil merged into each other, so went over the apron with Yellowed Bone (9143) to get it contrasted.

Blacksmith_013_zpsbb307a7f.jpg
Blacksmith_014_zpsd403cab7.jpg


Then went on to the stump with Muddy Brown (9028) and then dry brushed Yellowed Bone (9143) over that. Didn't like how stark that was, so went back over with a wash of Muddy Brown (9028).

Blacksmith_015_zps42f0892e.jpg
Blacksmith_016_zpsd2cd7915.jpg


Just noticed going over my notes that I forgot to paint the handle of the hammer with the same Muddy Brown. Oh well. I did post up an Epilogue video on Elliwyn. Poor Elliwyn. She's officially my lowest scoring mini. Ever. Even the ones I painted when I was first starting out scored better than her! That took a blow to the ol' confidence and enthusiasm. Still, Krulebear's observation that she's not that great a sculpt is a potential cause, in addition to the limited pallet, aiming for beginners, not being a GW mini, etc. So I'll put on my Underwear of Asbestos (+1 resistance to fire; +1 AC via Thicker Skin) and continue on.

Little bit of a "woe is me" here, so you can skip it. This weekend was the son's first Boy Scout camping trip without parents. Daughter is off to a sleep over at a friends house. So what happens to my perfect painting opportunity? I got sick. Oh, I'm so spitting mad at viruses right now. Add on to that allergy season and I'm surprised my head hasn't exploded from the pressure. I guess some days the universe is just against ya.

+4 pts, 274 points total
 

PegaZus

Stealth Freak
It appears that while hopped up on NyQuil, I can still manage a paint brush. Can't manage a pen ("perle" does not come close to "purple") which is why I managed to paint a bit.

Got his hair base done in a mix of Pure White (9039) and Pure Black (9037). Took the same color and edged the anvil, hammer head, and pliers. Then dry brushed the hair with Pure White, adding a Muddy Brown (9028) wash to the boots, Pure Black to the heels and stitches on the pocket. Tanned Leather (9031) onto the bracer, follow with a Pure Black wash. Add a bit of Yellowed Bone (9143) to the top of the stump, where the "core" would be to contrast it a bit.

Blacksmith_017_zps5bd79dff.jpg
Blacksmith_018_zps49e143b6.jpg


+2 pts, 276 pts total
 

PegaZus

Stealth Freak
Blah, blah, blah, real life, blah, no time, blah blah. You've heard it before, I shan't rehash it.

But I wanted to share yesterday's delivery. The whole GW killing off Battlefleet Gothic spooked me, so I purchased an unrelated space ship. I made Moebius Model's Battlestar Galactica before this thread started, and loved it. It's a huge model, about 13" long (33cm for those of you able to use metric). It's a big model, and sits above my desk with pride. But they make another Battlestar, too. Take a look at this beast!

4cea5589-1cd5-4259-866b-65df145835ea_zps1b1ce618.jpg


That's the Battlestar Pegasus. Well, with a name like that, I had to get it, of course. And from reading the online wikis, I understood that it was a bigger ship. But I didn't realize that it was THAT much bigger. This is huge! And that's without the engines sticking out the back. My my my. I'm going to enjoy this.

Guess I should update on other projects. Finished the Tau Defender spaceships. Into the display cabinet they went, sans pictures. Didn't realize I've got a box of Star Trek minis sitting around too until I started reviewing this thread. The blacksmith has been mounted to a base, but haven't taken a WIP shot of that yet. And started a new one, converting a Reaper beggar into a seer. That's in a video, but haven't taken pictures of it. It's been hanging out doing nothing as well.

I'd say I'll be painting things again soon, but that's a huge lie. Starting this Thursday, I may be working 12 hour days, seven days a week, which is going to be a huge amount of no-fun. I'll be getting paid for the OT, which is nice, but I'd hoped that I'd be able to have some down time in the coming month. Been so busy and creative lately at work that I haven't felt the urge to be creative at home. Just veggin'. And if I'm going to be putting in 84 hour weeks, I serious doubt I'll be doing anything other than eating and sleeping at home.
 

moetle

New member
You have as many projects going on as i do. Love this thread, never stop it. How easy was the BSG ship to construct? I am highly considering getting that and the viper, as I am a huge fan myself. My best friend is a huge fan also and this may be just the way to break him back into the hobby :)

Moe
 

PegaZus

Stealth Freak
It went together very easily, and didn't really have to fill any gaps that I recall. I was a bit disappointed with the launch bays' inset areas on the main body as there is no texture there. I seem to recall having a little difficulty with putting the major subassemblies together (head, body, engines) which took a little pressure to keep together. But those did occur at major natural breaks in the model, so don't look bad at all.

The biggest screw up was on my part, putting the decals for the launch bays in the wrong spot. Got them off center from the openings, so they look wrong.

Also, I skipped the red marking decals. I just painted them on instead on the belief that they would look better that way.
 
Back To Top
Top