Sigvald the Magnificent (with added tutorial)

Aliengod3

Active member
Great Work! Quick question...

On the shield how did you create the two side light points without making them look real harsh? They look very smooth and I have never been able to make light points look soft.

EDIT: Nevermind my queston. I see it was already explained in an earlier post.
 

Micha

Member
From now on you definately should be called Latham the magnificent, for who else but slaanesh could have granted a mortal man with such cosmic painting skill. The figure looks so unbelieveably glamorous and perfect, but when you see the face you realize sigvald is evil incarnate. With this figure you have once again proved you´re not merely human. If I said I admire than it would be an understatement. I bow before you - you´re the best.

Your devoted fan
Micha
 

Malchiar

New member
as awesome as this looks, to me (only on the chest and shoulders) the armour doesn\'t quite look like gold, the highlights at the bottoms of the plates seem a little inexplicable, I just cant understand where the light is coming from (unless it is that you\'r chnging the shape of the armour plates through trompe l\'oeil)
the blink points dont make much sense to me either.

nevertheless, Sigvald is meant to be rediculously shiny and so I think this is a very good illustration of that! I just prefer Mattsterbens sigvald for the more realistic nmm.
 

fat lad

New member
That is so luscious, it makes me want to stamp on mine because its nowhere near as good.

And on that note, please can we have a tutorial.

-T-
 

razza

New member
Hi all! just back from gamesday france, thanks for all the comments, i will post a tutorial for you asap.
thanks again, Daz

i have also uploaded another pic of sigvald with more views taken with my own camera. here is the vote link-

vote link
 

Wiltrichs

Member
Another one for my favourites list, me thinks!! :)

The shield is amazing, your showing us all up...... again!

Can\'t wait for the tutorial :)
 

squidders

New member
There is something about the sculpting on the face I don\'t like but the painting is some of the best I have seen.

Really really really stunning work!
 

nick232

New member
Originally posted by squidders
There is something about the sculpting on the face I don\'t like but the painting is some of the best I have seen.

Really really really stunning work!

will we see him at next salute??
 

squidders

New member
unfortunately not mate... Razza is already furiously working away on 2 minis for me and while this mini is breathtakingly well painted the sculpt isn\'t doing it for me.
 

razza

New member
Hi all, here is the tutorial I promised for sigvalds gold nmm armour-

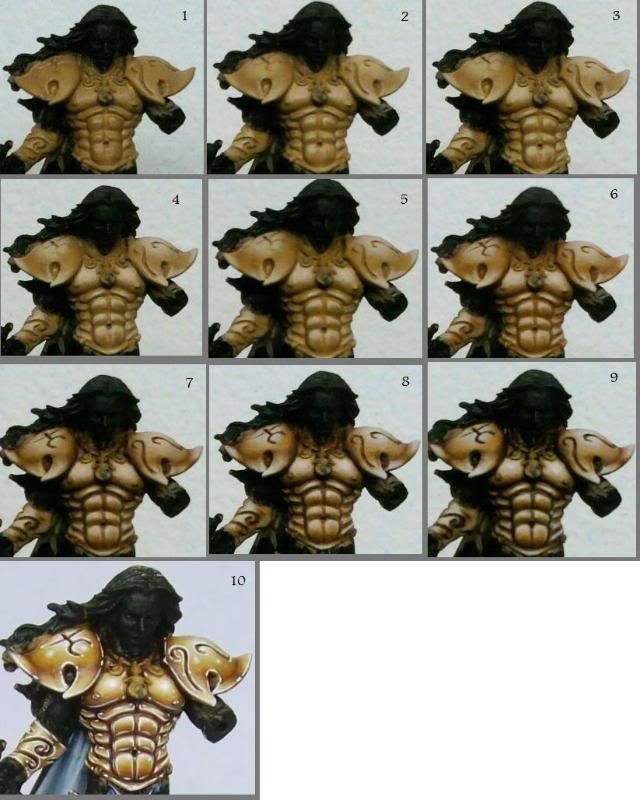
1. I started with a basecoat of calthan brown + snakebite leather + foundry canvas mix. I used calthan brown to give a quick even basecoat cutting down on the paint layers and keeping it smooth. The foundry canvas was added to give the colour a yellow tint.
2. I then added more canvas to the above mix for the highlights. At this stage I started thinking about how the light was going to work on the armour and placed my highlights loosely based on that.
3. Bleached bone was then added to this mix, once again thinking about how the light was going to react on the armour.
4. Even more bleached bone was added to the mix for further highlights.
5. I then started shading the armour with a mix of snakebite leather and terracotta. This mix was kept very thin.
6. I then used pure terracotta to shade the armour. I was aware of the nmm needing contrast so I placed the shading on the surface areas also.
7. Terracotta + black mix was then used to give more contast.
8. The armour was then highlighted with bleached bone.
9. I then shaded the armour with a mix of chaos black and badab black.
Before the final stage I washed a mix of yellow ink and glaze medium over the armour. I then added a little red into this glaze and placed it in the deeper areas on the armour. Some purple ink was also added into the darkest areas. The glaze pulls all the highlight and shade stages together and strengthens the colours.
10. As you can see from the pictures the final stage of nmm is the most important, adding the white highlight gives the illusion of a reflective surface. The white also pushes the contrast in the nmm which is very important, painting metal effect needs contrast and a range from black to white helps the finish. The hot spots don’t always work in nmm but with this example I think it does as sigvald is going to keep his armour nice and clean the hot spots help that effect.
Sorry for the crappy pics (I did them on my quality phone) but I hope you can see the general idea of what I was doing.
Cheers all, I will be happy to answer any more questions.
Daz


tutorialcomp.jpg
 

PhoenixFire

New member
Mind Blowing!

This is one of my fave GW sculpts and you have absolutely nailed this one, I thought Joe\'s was fab, but this... this is in a class of its own. Beautiful!

Thank you so much for taking the time to post the tutorial and for all the advice and questions that you answer here and other forums.

Damn I wish I had the money to commission some work from you!

Sam
 

nightsword

New member
*Throws paintbrush out of the window*

Within two days I receive the latest White Dwarf with Joe\'s mind blowing Games day Chaos Lord and Anja\'s superb collection (her boyfriend is a lucky guy) in it, and now this! Absolutely unique, is there anything you \'eavy metal people can\'t do? Thank you for taking the time to produce that guide, it\'s hugely appreciated :)

That\'s it, I\'m phoning GW HR on monday and seeing how my application is going...
 
Back To Top
Top