Steampunk Figure Paint-Along

Bailey03

Well-known member
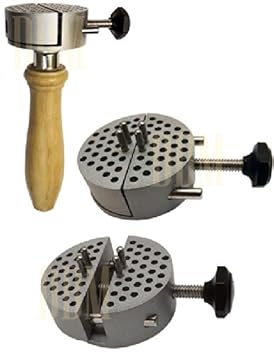
You got all the main stuff. I don't always go that far with the sanding and polishing, though I should. The only other thing to bring up is how to you plan to secure the figure during painting? Corks and pin vises work well for 28-32mm figures, but at 75mm you want something a little more secure. MAXXxxx, I know you've done some large scale stuff, so this is more for people trying big figures for the first time. For my 54mm and 75mm figures I used a jeweler's universal vise. You can find them on Amazon for around $12-15. I insert pins into the figure's feet (which will later go in the base) and clamp the vise onto the pins. You can create your own if you prefer, two blocks of wood and some nuts and bolts will do it.
419nsJpE6WL._SY355_.jpg


Thanks for the tip on the wing and hair. I see there's some flexibility in how you position the arm, so good to know that I'll have to test fit the bird and wings before I glue on the arm.
 

moetle

New member
I always wondered what that was...

I use Greening pins and a wooden stick:


They can hold a lot of weight in metal or resin.
 

oistene

Active member
I got one of those Bailey recommended, it's great! Also neat to hold stuff when pinning etc. And I think I paid less than that for it on eBay.
 

MAXXxxx

Well-known member
ok I have the main stuff, but do I miss some small thing that could improve the process ?
I do the 800 grit because I find the 400 too coarse and the steel wool as I feel it helps making the metal smoother, if not for that I'd leave those 2 out. As a matter of fact for resin I mostly do.
how to secure: well usual bluetac under the base gets a pretty good hold, and if I do the hair last, then I can hold her there too. The eagle I could hold in the pin-vice. To be honest I painted the others similarly (or without base, pinvice holding the pin in the feet, but there the pins I use are usually 1.5+mm brass rods, the thickest that'd fit)


well because of the organic shapes I glued the bird together with the left arm, so I have a pin there. It could be done, that the arm is glued to the body and the bird is assembled after painting, but it didn't feel right for me.
But I really think that position was intentional. Right now even without glue it's surprisingly stable just with the pin + wing resting on head. It also means you may not have that much poseability.
 

oistene

Active member
I know that some people water out Milliput and apply that to smoothen the mini, but I've never tried that myself (I fear that the risk of ruining the detail is greater than the odds of improving my less-than-perfect blends).
 

Bailey03

Well-known member
When I'm painting heavier figures (most 75mm and 90mm), I'll paint (more or less) from the top down. I still hold the handle of the vise, but I can put a finger or two on the figure right below what I'm painting to help give me some extra stability. But doing the hair last would give you basically the same result.

For assembly, I see a couple options. I'm tempted to leave off the bird's right wing and then assemble everything else. The birds body needs to get on the arm so I can smooth out that attachment before priming and painting. But I think I can attach the wing later without any seam issues. Alternatively, I could do what you did and assemble the bird and arm, but leave that separate. Once I get the body and head put together, I'll be in a better position to see if my initial idea would work or not. If your attaching the arm without that wing on, there's some flexibility in how you attach it. With the wing on, it sounds like there's only one way it will fit. So if I don't have the wing on, I will need to be very careful or else I may not be able to fit the wing on later.
 
I am in, but painting Launcelot from Twisted, a Steampunk Oliver Twist style game. Or I may paint the half man, half motorcycle guy, Dodger. These are tiny in scale compared to Jessica, but creatively genius in design. Sculpted by Seb Archer (Automaton).
 

Sionid

New member
Pulling this thing up with an unnecessary post, haha!


(Kinda looks like she's eating a drumstick, no?)

Cleaning up the bird is just. It's not great. One leg broke, which is not a real problem, but the tailfeathers on mine are really wonky, with weird horizontal scoring that hopefully won't show up once primed. If they do, I have a lot of sanding ahead of me. Jessica herself is coming together pretty easily, though.
 

MAXXxxx

Well-known member
but the tailfeathers on mine are really wonky, with weird horizontal scoring that hopefully won't show up once primed. If they do, I have a lot of sanding ahead of me.
abandon all hope. I know I practiced a lot of swearing while cleaning up that part.

also I hope you did dry fit the eagle before glueing the left hand to the body :)
 

Sionid

New member
abandon all hope. I know I practiced a lot of swearing while cleaning up that part.

Daaaammiiiit.

also I hope you did dry fit the eagle before glueing the left hand to the body :)

Naw. Assemble with blind faith or not at all! (The wing gets pretty close to the back of her head, but yeah. It works.)

Looks like she would benefit from a sanding on all surfaces with some 600 grit. Til she shines everywhere. Will make the paint go on much smoother.

Good idea. I don't usually do this with metal minis unless the surface is visibly bad, it'll be nice to see the difference it makes.
 
Hi, so do you use a tool like a dremel and attachment to work on this or would it be more careful hand work?

thanks

Take a look at this famous article for a word on preparing metal minis. Also a good pic of what a metal figure out if the blister looks like next to a fully sanded and prepared mini. The prep stuff is at the beginning of the article:

http://www.coolminiornot.com/articles/1649-metallics

In a nutshell, start with files on the places you can reach. Then use sandpaper attached to toothpicks or pieces of plasticard for the hard to reach areas. Then finally use Dremel type attachments to go over the whole surface. However, I reccomended 600 grit sandpaper on the mini Sionid is using because their is a lot of skin, and you don't want to rough that up too much. When sanding or filing metal armor surfaces, I am much more reckless because if you scratch or gnarl up the surface it's not too bad because armor takes a beating. But I never like to do this to skin textures.

Basically if a metal mini has a sort of white dusty look, it needs to be sanded or filed or even wire-brushed until it is shiney. If it is not shiney, paint may be repelled from the surface. Ever paint a surface and it seems like the paint gathers everywhere but where you want it to? Failing to prep the mini properly can lead to this. And IMO metal minis aren't the worst at this. They're actually the best because they can be smoothed out to a level that you often can't smooth out resin or plastic (tho these two start off better than metal). So, when we are willing to apply hundreds of micro layers in order to have smooth painting, why not take an extra hour or two on prep? I've learned that good painting is all about pushing paint around a surface until it spreads as evenly as possible. May sound simple but it's not when you're dealing with diluted acrylic. I'll do anything I can to make this easier.
 

Sionid

New member
You are a patient dude, BFoK. I once had a handy buffing dremel attachment, but I killed it :( still finding bits in the carpet...


Trying to apply a little of what I learned at the whirlwind greenstuff class at Adepticon. Sanding required, but I'm actually all right with the result. More planned.


Scherdy

New member
That looks great! I was just looking through the handouts from that class Sionid and sculpted a chain for practice with some of the extra putty I had from filling gaps.
 

DMcc

New member
Thanks for the information, ill see what I can do.

Take a look at this famous article for a word on preparing metal minis. Also a good pic of what a metal figure out if the blister looks like next to a fully sanded and prepared mini. The prep stuff is at the beginning of the article:

http://www.coolminiornot.com/articles/1649-metallics

In a nutshell, start with files on the places you can reach. Then use sandpaper attached to toothpicks or pieces of plasticard for the hard to reach areas. Then finally use Dremel type attachments to go over the whole surface. However, I reccomended 600 grit sandpaper on the mini Sionid is using because their is a lot of skin, and you don't want to rough that up too much. When sanding or filing metal armor surfaces, I am much more reckless because if you scratch or gnarl up the surface it's not too bad because armor takes a beating. But I never like to do this to skin textures.

Basically if a metal mini has a sort of white dusty look, it needs to be sanded or filed or even wire-brushed until it is shiney. If it is not shiney, paint may be repelled from the surface. Ever paint a surface and it seems like the paint gathers everywhere but where you want it to? Failing to prep the mini properly can lead to this. And IMO metal minis aren't the worst at this. They're actually the best because they can be smoothed out to a level that you often can't smooth out resin or plastic (tho these two start off better than metal). So, when we are willing to apply hundreds of micro layers in order to have smooth painting, why not take an extra hour or two on prep? I've learned that good painting is all about pushing paint around a surface until it spreads as evenly as possible. May sound simple but it's not when you're dealing with diluted acrylic. I'll do anything I can to make this easier.
 
Wow Si, the GS skirt looks incredible. I'd say your class paid off quite well. The wrinkles look good and should paint very well. That's the awesome thing about sculpting: you sculpt textures or surfaces that look great when given a gradient. Like when you see a part of a mini and you're like "Oooh, I know just how to paint that," except in reverse order.

If if you mean you need to sand the GS, sadly it doesn't take to sanding very well. For this reason I frequently mix Milliput in with my greenstuff, 50/50. This allows it to be sanded. But maybe you weren't referring to this...

Anyway, cheers! Way to make this mini your own with a solid conversion...
 
Back To Top
Top