You are using an out of date browser. It may not display this or other websites correctly.
You should upgrade or use an alternative browser.
You should upgrade or use an alternative browser.
Sukigod's All-In-One Painting Log
- Thread starter Sukigod
- Start date
Sukigod
Member
Thanks Tee!
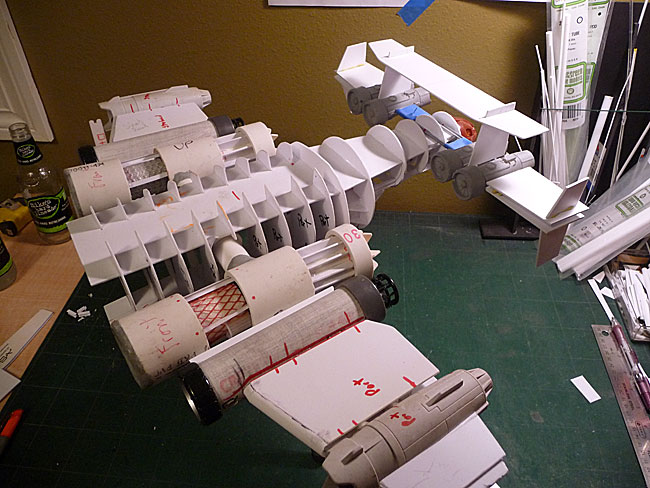
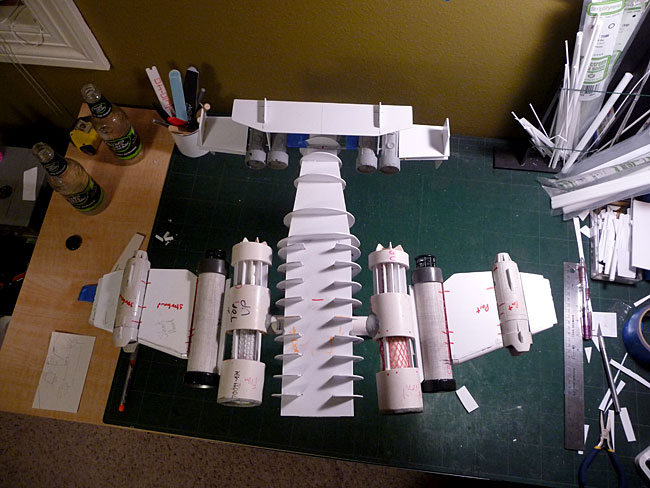
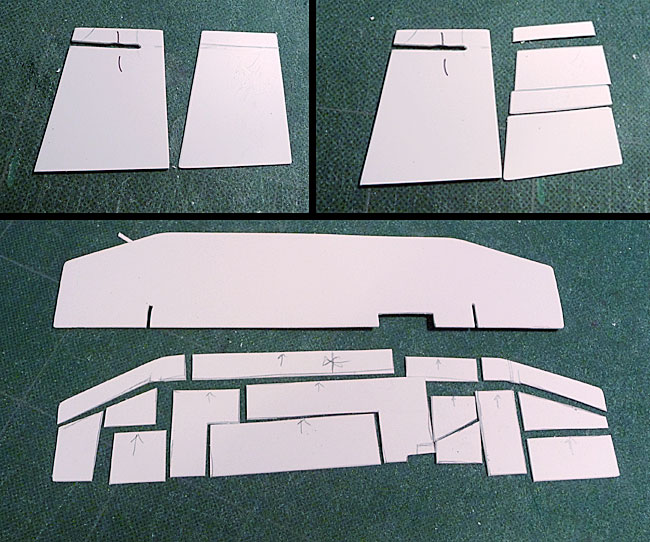
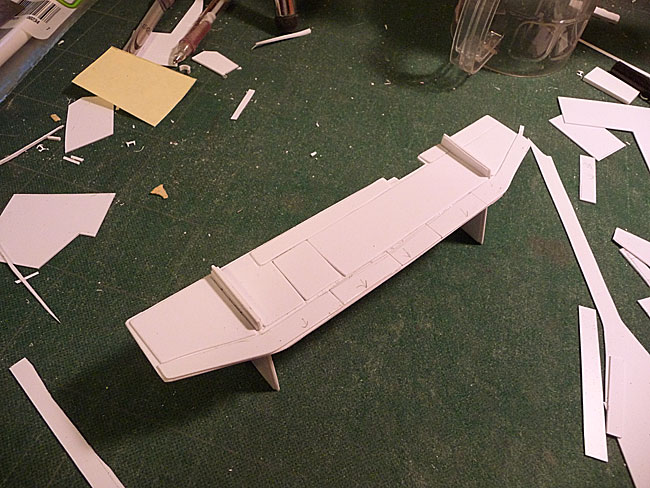
Got some time tonight to work on the blasta bommer. I knocked out the base shapes for the tail - this should clear up a couple of questions floating around. Badfangs suggestion about raising the tail engines up so they're not directly in line with the front engines was a good one. I accomplished it in a slightly different manner though.
The lower tail tips are only poster tacked in place as I don't have enough of the right size channel to assemble them the way I want to - sandwich technique much like the front wings. This shows the general shape and position of everything now.
I'm on vacation now for a week so there will be no more progress for the next 8 days as I'll be kicking it lakeside with beer, books and food. Once I get the framework on the tail done I'll start paneling the beast, then the detail work beginning with the Deff Arsenal in the nose. That's gonna be a lot of fun.
Enough of my rambling, here's the pics.

Later!
Got some time tonight to work on the blasta bommer. I knocked out the base shapes for the tail - this should clear up a couple of questions floating around. Badfangs suggestion about raising the tail engines up so they're not directly in line with the front engines was a good one. I accomplished it in a slightly different manner though.
The lower tail tips are only poster tacked in place as I don't have enough of the right size channel to assemble them the way I want to - sandwich technique much like the front wings. This shows the general shape and position of everything now.
I'm on vacation now for a week so there will be no more progress for the next 8 days as I'll be kicking it lakeside with beer, books and food. Once I get the framework on the tail done I'll start paneling the beast, then the detail work beginning with the Deff Arsenal in the nose. That's gonna be a lot of fun.
Enough of my rambling, here's the pics.
Later!
Meph
Cat-herder Extraordinaire
Cool, looks good man.
In case you want some inspiration for the nose section. ^^
http://i.telegraph.co.uk/multimedia/archive/01251/Short_Stirling_I_1251094c.jpg
http://www.kczum.ch/aviation/images/he111-bomber-2_500.jpg
http://www.aviafilms.com/photos/an22.JPG
http://www.testpilot.ru/russia/antonov/22/img/an22_13.jpg
http://www.aviapress.com/engl/amo/amo72003_3.jpg
Here are some particularly orky ones:
http://1000aircraftphotos.com/APS/2005Z.jpg
http://img19.imageshack.us/img19/4935/he274photo.jpg
http://3.bp.blogspot.com/_noZIAAWuz0A/TI5N8J-CO-I/AAAAAAAACFQ/oMXfTBJRwdM/s1600/aero_afonsopena_cab_017_12092010_andrem.jpg
Sukigod
Member
Thanks Meph, I'll come back to these links when I get to the nose!
That also means.... updates!
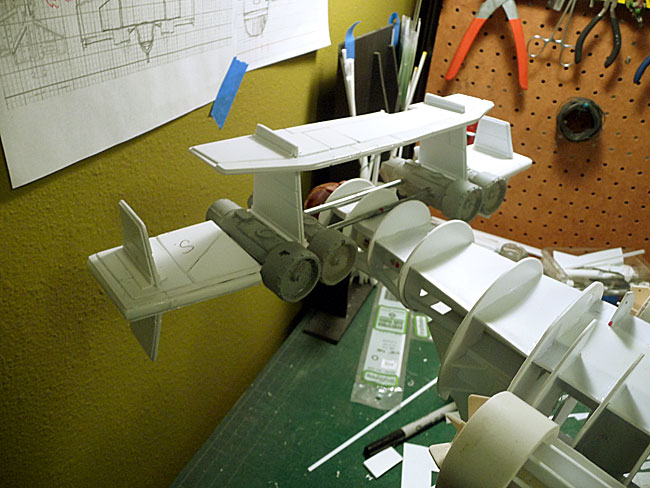
I wanted to get the vertical stabilizers done today and that meant doing some of the detailing/paneling on the rear wing section to accomplish this. Here's how I put it together.
I superglued the engines in place and sanded all the edges on the wing panels. Then I used H-Beams to create the slot the metal bars will slide into for support...
Then I used the same thickness of channel to create a sandwich for support.
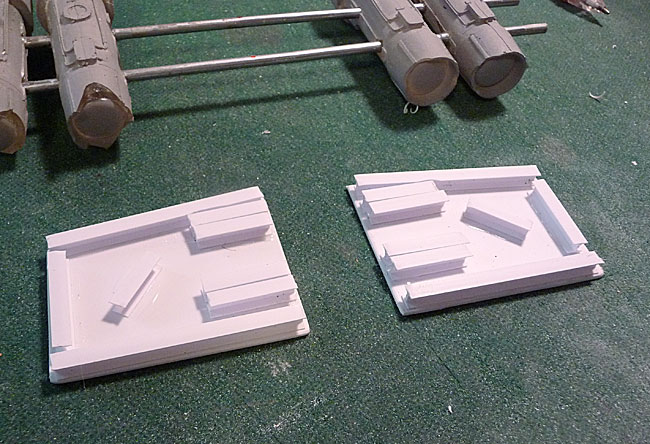
Then I glued the top piece to the wing and used tubing to create the leading edge like I did on the forward wings. I then cut panels into smaller pieces adn glued them to the vertical stabilizer wings, then glued them in place using angle iron.
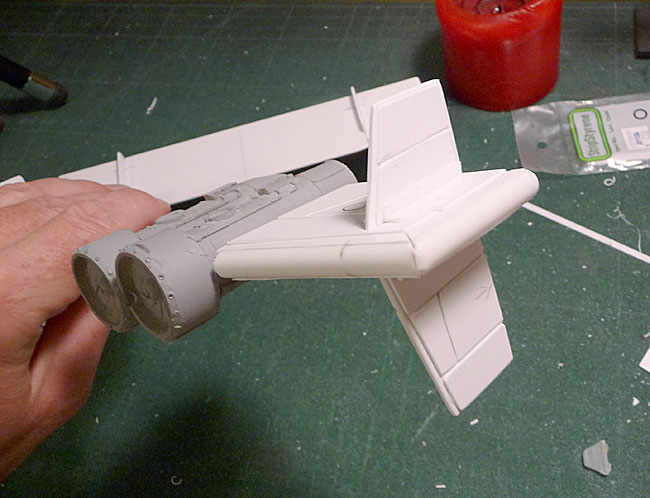
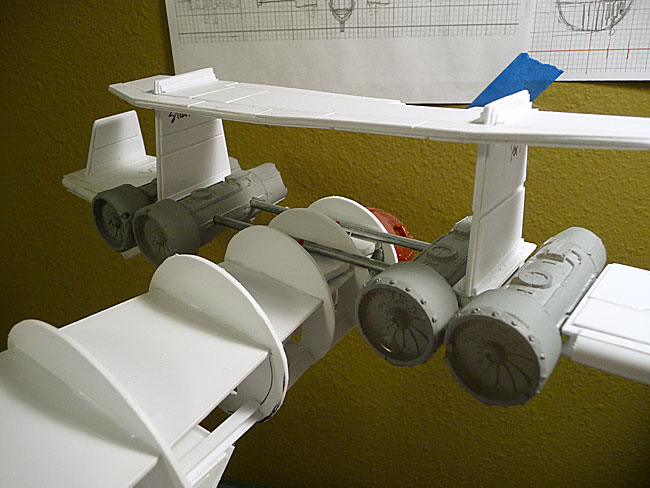
Then I used two-part epoxy to glue the wing tips onto the metal bars. And a shot of the wing placed on the frame.
I still need to shore up the space between the engines and do a similar plating to the upper wing section. Once that's glued into place I can move on to the wheels. After that, deff arsenal! Whooo hooo!
Later
That also means.... updates!
I wanted to get the vertical stabilizers done today and that meant doing some of the detailing/paneling on the rear wing section to accomplish this. Here's how I put it together.
I superglued the engines in place and sanded all the edges on the wing panels. Then I used H-Beams to create the slot the metal bars will slide into for support...
Then I used the same thickness of channel to create a sandwich for support.
Then I glued the top piece to the wing and used tubing to create the leading edge like I did on the forward wings. I then cut panels into smaller pieces adn glued them to the vertical stabilizer wings, then glued them in place using angle iron.
Then I used two-part epoxy to glue the wing tips onto the metal bars. And a shot of the wing placed on the frame.
I still need to shore up the space between the engines and do a similar plating to the upper wing section. Once that's glued into place I can move on to the wheels. After that, deff arsenal! Whooo hooo!
Later
Sukigod
Member
I'm working my tail off here!
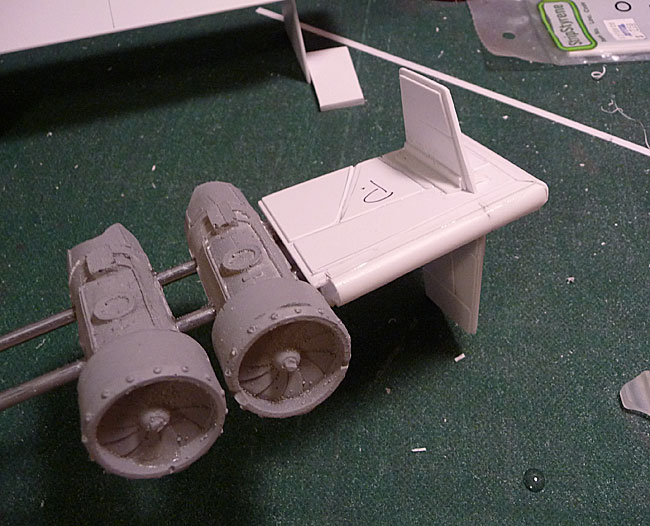
I've now paneled up the entire tail wings. I created smaller plates using the original struts and wing panels as templates. Then I trimmed them a bit smaller and cut them into interesting shapes, sanded them a little and glued them in place. Here's a support and the upper wings underside panels.
The finished upper tail section...
And the upper tail piece glued to the engine supports.
I'm finished with the tail for the moment, I probably won't come back to it until I'm ready to incorporate it into the fuselage.
Up next - tires, then the nose!
Later!
Sukigod
Member
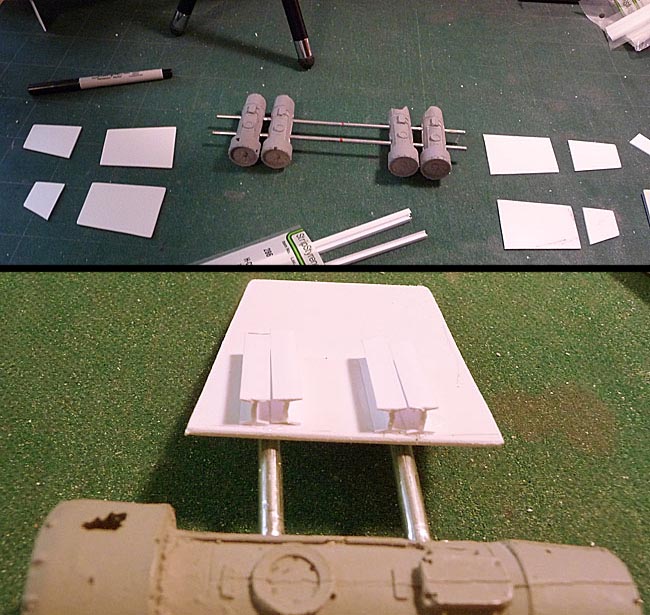
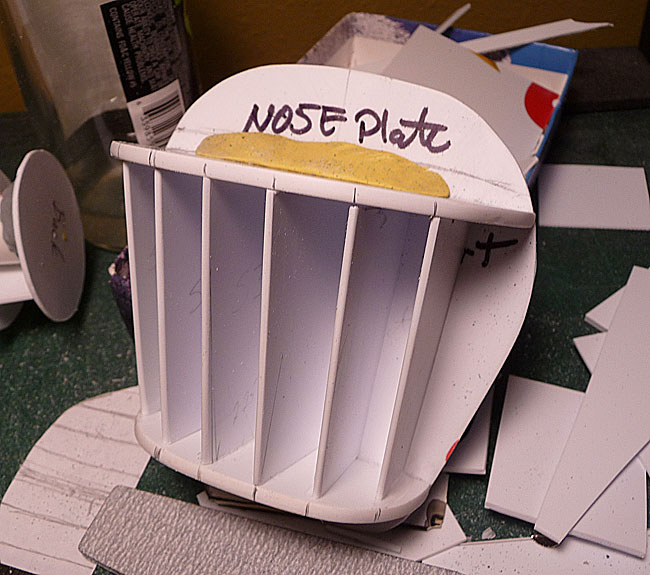
Putzin' around with a few small things over the last few days. Built the front nose intake. The top/bottom plate and vertical posts/vanes are glued together but poster tacked into place to hold them until the glue dries. I did this so I can remove it from the main nose plate and have access to put in all the little rokkit inside, then I'll glue it down.
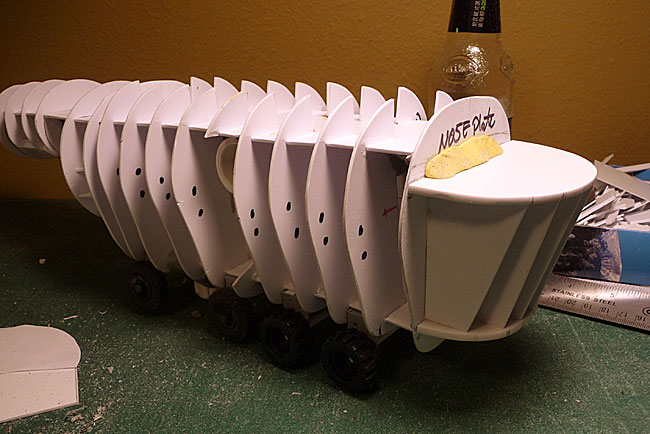
I also figured out how the wheels were going to go. They seem to be balanced enough to stay level and I'm hoping they'll support he final weight, although I'll rarely ever use it without the tripod. I also puttied the front plate onto the fuselage - this is what the front nose plate will be glued to.

Snotling steps!
Later!
I also figured out how the wheels were going to go. They seem to be balanced enough to stay level and I'm hoping they'll support he final weight, although I'll rarely ever use it without the tripod. I also puttied the front plate onto the fuselage - this is what the front nose plate will be glued to.
Snotling steps!
Later!
Sukigod
Member
Thanks Meph! Boy are you going to be upset when I'm on vacation next week and lock up all the grots and snots in the shed so they don't wreck everything without my supervision! ")
I guess the grots were let loose tonight so we got a bunch of little stuff done tonight!
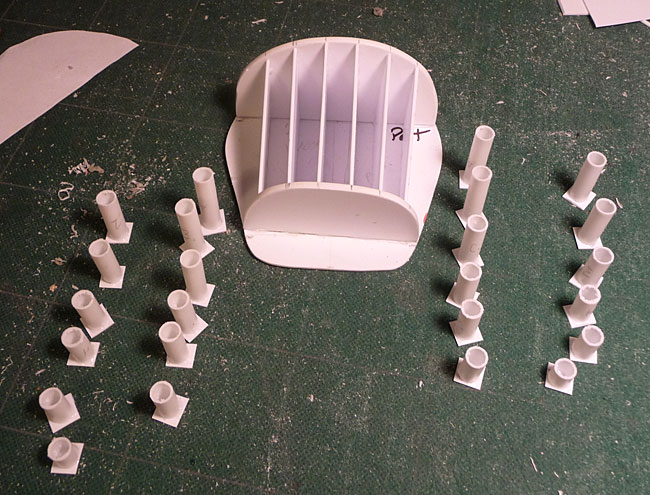
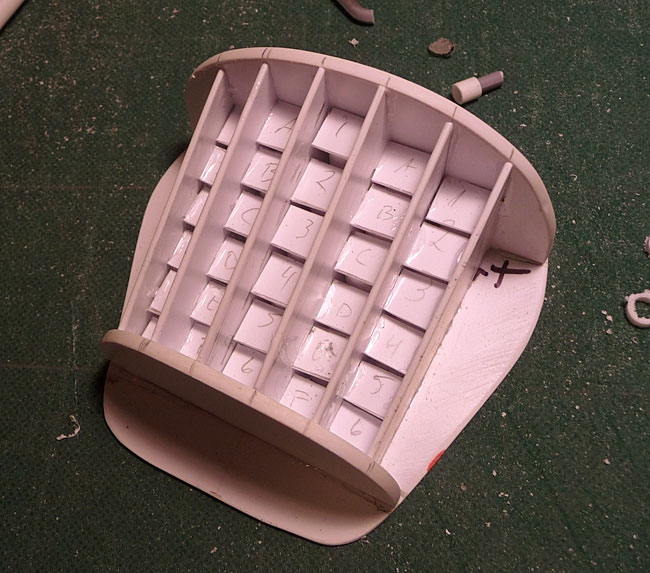
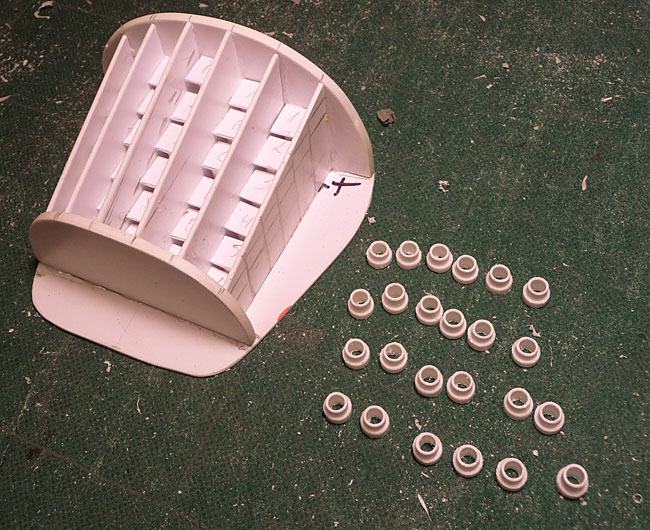
I fumbled around in my head all day during work, trying to figure out how I was going to do the rokkets in the nose. I wanted them to kinda stair step, creating an angle that matched the vertical vanes to compliment the different angles going on in the shape of the nose. It all came down to biting the bullets and making "stairs" upon which the ends of the rokket tubes will project out of.
The outward ends of the tubes were to be the same length for consistency (?) so that meant the supports behind the tube mounts were going to have to change. This first pick shows how I achieved that.

Yes, tonight was about cutting lots and lots of tubing with tons of clean up. My grots fingers will be sore for a day or two after this... (and these aren't the half of it!)
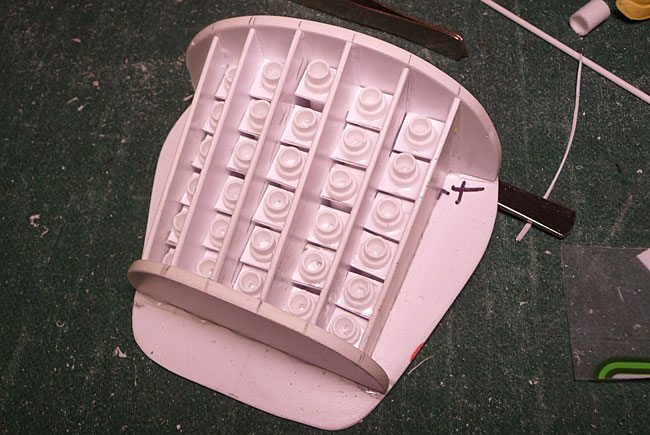
and all of the stair step platforms in place.
Then cutting more tubing to make the rokket tubes and mounting rings...
...and viola! The rokket tubes in the nose are done.
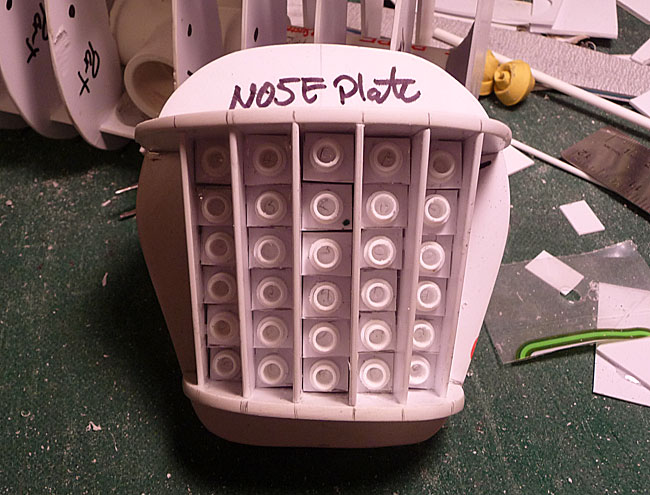
There were a bunch of different things going on in my head while trying to figure out what I wanted it to look like, and of course, this was the most time consuming and fiddly one. Now that it's done I'm glad I went this route. It adds a lot of depth to this part of the model, and besides, it was a lot easier doing the rokkets while the front plate wasn't mounted to the rest of the fuselage.
I still need to put some rokkets in a majority of the tubes and I might finish off the top center rib over the nose (it'll split up the deff arsenal weapons) before gluing the whole shebang to the fuselage.
Whew! Long night of work and off to bed.
Later!
I guess the grots were let loose tonight so we got a bunch of little stuff done tonight!
I fumbled around in my head all day during work, trying to figure out how I was going to do the rokkets in the nose. I wanted them to kinda stair step, creating an angle that matched the vertical vanes to compliment the different angles going on in the shape of the nose. It all came down to biting the bullets and making "stairs" upon which the ends of the rokket tubes will project out of.
The outward ends of the tubes were to be the same length for consistency (?) so that meant the supports behind the tube mounts were going to have to change. This first pick shows how I achieved that.
Yes, tonight was about cutting lots and lots of tubing with tons of clean up. My grots fingers will be sore for a day or two after this... (and these aren't the half of it!)
and all of the stair step platforms in place.
Then cutting more tubing to make the rokket tubes and mounting rings...
...and viola! The rokket tubes in the nose are done.
There were a bunch of different things going on in my head while trying to figure out what I wanted it to look like, and of course, this was the most time consuming and fiddly one. Now that it's done I'm glad I went this route. It adds a lot of depth to this part of the model, and besides, it was a lot easier doing the rokkets while the front plate wasn't mounted to the rest of the fuselage.
I still need to put some rokkets in a majority of the tubes and I might finish off the top center rib over the nose (it'll split up the deff arsenal weapons) before gluing the whole shebang to the fuselage.
Whew! Long night of work and off to bed.
Later!
Sukigod
Member
Tiny update tonight. Model-wise I did the bridge of the nose and glued it to the rest of the fuselage. Dat's about it. I spent the rest of the time celaning up my work area and sorting through bits for details for the wings, cockpit and engines. That means the main body and shape is finished, now the detailing starts. The cockpit will be first, then I'll move to the engines and wings. Just because I'm like that though I have to post some pics.
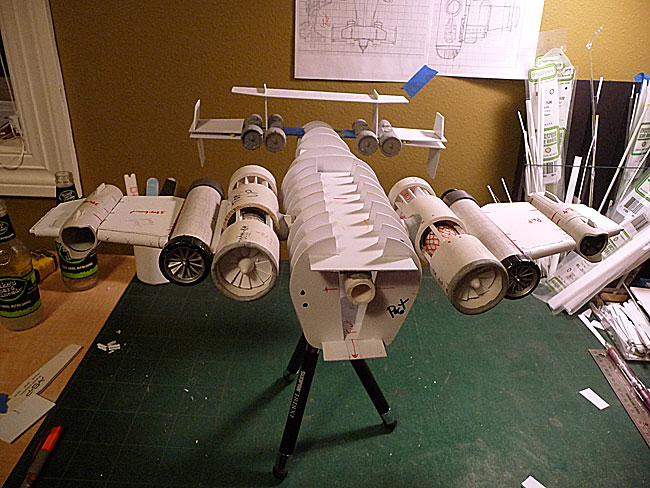
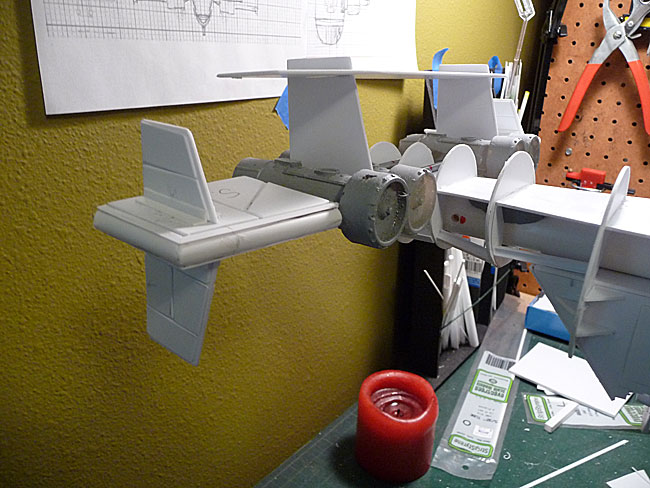
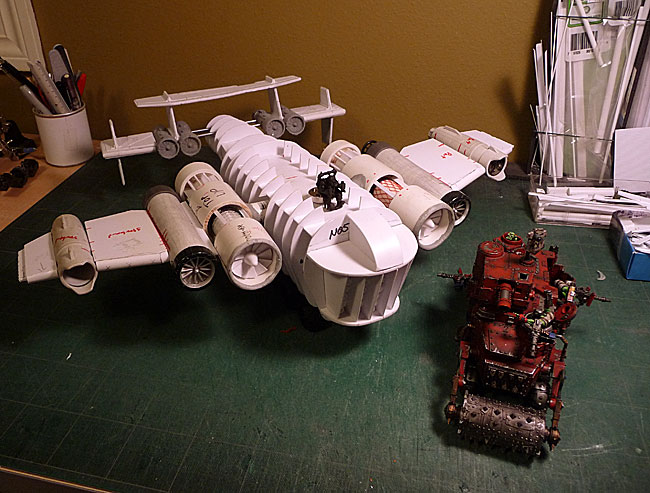
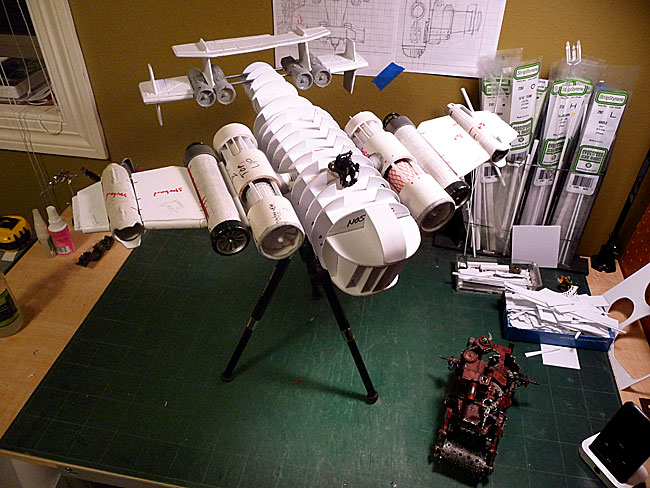
Beauty shots! Here's two of the plane assembled. One on it's wheels and one in flight on the tripod. There's a Barry-wagon in there for scale I'm surprised this thing balances out as well as it is. I was really worried I was going to have spend some considerable time balancing this thing back and forth to get it to sit right. (thank Gork - or Mork - I don't have too!)
I might get a change to start on filling out the cockpit tomorrow night, who knows. I'm leaving Friday for an 8 day anniversary vacation with the missus to Duluth, we love it up there. Lots of used bookstores, plenty of great food and lots of places to drink really, really good beer.
Later!
Beauty shots! Here's two of the plane assembled. One on it's wheels and one in flight on the tripod. There's a Barry-wagon in there for scale
I'm surprised this thing balances out as well as it is. I was really worried I was going to have spend some considerable time balancing this thing back and forth to get it to sit right. (thank Gork - or Mork - I don't have too!)
I might get a change to start on filling out the cockpit tomorrow night, who knows. I'm leaving Friday for an 8 day anniversary vacation with the missus to Duluth, we love it up there. Lots of used bookstores, plenty of great food and lots of places to drink really, really good beer.
Later!
I second that. BEER! GOOD!
Suki, I don't know where you get the ideas for this stuff, but dude! And I mean Dude, serious orkie bro love. Just the fact that you have a battle wagon as a barry.....
Random thought. Ball turrets on the wing tips? Something of a mix of the metal Thunderhawk gun turrets and the troop carrier/fliers in the Clone Wars ball lazer thingies? just a thought.
Have fun in Duluth!
Sukigod
Member
Thanks mud duck. I get my ideas by looting....
I think i understand your concept for the ball turrets at the end of the wings but I don't think it'll work with the current design I've already got going. Would look pretty cool on something though.
And Duluth was a blast. My wife and I go there every year for our anniversary. Not like we got met or married there, just a great place to get away from everyone for a bit.
I'm back from vacation and started it off right by whipping those parts grots inta shape!
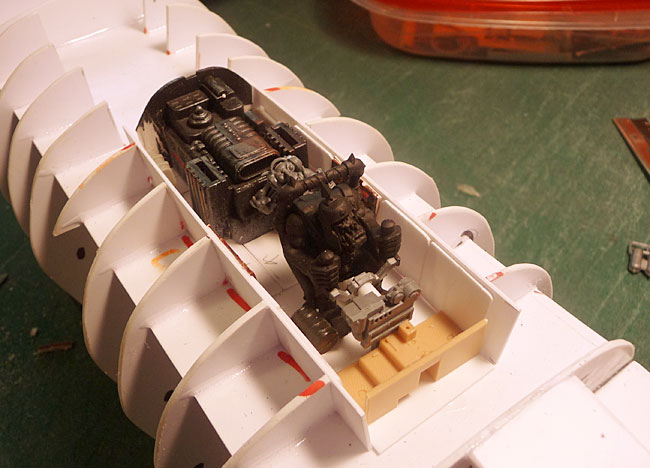
Started work on the cockpit today. Put some gubbins in the back, a pilot, a control yoke and a commo-grot. Various plates, planks and rivets round out the detail.
Here's the parts pulled out so I can prime and paint.
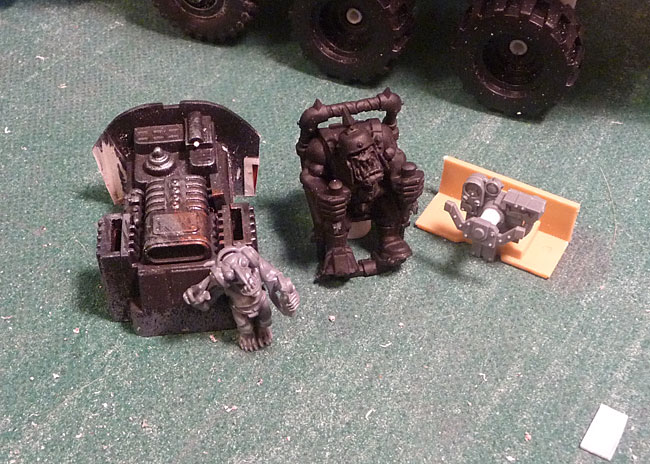
The big radio gubbin' thing is a part from an old space ship model I've had lying around for about 25 years.The pilot, of course, is from the trukk kit and the grot's from the stompa kit.
Here's the detail of the interior plating...
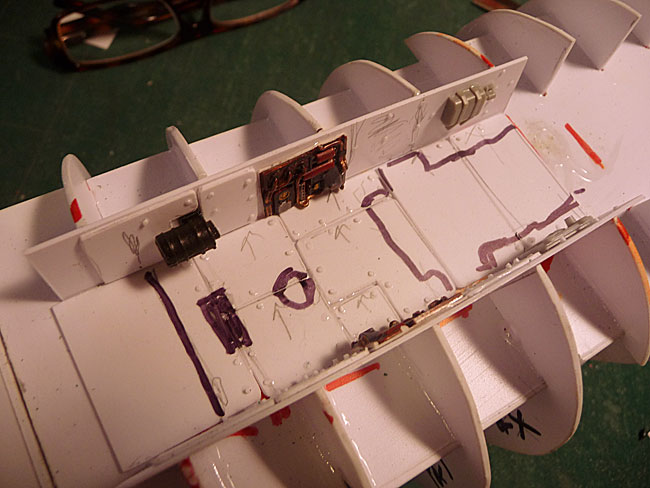
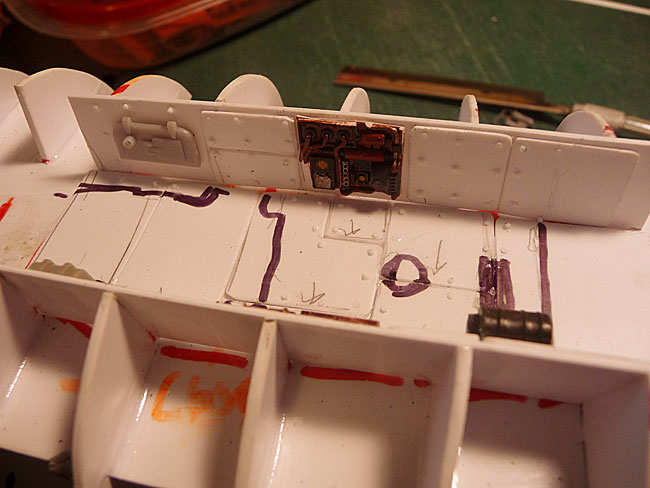
The black marked areas are where the other cockpit parts are going to sit. I marked them out so I didn't rivet any areas I didn't have to.
I'm out of primer so there'll be a little bit of running to do today before I can move on.
Later!
I think i understand your concept for the ball turrets at the end of the wings but I don't think it'll work with the current design I've already got going. Would look pretty cool on something though.
And Duluth was a blast. My wife and I go there every year for our anniversary. Not like we got met or married there, just a great place to get away from everyone for a bit.
I'm back from vacation and started it off right by whipping those parts grots inta shape!
Started work on the cockpit today. Put some gubbins in the back, a pilot, a control yoke and a commo-grot. Various plates, planks and rivets round out the detail.
Here's the parts pulled out so I can prime and paint.
The big radio gubbin' thing is a part from an old space ship model I've had lying around for about 25 years.The pilot, of course, is from the trukk kit and the grot's from the stompa kit.
Here's the detail of the interior plating...
The black marked areas are where the other cockpit parts are going to sit. I marked them out so I didn't rivet any areas I didn't have to.
I'm out of primer so there'll be a little bit of running to do today before I can move on.
Later!
freakinacage
Well-known member
bloody hell, haven't seen this thread for a while. what a beast. great to see how it's shaping up
Sukigod
Member
Thanks everyone! mud duck, see this post for your answer.
Paint!
Spent some time slapping paint inside the cockpit of the blasta bommer tonight. Figure I'm about half finished. I'm not going to rush things and want to make sure I spent enough time to make each part of this thing right.
The pilot and comm-grot is nearly finished and some of the reds have been blocked out and the metal decking the once over.
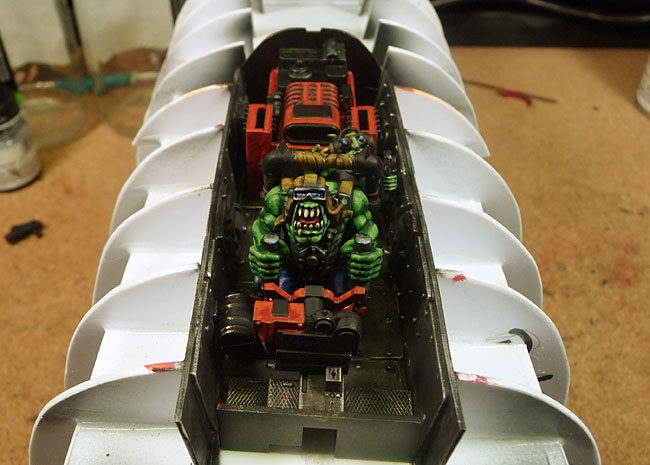
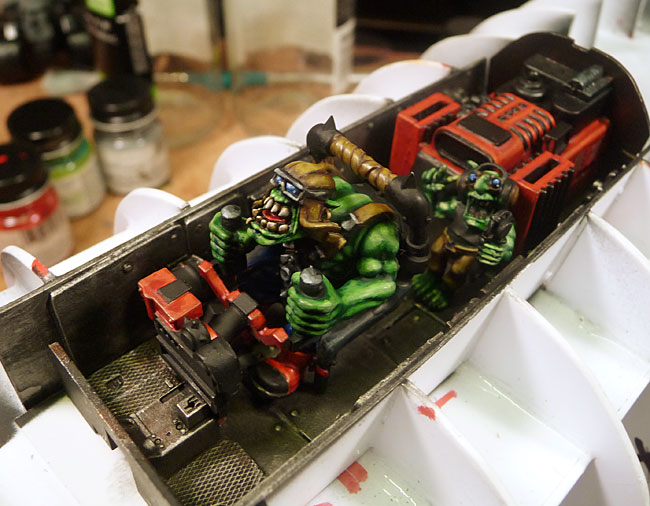
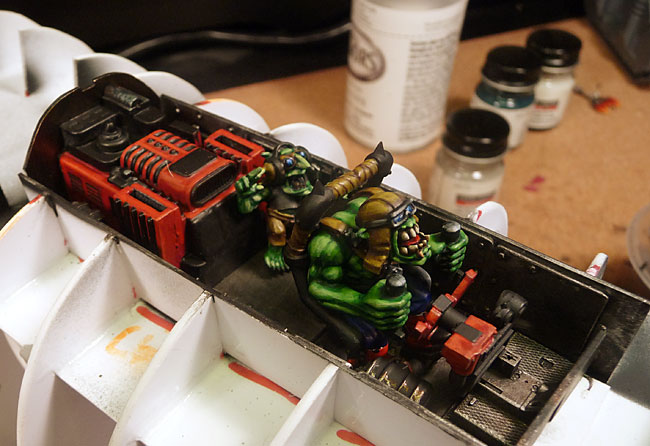
Some people had questions about some of the details - or lack thereof. I won't be making a separate bombadier - he'd be stuck in the belly of the beast. The cockpit canopy will be open so you can see inside, most likely slid back or something. I just want to be careful that it doesn't obscure too much of the interior details toward the back that I'm taking the time to make and paint.
In other news: Some of you know Big Shoota.com as a an out of date place for my ork pics and such. Well, it's been updated recently and is continuing to be updated with new material. It was also originally intended to be a site that would grow into a resource on building and painting miniature models. BigShoota is almost 7 years old now and I'm finally getting around to adding this new section to the web.
The Big Mek Manual is a collection of things I've learned about modeling and miniatures over the last 30+ years. It's going to be the site I wished I could have found in one place when I started really "painting miniatures" way back when. Basically a book about miniature modeling painting for the beginner who can use it to learn the basics and advanced techniques all in one place. It's going to be as comprehensive as I can make it and easy to find the things you want to know - whether you've just picked up your first box of plastics or been painting metal models since there was lead in them.
I know, big ideas, big talk. I've got tons of stuff already written and it's mostly now about getting things organized and formatted for the web (it was originally going to be a PDF book). I've started the process already and welcome you to take a spin around and let me know what you think. I'm going to start with only the basics, and once the basics are finished, I'll add the intermediate techniques. When that's done I'll do advanced stuff and continue to update and add as time goes on.
This has been a pet project of mine for about five years now as a way to give back to everyone who has given me the inspiration to dive into this hobby and give to those who were once in my shoes the guidance they may be looking for.
http://www.bigshoota.com/the-big-mek-manual/
Thanks!
Later!
Paint!
Spent some time slapping paint inside the cockpit of the blasta bommer tonight. Figure I'm about half finished. I'm not going to rush things and want to make sure I spent enough time to make each part of this thing right.
The pilot and comm-grot is nearly finished and some of the reds have been blocked out and the metal decking the once over.
Some people had questions about some of the details - or lack thereof. I won't be making a separate bombadier - he'd be stuck in the belly of the beast. The cockpit canopy will be open so you can see inside, most likely slid back or something. I just want to be careful that it doesn't obscure too much of the interior details toward the back that I'm taking the time to make and paint.
In other news: Some of you know Big Shoota.com as a an out of date place for my ork pics and such. Well, it's been updated recently and is continuing to be updated with new material. It was also originally intended to be a site that would grow into a resource on building and painting miniature models. BigShoota is almost 7 years old now and I'm finally getting around to adding this new section to the web.
The Big Mek Manual is a collection of things I've learned about modeling and miniatures over the last 30+ years. It's going to be the site I wished I could have found in one place when I started really "painting miniatures" way back when. Basically a book about miniature modeling painting for the beginner who can use it to learn the basics and advanced techniques all in one place. It's going to be as comprehensive as I can make it and easy to find the things you want to know - whether you've just picked up your first box of plastics or been painting metal models since there was lead in them.
I know, big ideas, big talk. I've got tons of stuff already written and it's mostly now about getting things organized and formatted for the web (it was originally going to be a PDF book). I've started the process already and welcome you to take a spin around and let me know what you think. I'm going to start with only the basics, and once the basics are finished, I'll add the intermediate techniques. When that's done I'll do advanced stuff and continue to update and add as time goes on.
This has been a pet project of mine for about five years now as a way to give back to everyone who has given me the inspiration to dive into this hobby and give to those who were once in my shoes the guidance they may be looking for.
http://www.bigshoota.com/the-big-mek-manual/
Thanks!
Later!
