the waaagh off Sukigod -vs- Uberdark

Sukigod

Member
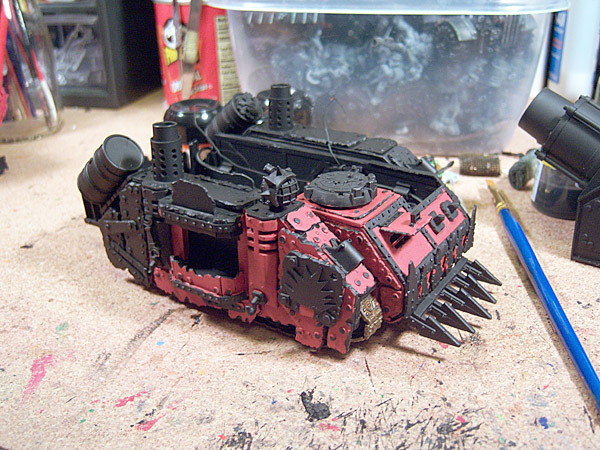
Hey uber, I notice that your images tend to be a put on the \"light\" side, like it\'s washed out. Not to insult your Photoshopping skills (if that\'s what you\'re using) but the darks are too light, they\'re grey instead of black. I did touch up and have it here.... Is this more to real life? (it does look richer here)
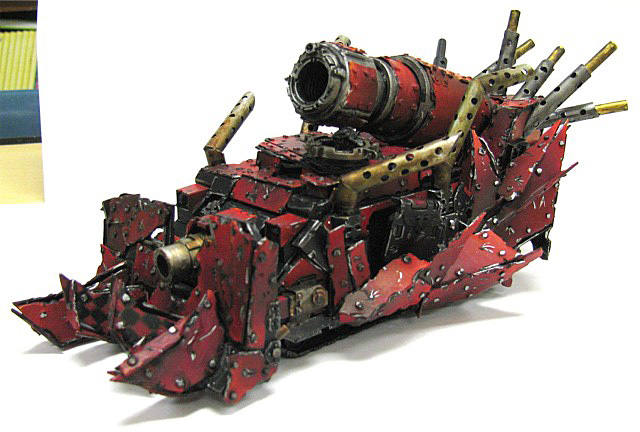
lootedwagon42a.jpg


It might be your screen (or mine) too. If you like the one I posted, set your black point to the darkest shadow in the image (sample tool).

Let me know if I should just shut up too!:D

Sukigod
 

uberdark

New member
no i totally agree i have had problems with the lighting. and i think it got a little too washed out. thats more true to life.

thanks man. all i have is photdraw.

:D
 

Sukigod

Member
You should look into this... GIMPGIMP

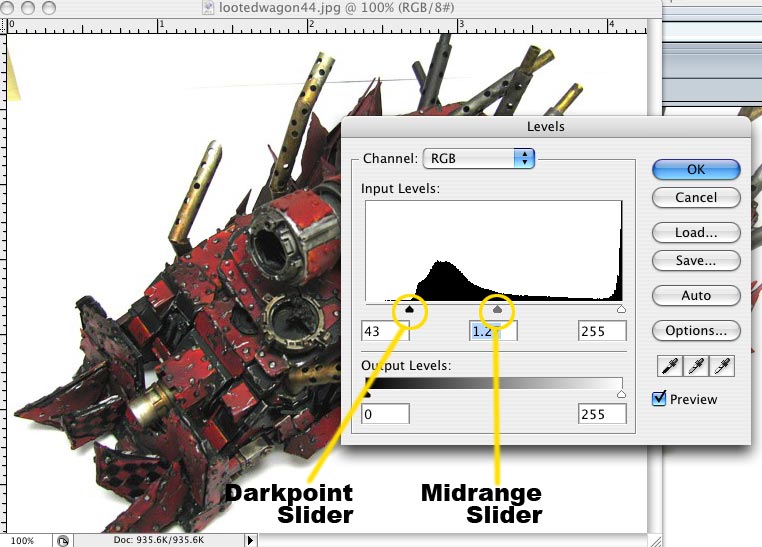
It\'s free and it\'s got the Levels Adjust that Photoshop has and Photodraw doesn\'t. Once it\'s installed you\'ll see histogram showing the colors (rgb or cmyk, depending on mode) and you\'ll see the gap on the left side (no spikes) where there\'s no color information. There should be a slider or little arrow underneath it at the far left end, slide this to the right, just past teh point where the spikes start, like this.....

levels1.jpg


Slide the darkpoint to the start of the \"mountain\" and then move the center arrow (Midpoint/Midrange slider) to the left a little to bring the median levels back to true.

Hope this helps and looking good Uber!
 

mud duck

New member
@Suki member of the Zombie Pub crawl this year?

@Uber, Why is that every time that I look at your wagon, I see a train? Something from say the \"Dark Tower\"?
 

uberdark

New member
man this will make my pictures so much better. now does gimp have a tendency to have any viruses on it and does it work well with windows vista....cause vista....well sucks.
 

Sukigod

Member
As long as you get it form the source (ie. the URL I sent) you should be virus free. I do believe it will work fine on Vista (your only worry might be Vista itselflol)
 

uberdark

New member
what about autocutting the picture out? i cant stand foloowing along the line. i cant seem to find an autocut feature on the program?

edit: also...how do i find the darkest spot on the picture? sorry for all the quesitons..
 

Sukigod

Member
Not sure what you mean about \"autocutting\". If you mean clipping, let me look into it and I;ll get back to ya. I\'m assuming you want to put in the blue gradient background (or something similar?). (I\'m back with it...}

You could use the Free Select Tool, Fuzzy Select Tool or the Select By Color Tool to select all the areas you don\'t want and fill them using the Paintbrush, Bucket Paint Tool, or Blend Tool.

As for finding the darkest area, it\'s usually in the deepest shadows/recesses. In the example photo I chose, it was under the armor skirt and above the tracks. Sometimes this works, sometimes you\'ll need to open the levels/histogram and manual move the sliders to get the best results. Takes a little practice but comes very naturally once you\'ve got it.


btw - The levels is located under the Colros Menu -->Levels, adn adjust the Input Levels.
(Dont\' worry about the questions, it\'s one of the things I do for a living...:))
 

uberdark

New member
Originally posted by Sukigod
Not sure what you mean about \"autocutting\". If you mean clipping, let me look into it and I;ll get back to ya. I\'m assuming you want to put in the blue gradient background (or something similar?). (I\'m back with it...}

You could use the Free Select Tool, Fuzzy Select Tool or the Select By Color Tool to select all the areas you don\'t want and fill them using the Paintbrush, Bucket Paint Tool, or Blend Tool.

As for finding the darkest area, it\'s usually in the deepest shadows/recesses. In the example photo I chose, it was under the armor skirt and above the tracks. Sometimes this works, sometimes you\'ll need to open the levels/histogram and manual move the sliders to get the best results. Takes a little practice but comes very naturally once you\'ve got it.


btw - The levels is located under the Colros Menu -->Levels, adn adjust the Input Levels.
(Dont\' worry about the questions, it\'s one of the things I do for a living...:))

ok sounds good..but how do you \"mark\" the darkest level and what6 not.

thanks again.
 

Sukigod

Member
In the Colors --> Levels palette, you\'ll see two eyedropper icons, one black and one white, under the sliders for Input Levels. Click on the black one and use the mouse to \"pick\" the darkest pixels in the image. You can do the same for the brightest/whitest point as well.

This is good for general correction, but it\'s still good to slide that middle slider back and forth a bit to see where it looks most natural.
 

Jericho

Consummate Brushlicker
I think you can use Photoshop Express for this kind of thing as well. Works anywhere with updated Flash and an internet connection.

Or, of course you can adjust your camera settings to compensate for the white background. You should be able to bring up a Histogram and adjust the exposure values (EV) to make the mountain shape of the graph stretch close to the edges. Big gaps are to be avoided, since you\'re losing the subtle differences between shades.

You should always check the levels in Photoshop/GIMP even if you correct the EV somewhat on your camera. Adjust the levels before resizing your image though. If you do it after, I find you\'re more likely to get rough color transitions.
 

Sukigod

Member
OK - not much time tonight - 20 minutes at most, but I promised I\'d get something up and here it is.

RED!

wagon27.jpg


Goodnight
 

Kester

New member
Looking tasty.
You two have inspired me to build a battle wagon. I\'ve been meaning to have a crack at it for a while. As a result, my studio looks like a bomb site!
 

uberdark

New member
well next month i am gonna try to do 12 warbikes in a month complete with conversions.... you up for a challenge? i dont know if suki will be after this battle, i hope is though.
 

Sukigod

Member
Got some more red on this thing tonight, the first three layers. It\'s looking a little rough as I always do a sloppy base coat, then do a clean up of the black before startin the metals. It will probably look this way for a while then all of a sudden snap into shape, much like the build did.

wagon28.jpg

wagon29.jpg

wagon30.jpg

wagon31.jpg
 

Kester

New member
Originally posted by uberdark
well next month i am gonna try to do 12 warbikes in a month complete with conversions.... you up for a challenge? i dont know if suki will be after this battle, i hope is though.

Tempting....
 

uberdark

New member
a big update today. i managed to get quite a bit done while at work today since it was our final grades day but since i was already finished i had 8 hours to dedicate entirely to miniature painting. one side is predominately done but needs some work on the fans in the back where the motors are. i also need to work on the rest of the exhausts as well. the glyphs are coming out pretty cool and i also managed to get some work done on the boomgun. i feel like its pretty much done (boomgun that is) and was incredibly happy with the checks on it.

i have also begun work on the ork in the lazy boy chair and am really happy with how thats turning out, but i want to make you wait till ya see him. he will have a control stick with a a shiny red button that counts as the \"dont press dat button.\" i plan on attaching his chair to the boomgun with hooks, wires and bolts. so i guess i may need to put on some more rivets. :sigh

so without further ado.

lootedwagon1-2.jpg

lootedwagon3-2.jpg

lootedwagon2-2.jpg

lootedwagon5-2.jpg

lootewagon6.jpg

lootedwagon4-2.jpg
 

kulandini

New member
Wow, I really like the checks on the boom gun,
looks nice and weathered. Keep up the good work you both! :beer:
 
Back To Top
Top