WIP Ork Warboss on Warbike *update 4/05/09* done!

kulandini

New member
Hey all,

I have glazed the skin with some dark green today and it really helped to smooth down the transistion lines and gave the skin a much richer color.
So thanks for the tip!


(the left one is with glazing and the right one without glazing)
heads.jpg


and some more pictures
P3190115.jpg

P3190118.jpg

P3190120.jpg


C&C welcome and thanks for watching!

Kulandini
 

Sukigod

Member
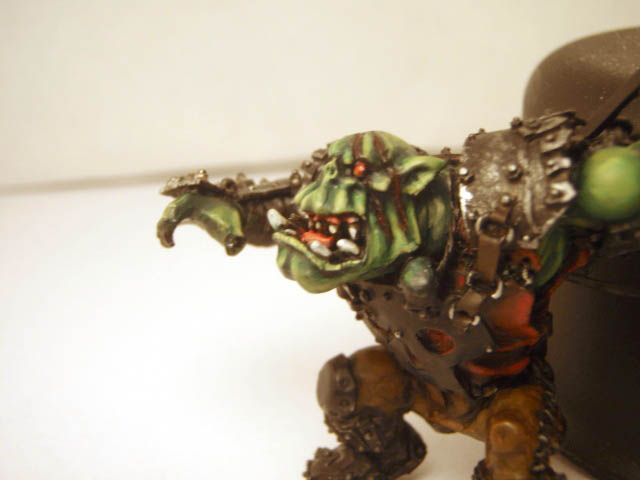
Things are looking very good here, kurlandini. I\'m so very glad my tips helped your painting and your photography. It\'s always nice to hear that somethign you do inspires another. Thanks!

The glazing/wash really seemed to smooth those transitions out. It\'s amazing (especially once you do it for yourself) how such a small thing can have such a large impact. I wouldn\'t have too many more tips for painting - I would suggest few more things for your photography though.

The photos are coming out very yellow. Usually it\'s because of one of two things. You\'re not using color corrected bulbs and/or the paper you used for the soft box isn\'t of the bright white variety. Both will give an off white/yellow cast to the entire mini. Both are simple fixes. Use a whiter paper (hold up the sheet you\'re using now against other paper to see how \"white\" it really is), and get some color corrected, or \"daylight\" bulbs for your lamps. Both are fairly economical upgrades.

The other cause maybe the white point balance settings of your camera. This one is not so easy and will involve devoting some time to your camera and its manual. The basics idea is that your camera auto-senses the color ranges that it \"sees\" and decides what the whitest part will be. Sometimes it\'s wrong and the color it chose isn\'t really white but off-white/yellowish in nature. This will effect \"all\" of the other colors since the camera makes it\'s color choices based off this \"white point\". If it\'s yellow, everything else will have a yellow cast.

It may seem awefully boring and a bit confusing to start with but your manual should have a section on \"Setting White Point Balance\" or similar. Spending an hour (or even two) to figure this out with your camera will vastly improve your picture quality AND the colors that are shown are more true to life.

Again, great model, great paintjob so far. I\'ll be watching this one through.

Good Luck!

Sukigod


EDIT: p.s. I did a little color correction to one of your photos to show you what your camera should be outputting with the white point balance set correctly. I hope this helps!

P3190118a.jpg
 

kulandini

New member
Hey all!

Thanks again for all the useful tips tips Sukigod! I changed the paper in my lightbox for some whiter paper. Changing the camera settings was a bit trickier but after some trial and error I think I have found the right settings. Still have to get some daylight bulbs, but for now the pictures are a lot less yellow.
P3200119.jpg

P3200118.jpg

P3200120.jpg

P3200121.jpg

P3200122.jpg

P3200123.jpg

P3200124.jpg


I\'m not entirely content about the shoulderpads though, so if you\'ve got an idea, please tell me.
Still have a lot of metal to paint, but if it\'s all painted the same it may look boring so I\'m not really sure what to do.
For the base I want do to something special because it\'s a special model, so if you\'ve got a cool idea just say it.

Thanks for watching!

Kulandini
 

Sukigod

Member
I agree with Choas there, some red and maybe some black and white checks at a slight diagonal across the pad for visual interest.

Lookin\' good and the photography is definatey looking better. Next tip: Choosing your Black Point in Levels! This will give your photos that additional punch in the shadows - increased contrast = increased visual interest.

Let me know what software you\'re using and I\'ll see about writing up a quick tutorial on how to do this.

Sukigod
 

kulandini

New member
Hey all,

Thanks for the comments I appreciate it very much.
Thanks sukigod, I\'m still having some problems with my camera (it\'s a Olympus Stylus 790 SW) I can\'t find out how to change the white and black point settings.
Perhaps it is an idea to use photoshop to improve my pictures, but I\'m not sure about it. Thanks for all your help :)

I have started on the shoulderpads again. due to suggestions of chaos and Sukigod I\'ve decided to paint the shoulderpads red with white and black checks. Still have to do some work on them, but they are coming along nicely.

P3230118.jpg

P3230119.jpg

P3230120.jpg

P3230121.jpg

P3230122.jpg

P3230123.jpg

P3230124.jpg

P3230125.jpg

P3230126.jpg

P3230128.jpg

P3230129.jpg

P3230131.jpg


Here is another small project I\'ve been working on, wich I just wanted to show you.
(It\'s a crappy picture but I had to make it quick)
P3230138.jpg


Thanks for looking and have a nice day!

Kulandini
 

kulandini

New member
Hey all!

I have started with painting the saw-arm today. I\'m not entirely satisfied with the saw itself but I\'ll change that later

P3270121.jpg

P3270122.jpg

P3270124.jpg

P3270126.jpg

P3270127.jpg

P3270128.jpg

P3270129.jpg

P3270131.jpg


It\'s coming along pretty nice but there is still a lot to do and improve.

Comments and Critics are most welcome.
Have a nice day!

Kulandini
 

kulandini

New member
Hey all!

It has been a pretty long time since the last update but I have a lot of homework and other projects to work on.

Not a really big update, but it is something.
P4010121.jpg

P4010123.jpg

P4010124.jpg

P4010126.jpg

P4010127.jpg

P4010128.jpg

P4010129.jpg


here is another ork project that I\'ve been working on.
When this model is finished I might start another log about orks.
P4010130.jpg


Does anybody know if forgeworld is going to make more ork models? I hope so!

Thanks for looking!

Kulandini
 
Forgeworld advisied in thier last email (sent out yesterday) that they would be showing some of the soon to be released ork models at the Forge World open day this sat or sun.

Hope that helps.
 

Pentrago

New member
You did a great job with this amazing model! I\'m almost done assembling the bike but I have no idea where to install the two dampers...
 

kulandini

New member
Hey Pentrago!

thanks for the compliment, I appreciate it very much.
Placing the dampers is pretty difficult but I hope these pictures help:
1.jpg

2.jpg

3.jpg


Make sure you place the longest damper on the left side of the warbike and the smaller one on the right side.
If you encounter other problems with this model let me know.

Kulandini
 

aapjeBOB0

New member
It looks very good,


off topic: (this will be in dutch) waar precies woon je in Nederland? als het in de buurt van Leiden is kunnen we misschien een keer samen gaan schilderen en kan je me tips geven ^^
 

dannyk01

New member
I think the skin tones look really good :) Would you mind sharing the recipe?

Also, there\'s a saying I like to say to people, age can never effect an artist but time can only make them better!

Cheers,
Daniel
 

kulandini

New member
Hey,

@Pentrago: That\'s good to hear, if you need help with something else just send me a pm.

@aapjeBOB0: ( in dutch) ik woon helaas niet in de buurt van leiden (Breda) maar als je iets over schilderen wil weten kun je me altijd een pm sturen.

@dannyk01: Thanks for sharing, I\'ll remember that.
The recipe for the skin is (mostly in GW paints):
- Orkhide Shade basecoat
- 50% Orkhide Shade + 50% knarloc green
- knarloc green
- 50% knarloc green + 50% gretchin green
- gretchin green
- gretchin green + a dap of bad moon yellow and a dap of skull white
- add some more white and yellow to the previous mix
- gretchin green + bleached bone
- bleached bone
- a lot of glazes with dark angels green to smoot out the transition-lines


I\'ll post some pics tomorrow
Thanks for watching and have a nice day:beer:

Kulandini
 

kulandini

New member
Hey!,

I started with painting the red armor on the bike yesterday. It still needs a lot of work but now I\'ve got a nice base to work on.
Once that is done I will start on the metal frame. after that I\'ll apply details, weathering, make a nice base and fix things I don\'t like.

as you can see I left the right wheel guard off because it still needs some paint.

P4080124.jpg

P4080125.jpg

P4080127.jpg

P4080128.jpg

P4080129.jpg

P4080130.jpg

P4080131.jpg

P4080132.jpg

P4080134.jpg

P4080135.jpg

P4080136.jpg


What do you think?
Thanks for watching!

Kulandini
 

uberdark

New member
nice work on the red armor... its quite nice. i would reccomend hitting it with a few marks of chainmail in spots for chipping and maybe a 1:1 mix of scorched brown and chaos black to show other areas of chipping but other than that, a right fine job. :cheers
 
Back To Top
Top