You are using an out of date browser. It may not display this or other websites correctly.
You should upgrade or use an alternative browser.
You should upgrade or use an alternative browser.
Bailey03's WIP
- Thread starter Bailey03
- Start date
Bailey03
Well-known member
Thanks for commenting, YetiSA! And thanks ArchArad and Maenas!
I finished off the helmet and shoulder plates, then moved on to his pants. Shading and highlighting was a bit tricky since there will eventually be more armor plates covering his legs (but they're left off to make getting the brush in there easier). To help, I tacked on the armor and then sketched in the highlights and shadows. Then I took the armor back off and went about the long work of blending and smoothing out the transitions. It still looks a bit funny, but here he is with and without the armor so you can see how it works together.
View attachment 45429View attachment 45430
The next step is to do the design work on the pants just like his sleeve. You may have already noticed the white dots. These mark where I want the centers of the circles. Like on the arm, I measure them to keep the distance consistent. Next I'll add in the circles (again, measuring so the sizes don't change) and then paint in the leaf/flower designs).
View attachment 45431View attachment 45432View attachment 45433
Now that I'm getting to work on his lower body, I began to think about what color I want to use for the cloth covering his calves. It's not a major part, you can really only see it from behind. I initially thought I'd use green to go with the purple-orange-green tricolor scheme. But, with so little green elsewhere, if I made that cloth green it would really stand out and draw the eye down to a place where I really don't want the viewer to focus. I'd rather just keep the left sleeve green and let it stand out (and draw the viewers eye up towards the face). So that should mean I'll paint them purple... but I don't know. What is another option. For now, I think I'll add on the armor panels for the sides and front, then see how it looks. As long as I don't add the back armor panel, I shouldn't have a problem getting my brush there to paint the back of his calf. Of course I'm always open to suggestions if anyone has some. Oh, and don't forget, there will be a pattern there too. Probably just a simple flower design. The way I'm leaning, it would be a white design on purple or a purple design on white.
BloodASmedium
[img]http://pnp
This thing is like norm McDonald said- RIDICIULOUS!!! If it were me David I might use a neutral color or an earth tone...I think a dark grey or a medium brown not and orange brown a less intense brown,scorched brown with a bit of white or grey to desaturated the color a bit....if you really wanted to stay with the triad then maybe varying degrees of what you have already ,like analogous colors of the ones you already have chosen....a deeper purple,blue green etc.
Bailey03
Well-known member
Ha, well there's a good chance I'll be a drooling mess by the time I finish this one. I hope the people taking my classes will understand if I just sit there and babble incoherently.
In other news, I just saw this tip over at PlanetFigure and thought it was pretty nifty. For you iphone users, if you want to check the contrast on your figure, go to Settings->General->Accessibility->Greyscale. Then you can open up the camera app and point it at your figure. This can help you check the contrast without getting distracted by all the pretty colors. You can do the same thing with android devices, though you'll have to figure out where the setting option is.
In other news, I just saw this tip over at PlanetFigure and thought it was pretty nifty. For you iphone users, if you want to check the contrast on your figure, go to Settings->General->Accessibility->Greyscale. Then you can open up the camera app and point it at your figure. This can help you check the contrast without getting distracted by all the pretty colors. You can do the same thing with android devices, though you'll have to figure out where the setting option is.
Digganob
New member
Ha, well there's a good chance I'll be a drooling mess by the time I finish this one. I hope the people taking my classes will understand if I just sit there and babble incoherently.
I mean if I was taking your classes I am sure I would understand your babble, one mad man to another and all...
Bailey03
Well-known member
Thanks, guys. Zab, yeah, maybe I'll go with white or the very light purple (same color as the layer of laces just below the yellow-orange layer).
I did a little more work on the samurai, no pictures to show though. I've started painting on the circle designs. I realized I could really use an extra hand for these, especially when it comes to the ones on the bottom of the legs. It's getting really tricky to hold the figure, hold the paper I'm using to measure with, and hold the brush. I've finished some of the designs, enough to attach the first two armor plates around his waist. By the way, I've reached the point where I go back and forth between loving this figure and despising it on an almost daily basis. Ah, just one of the many joys of spending months on the same project!
In other news, I found/won this 75mm Pegaso mounted knight on ebay for a good deal (original kit, not a recast). This is a serious contender for my next big project (after Crystal Brush of course). I'm debating if I want to stick with a historical look for him, like a teutonic knight, or go more towards fantasy. By the way, if anyone is looking to paint a larger scale knight, the seller has a number of kits in 54mm, 75mm, and 90mm scale (including the kit of the Knight of the Holy Sepulchre I painted a while back). The prices are around 30-40% off retail. If anyone is interested, send me a pm and I'll forward you the link to the auctions/seller. They're up for another 3 days.
View attachment 45541
BloodASmedium
[img]http://pnp
Oh my god,that's a steal,and I cannot to see how you breathe life int this historically,but I can't wait even more to see how you're transform this historical piece into a fantasy piece....either way it'll be knocked out of the time zone when your done...")
Bailey03
Well-known member
Ha, well that's one of great things about working on medieval figures... doesn't take much to turn them from a historical knight into a fantasy knight! I can use a color scheme and heraldry that is based on history, or just have fun with it and paint whatever I want. Put a dead monster or some other fantasy elements on the base and you've got yourself a fantasy figure.
But, even if I stick with a historical look, there are still some very ornate designs on I can draw upon
View attachment 45542
But, even if I stick with a historical look, there are still some very ornate designs on I can draw upon
View attachment 45542
bgcdazzler
New member
At this point Bailey it wouldn't surprise me if you created a scale version of the Bayeux tapestry on the hem of the horse's coat. Can't wait to see the finished samurai (but then I guess neither can you!)
Quantum Man
New member
Looks like a great kit, but horrible to put together if it comes in as many pieces as pegaso says it does! Please go nuts with the freehand - like Karol Rudyk's knights or something like that :drool:
Bailey03
Well-known member
Thanks, bgcdazzler and Quantum Man. Yeah, I've saved pictures of Karol's knights into my inspiration folder. I'll definitely be drawing upon those for ideas.
Wow, 43 pieces! I hadn't noticed that. Well, the samurai is 38, so this one is only a little more complicated! I haven't gotten the kit yet, so I'm not sure why there are so many parts. I wouldn't expect the build/painting to be too much more difficult than the last knight I did. Hopefully I can assemble the rider but leave off the cape, banner, and shield for later. The horse will probably be painted in two sections due to the caparison covering it. But a lot will depend on how the pieces fit and where there are gaps.
A big challenge/pitfall with painting the rider and horse separately is the saddle. Be careful gluing the front and back portions of the saddle without the rider in place. I'd had a couple kits where once these were in place, it was almost impossible to get the rider on. On the last knight I did, I glued on the back but left the front off until I was ready to attach the rider.
Bailey03
Well-known member
I finished off the pants then attached and painted the first two of the armor panels around his waist. Now that these are in place, I feel like I can finally see how the whole thing is going to look when I'm done. It's definitely a complex figure with a lot of detail, but I feel like keeping the palette limited to mostly orange and purple with a little green (plus black and white) has helped create a cohesive look. Looking at the piece critically, I'd like to add a splash of color to the rear of the figure. The green sleeve is only visible from the front and the back doesn't have much of the freehand work, so it's just the purple/orange lace detail over and over. I'm not sure of how to add another color (preferably green) in a way that would make sense. There are some more pieces to add and the quiver/arrows will be on the back... so perhaps that will present a solution.
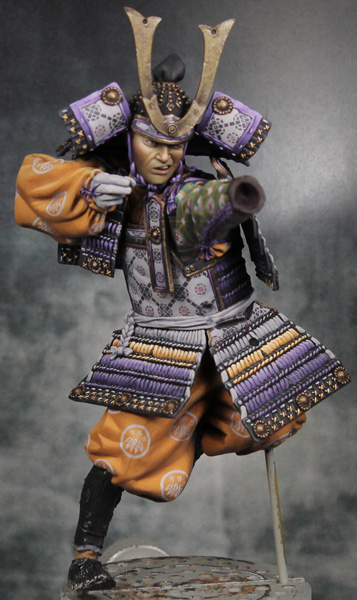


I left off the back two armor panels for now. I need to paint the lower legs and, for the bent leg, they will definitely get in the way. I decided to do with white cloth for the calves. Yes, I could do green which would solve my earlier problem... but it'd be visible from the front and distract from the eye (drawing it to the ground and away from the main focal point). Plus, even from the back it would draw the eye down to the ground which really isn't an area I want the viewer to focus on.
The figure is looking pretty close to being complete, but there's still plenty to do. I did a quick count, there's another 11 pieces which need to be attached and painted (yup, complicated figure) and then there's a base which needs to be built. I'm happy with where the figure is, I'm no longer freaking out about finishing it in time for Adepticon. I'll be traveling for half of February, so that cuts out two full weeks of painting. But, if I stick with a schedule I put together, I should get all three of my entries done with a few days to spare! =)
BloodASmedium
[img]http://pnp
This is one of my top five figures I've seen in my life ....period....perfect precision painting.
