You are using an out of date browser. It may not display this or other websites correctly.
You should upgrade or use an alternative browser.
You should upgrade or use an alternative browser.
Bailey03's WIP
- Thread starter Bailey03
- Start date
Bailey03
Well-known member
Okay, the article on painting eyes is up. Take a look here for a pretty detailed description of my process.
http://figurementors.com/method-for-painting-eyes-on-busts-and-smaller-scales
http://figurementors.com/method-for-painting-eyes-on-busts-and-smaller-scales
Maenas
New member
Having a look at the article on eyes ^^
Completely agreed. It looks very much like a comic or drawing, and I am pretty sure there is someone over the internet specialized in painting miniatures with this style. For sure! Because it looks different and cool!Awesome, love how the rough scetch looks like you drew it on with a pencil../...
MAXXxxx
Well-known member
Everything is still very very rough,...
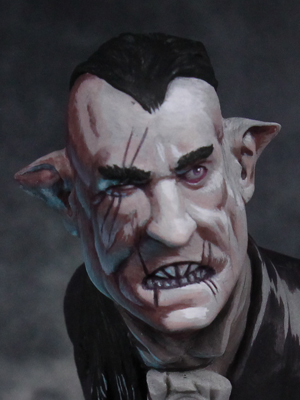


I don't know how it looks like irl, but as a pic this rough look has a very good comic book style, that looks awesome as it is. And something new to all the stale, 'boring' paintjobs that are out there.
And being rough and fast is a small plus to the whole thing.
using it as a chosen style could work with a lot of busts, especially with those that are very stylized to begin with, like these: http://massivevoodoo.blogspot.de/2015/04/mu-69-tiny-leads-dungeon-adventurers.html
as a matter of fact, there are some, mainly from japan.It looks very much like a comic or drawing, and I am pretty sure there is someone over the internet specialized in painting miniatures with this style. For sure! Because it looks different and cool!
( http://www.gunjap.net/site/?p=221046 )
or this: http://www.coolminiornot.com/343852
Last edited:
BloodASmedium
[img]http://pnp
Excellence once again to e father of the year!!!! And painter of the ages!!!!
Schwarz-Brot
New member
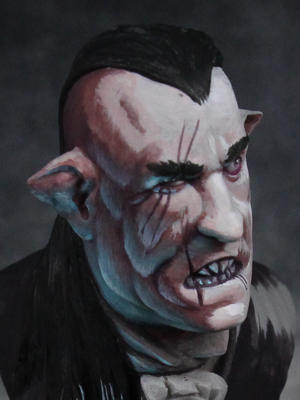
I am bothered by something as well and looked at the pictures for quite a while. I think it is the blue reflection around his right eye. It looks like it comes from a light placed in front of him, below his face. If this was the intended position, the rest of the face should see much more blue light. Instead you painted his right side like the blue light was placed there, which I think was the real intention. So I guess by reworking his right eye you'll get on track.
Hope this helps
Hope this helps
Maenas
New member
WOOOOWW Mindblowing, on some pictures my mind went crazy deciding if they were 3D or 2d paiting! Thanks for sharing Max!
Bailey03
Well-known member
Based on the feedback, I'll have to intentionally take a comic book style approach on a figure one of these days. However, here my goal was to get in some more OSL practice so I'm sticking with a more traditional style on this one.
I've started smoothing out the work on his skin. I've started with the regular skin and left the OSL areas alone for the time being. Everything is still a work in progress. There are some shadows and highlights I'm not quite happy with, so I've got some more tweaks to make. And, once I'm finished with that and the OSL, I plan to go back over everything to add more details. That will definitely include glazes for more color variation. I also really want to try to add some veins like Sionid did on her Skarre bust.


I've started smoothing out the work on his skin. I've started with the regular skin and left the OSL areas alone for the time being. Everything is still a work in progress. There are some shadows and highlights I'm not quite happy with, so I've got some more tweaks to make. And, once I'm finished with that and the OSL, I plan to go back over everything to add more details. That will definitely include glazes for more color variation. I also really want to try to add some veins like Sionid did on her Skarre bust.
MagmaPainter
Member
How do you go from such a ruff sketch to that smooth look? Is quite the difference. And do you always sketch like that first?
BloodASmedium
[img]http://pnp
Holy Shioli!!! Never ceases to amaze and impress!!!! Just amazing stuff David..
KruleBear
Active member
Because he is a robot witch...or so Zab keeps telling usHow do you go from such a ruff sketch to that smooth look? Is quite the difference. And do you always sketch like that first?
lol. This is keeps looking more interesting with each update. Veins sound like a great idea as well.
Maenas
New member
/.... I also really want to try to add some veins like Sionid did on her Skarre bust./...
Completely agree, some "spider veins" like a true vampire should have.... ^^
Bailey03
Well-known member
Thanks, everyone!
MagmaPainter, I paint by layering. I usually paint from dark to light, starting in the shadows and gradually transitioning to the highlights through many layers. However, instead of starting with everything dark, I'll just apply those shades in the shadow regions. Then, as the layers get lighter and lighter, I move towards the highlights. It's sort of like painting in a narrow band that keeps moving with each new layer. This way the lightest regions end up with 3 or 4 layers instead of 20+! The sketch helps guide me on this process, but that initial version gets pretty well covered up by the end.
As for the sketching, normally I'll just base coat and then only sketch in the shadows. On this piece, because I wanted to do more with the lighting, I did a more thorough sketch. What I'm trying to do with the lighting is still pretty challenging for me, so I wanted to make sure I was headed in the right direction before I put too much work in on the piece.
SaintToad
New member
Hi, Bailey. When you move from dark to light, building up layers to create smooth transitions, are you drawing the brush toward the brightest point on the surface, across the previous "narrow band" or something else? In other words, is each band a series of tiny strokes or a few (single) longer ones?
Bailey03
Well-known member
Yeah, usually I'm moving in the direction of the light (assuming I'm painting a lighter shade on top of a darker one). For tricky areas or if I'm just trying to adjust some shadows, I may dip back into the darker shades, in which case I'd then be brushing towards the shadows (when going dark over light).
In general I'd say it's fewer, longer strokes with the brush. I might do a couple parallel strokes, but I do those in rapid succession so that the paint hasn't dried (that makes it like a single stroke rather than multiple overlapping ones). And then there are times where to hide a transition I'll do some stippling to try and break up the border between two colors. In the early sketching stage I used some tiny strokes in the area where the light is coming from below. You can still see them in the pictures... but when I go back over that area I expect I'll be going with fewer but longer strokes to smooth everything out.
In general I'd say it's fewer, longer strokes with the brush. I might do a couple parallel strokes, but I do those in rapid succession so that the paint hasn't dried (that makes it like a single stroke rather than multiple overlapping ones). And then there are times where to hide a transition I'll do some stippling to try and break up the border between two colors. In the early sketching stage I used some tiny strokes in the area where the light is coming from below. You can still see them in the pictures... but when I go back over that area I expect I'll be going with fewer but longer strokes to smooth everything out.
