You are using an out of date browser. It may not display this or other websites correctly.
You should upgrade or use an alternative browser.
You should upgrade or use an alternative browser.
Pegazus's Pile of Pminiatures (WIP)
- Thread starter PegaZus
- Start date

PegaZus
Stealth Freak
Got started on my Reaper article project yesterday. Haven't quite decided exactly the words I'll use for this, but figure I'll used quoted text as a tool to show what I'll put in each article, and edit it per suggestions, etc.
So, for those of you not familiar with my idea, I'm going to be doing a series of articles focused on the Reaper Bones Kickstarter. This was done by Reaper to raise the money for expanding their PVC (ish?) line of miniatures, which they state in their summary had a huge demand but not a lot of minis. The molds for these are a lot more expensive than the ones done for metal minis ($10k or so vs $100, if I've got things right). It was a successful kickstarter by raising $3.4 million, with 16,000 people pledging $100, most likely for the Vampire set. That Vampire set sends the backer 240 of the new minis. This is without the options, mind you.
A lot of chatter I've seen on the kickstarter itself and Reaper's forums is that many of people bought them who have never painted before. They'll be getting paint sets and minis in March, and I'm wagering more than a few will wander over to CMON. So, I'm getting some articles prepared for them, using the metal minis as stand-ins when I can.
So there's going to be an introduction:
Next, I'll show the three primed.

The issue if you're wondering, is that the flat black enamel isn't primer. Doesn't really matter with metal minis. Makes a difference with PVC. Doesn't exactly dry, and it cracked the base coat.
So that's what I've got written so far. Got to go do family things, but I'll add more (I've already gotten to the chainmail and cloth).
+5 pts, 180 pts total
So, for those of you not familiar with my idea, I'm going to be doing a series of articles focused on the Reaper Bones Kickstarter. This was done by Reaper to raise the money for expanding their PVC (ish?) line of miniatures, which they state in their summary had a huge demand but not a lot of minis. The molds for these are a lot more expensive than the ones done for metal minis ($10k or so vs $100, if I've got things right). It was a successful kickstarter by raising $3.4 million, with 16,000 people pledging $100, most likely for the Vampire set. That Vampire set sends the backer 240 of the new minis. This is without the options, mind you.
A lot of chatter I've seen on the kickstarter itself and Reaper's forums is that many of people bought them who have never painted before. They'll be getting paint sets and minis in March, and I'm wagering more than a few will wander over to CMON. So, I'm getting some articles prepared for them, using the metal minis as stand-ins when I can.
So there's going to be an introduction:
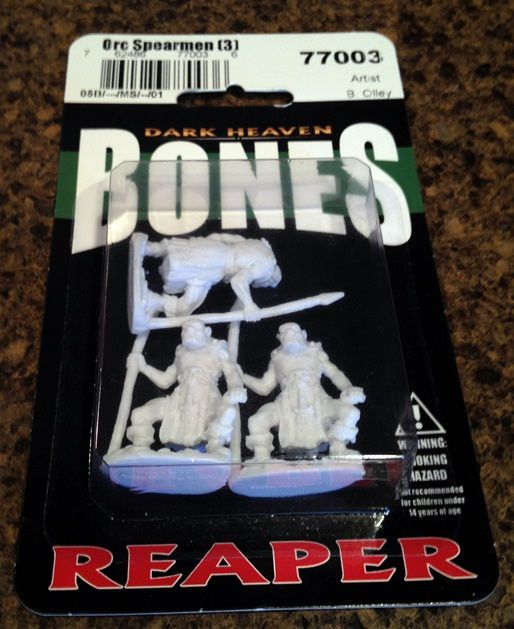
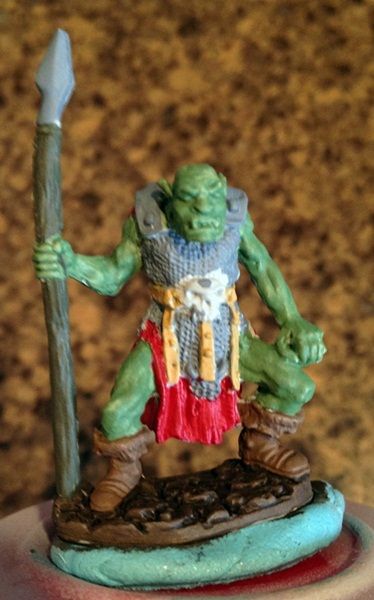
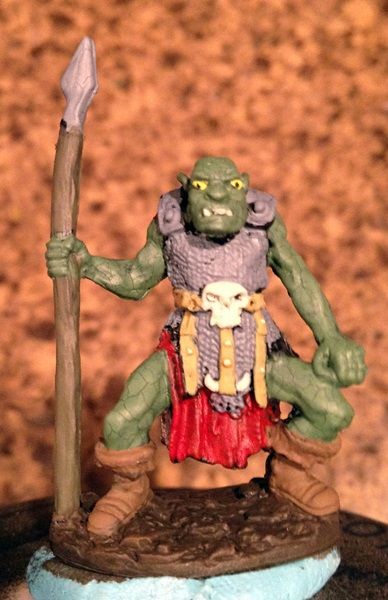
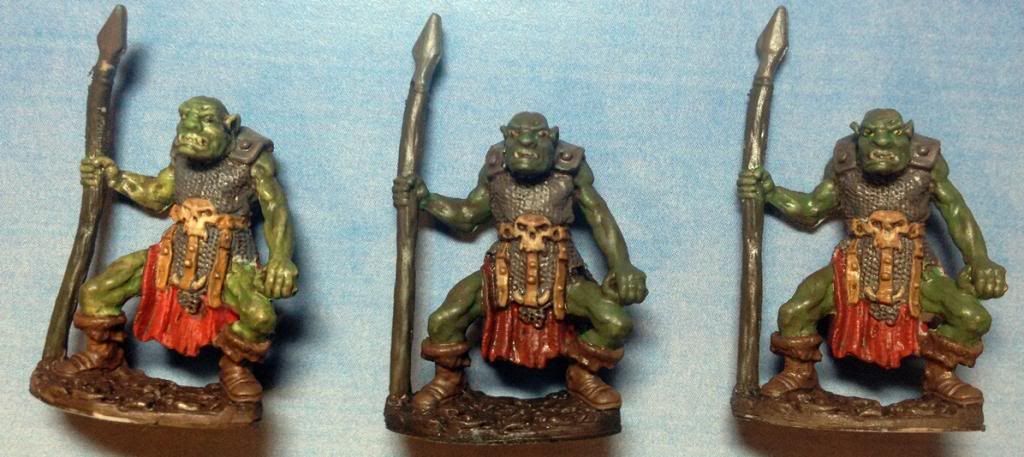
This first article is going to be discussing the statement that Reaper has made that they don't need any primer. Straight out of the package and paint 'em. But many of us still like to prime, and there's some benefits to that. So, I'm taking a Bones set of three identical minis and painting them exactly the same except for the underlying primer, or lack of. In addition, I'll only be using the paints that come with the optional Paint Set 1. I already had all the colors, so it was a happy coincidence.
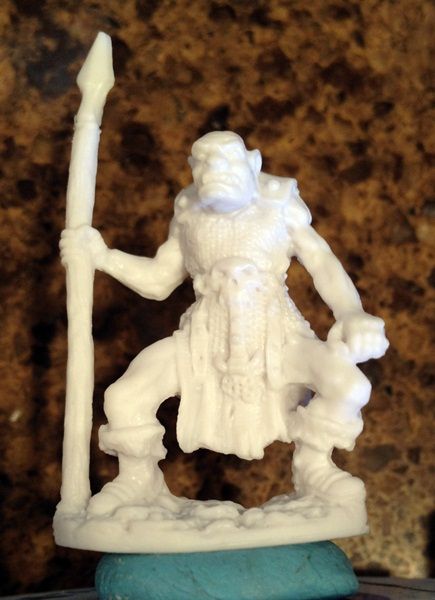
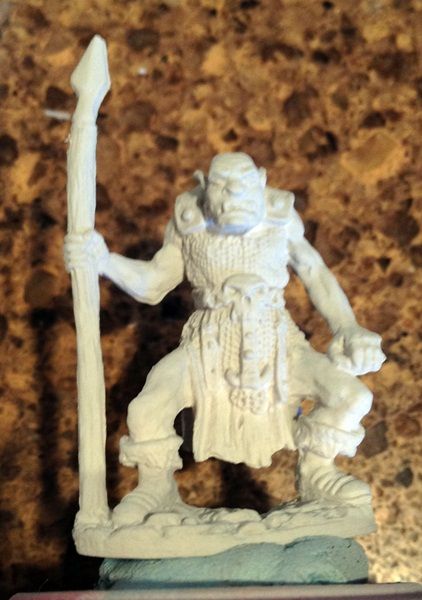
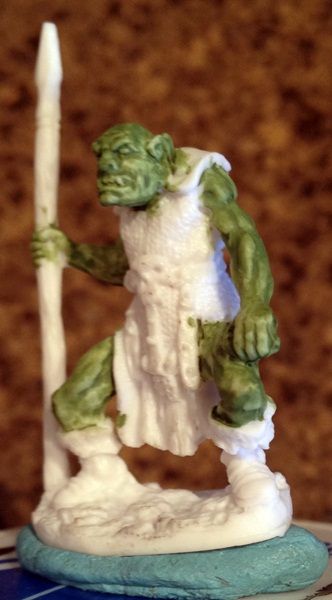
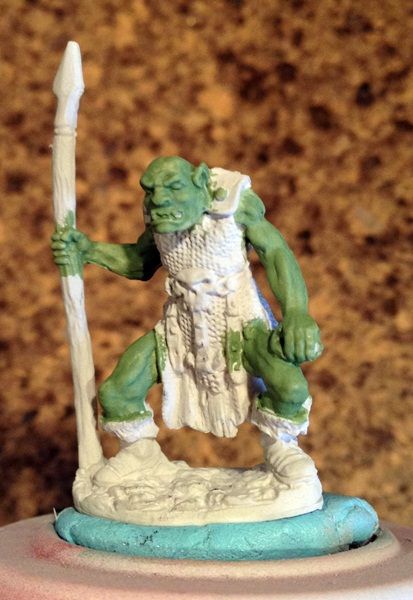
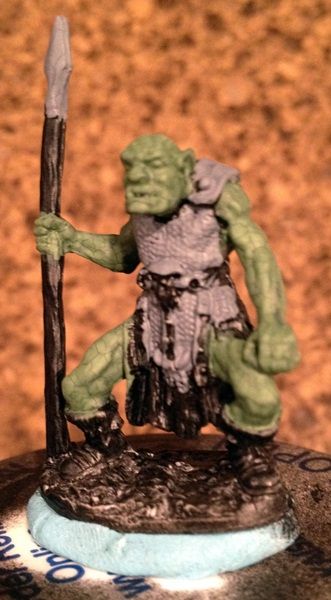
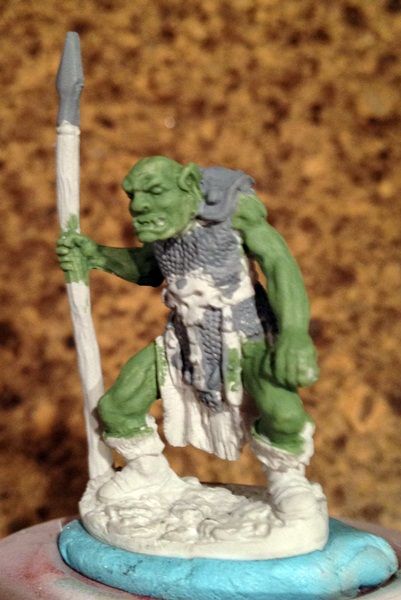
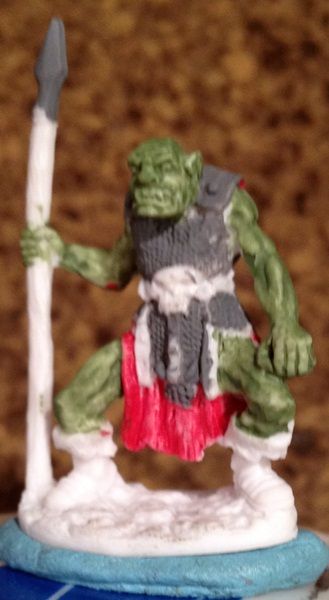
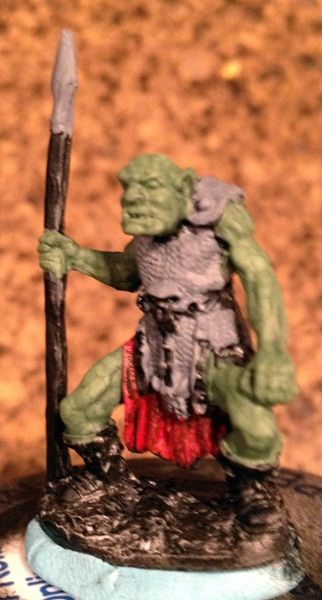
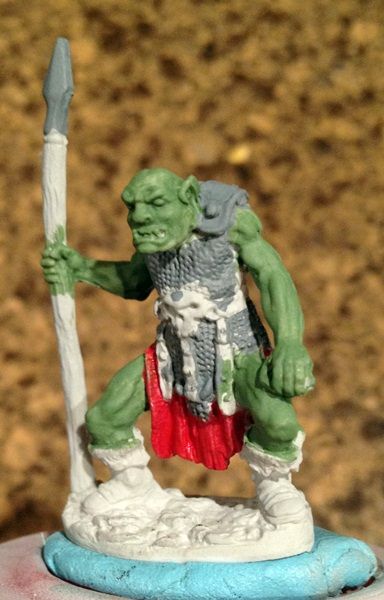
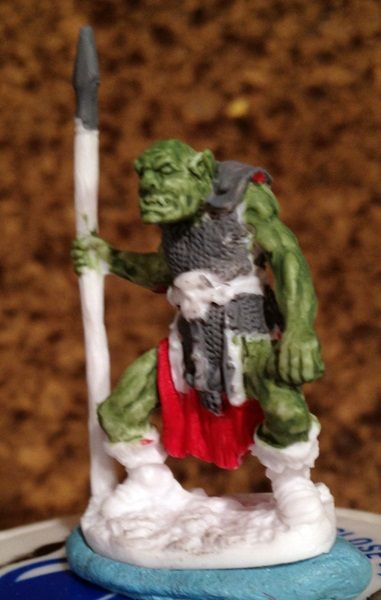
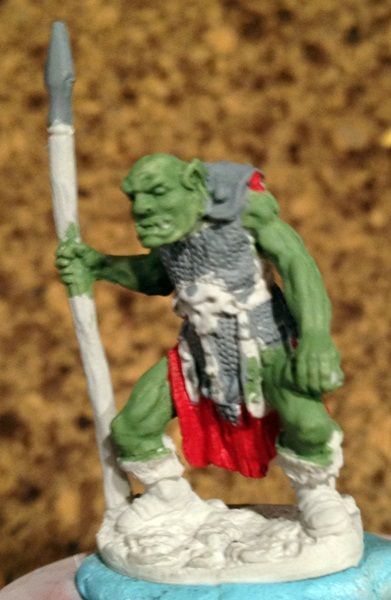
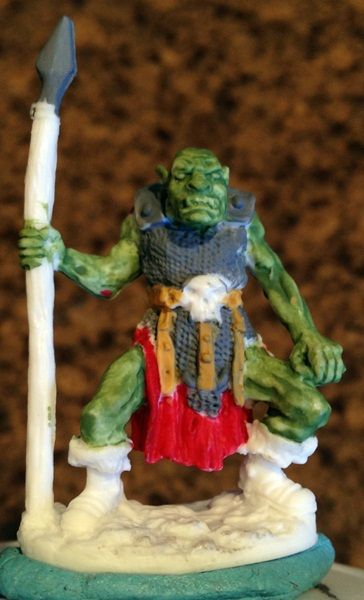
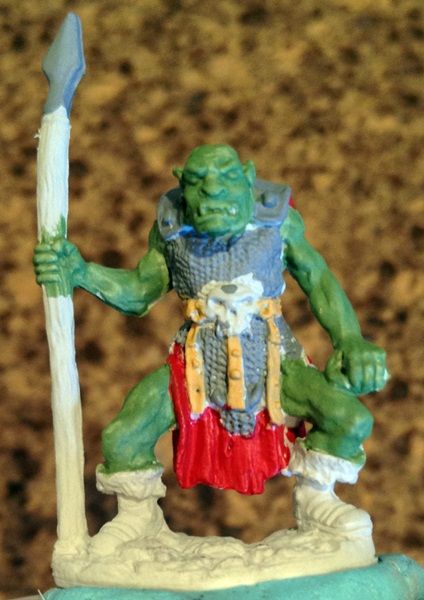
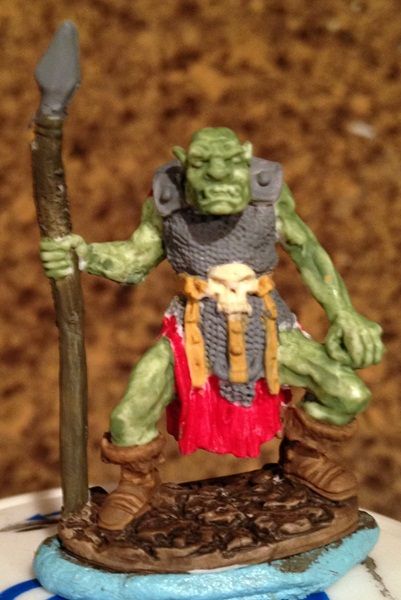
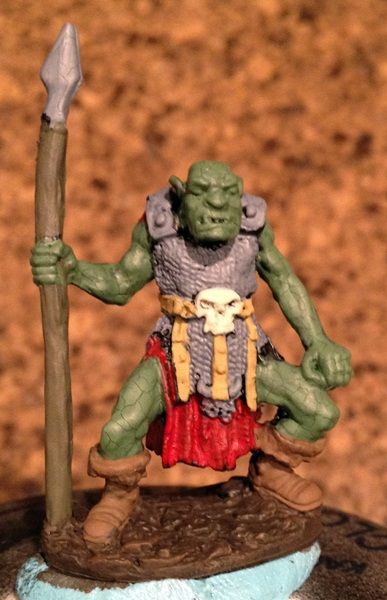
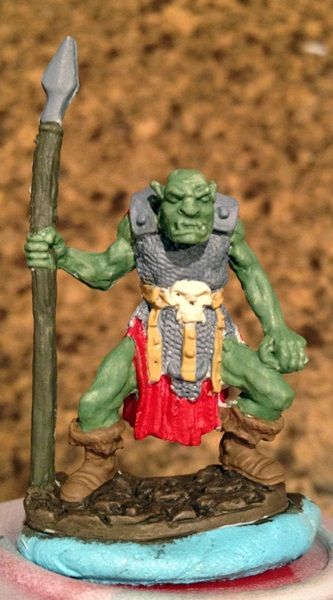
Let's start with three identical Bones figures. As the flood of new minis hasn't occurred yet, I've settled upon Reaper's Orc Spearmen (#77003)
Next, I'll show the three primed.
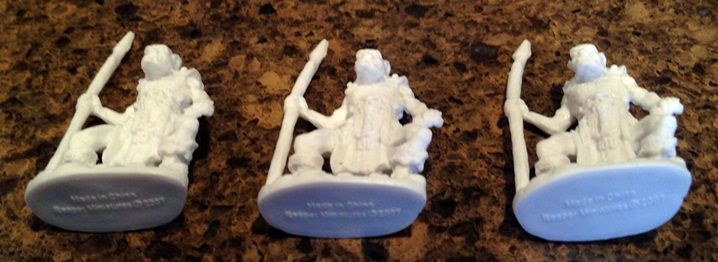
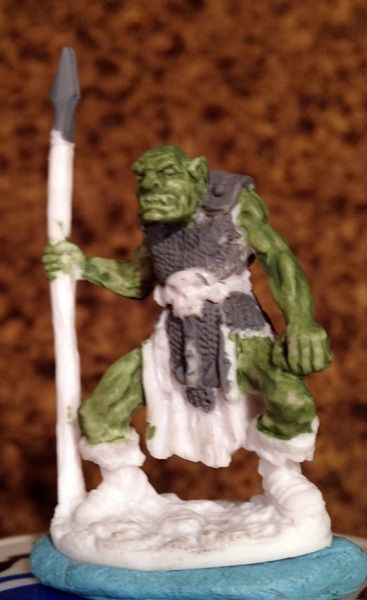
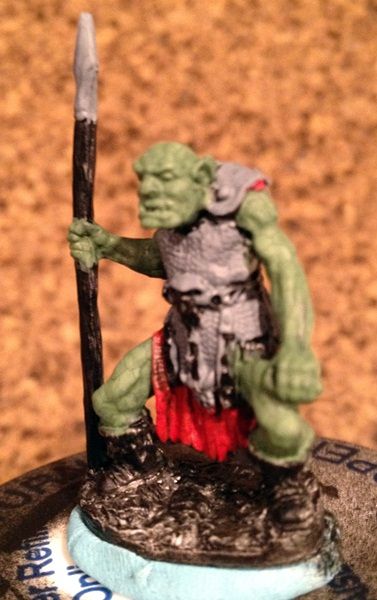
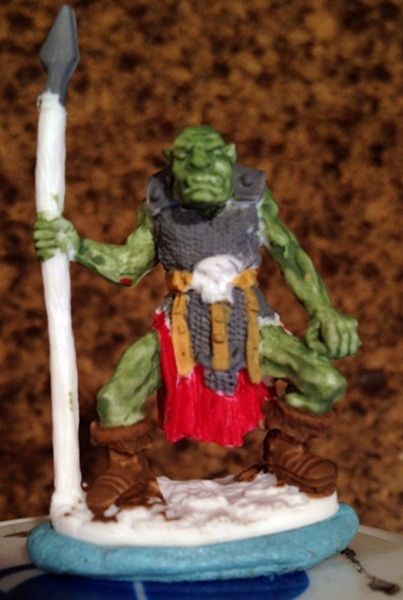
Let's leave one unprimed, prime one black (Krylon Flat Black Enamel), and one gray (Krylon Automotive Primer). There's a problem right there, which I forgot, and we'll discuss in a minute. But let's see the results
The issue if you're wondering, is that the flat black enamel isn't primer. Doesn't really matter with metal minis. Makes a difference with PVC. Doesn't exactly dry, and it cracked the base coat.
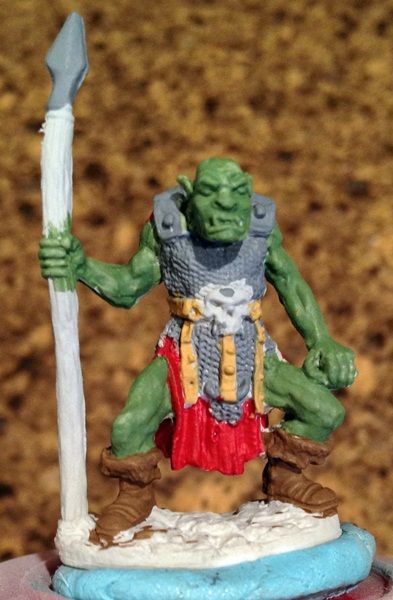
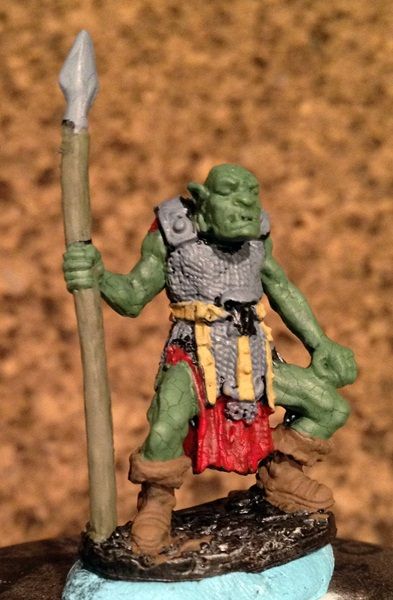
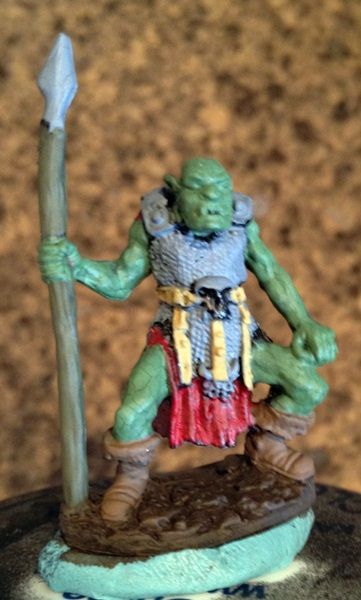
At this point, the white (left) and the gray (right) look nearly identical, but the gray does show the features a lot better than the white. Point for gray
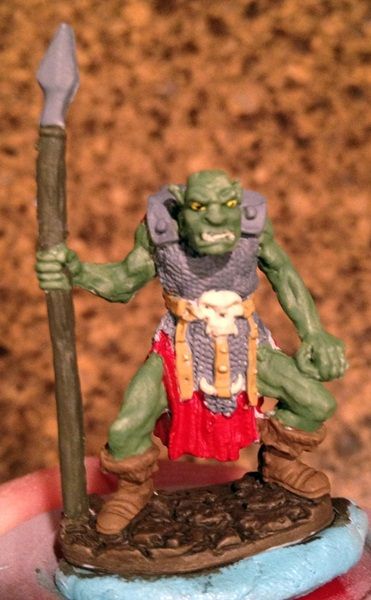
Now that we've got them primed, let's start off with the skin. This article isn't intended to be a How To Paint, but I'll jot down the colors for information. Mixed equal parts (4 drops total) of Green Grass (9014) and Yellowed Bone (9143) with a drop or two of water to get it to be the right consistency (my paints are older).
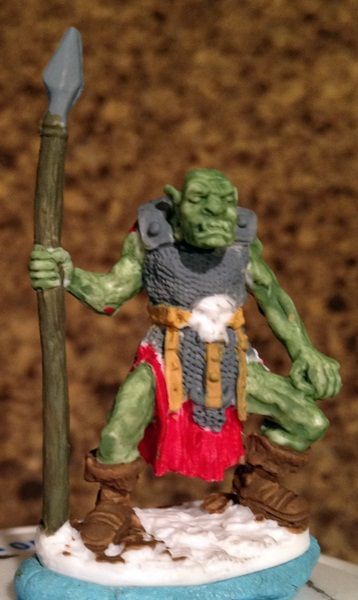
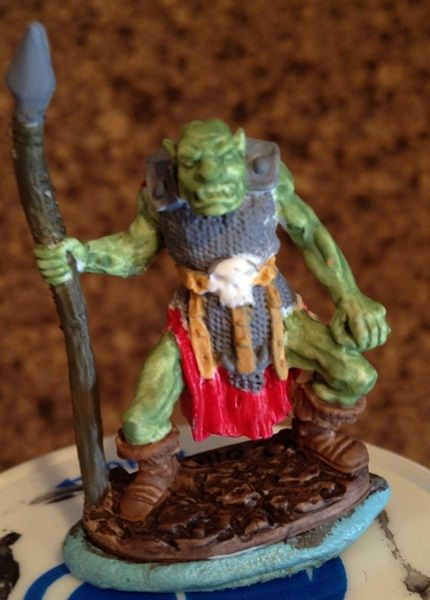
The same number of coats over all were done. The white figure shows quite a bit, while the gray is better covered in my opinion. The black looked best, but do you see what happened? Flat Black Enamel does not equal black primer! It didn't really dry over the figure, and when painted, the acrylic figure paint crackled. I had heard about this problem on Reaper's forums, but forgot. Oops. I'd correct this a little by going over with some thin wash of bright green, trying for a vein effect. But, that's an extra step that won't be done in this article. I'll wager had I actually used black automotive primer, things would have been fine. The gray from the same company didn't have the issue.
So that's what I've got written so far. Got to go do family things, but I'll add more (I've already gotten to the chainmail and cloth).
+5 pts, 180 pts total
Last edited:
PegaZus
Stealth Freak
Continuing the article's future text:
And that's as far as I've gotten on the painting. I'm a little disappointed with the pictures being slightly out of focus. I may make them smaller, and hide that a bit. Since I'm not trying to show a lot of detail, and think the aim here would be something of a score around 4.5, I think the pics could shrink without harming anything.
+9 Pts, 189 Total.
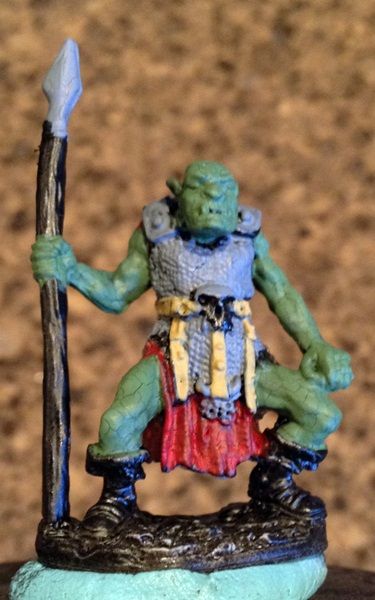
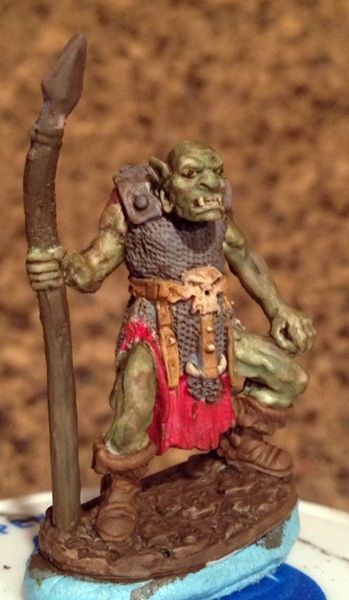
Next, I mixed three parts Pure White (9039) with one part Pure Black (9037). The black overpowers the white quickly, which is why it isn't a 1:1 ratio. The paint set doesn't come with a gray, so had to make one.
Nothing really special here. Later, I'm going to come back with a pure black wash that will make things pop just a bit. And so we'll continue on with red, Blood Red (9003) with no mixing. This is where it gets a little interesting.
Both the unprimed and black minis both show through, but the gray doesn't. Now this is easier, since I didn't mix the paint, to go back and do a second coat.
Two coats of the red, and everything is covered fairly well. The black shows through still, but that can be useful.
And that's as far as I've gotten on the painting. I'm a little disappointed with the pictures being slightly out of focus. I may make them smaller, and hide that a bit. Since I'm not trying to show a lot of detail, and think the aim here would be something of a score around 4.5, I think the pics could shrink without harming anything.
+9 Pts, 189 Total.
Last edited:
As one of the nubbins who got in on the Kickstarter, is new to painting, and found his way over here from the Reaper forums, let me say great prediction.:smile-big: I think you'll find more than one of us wandering around these forums...
Some nubbin comments:
1. There's been fair discussion about primers for Bones on the Reaper forums, and some claims have been made that some primers cause real issues, usually things like staying tacky indefinitely, etc. Good that you focus on the exact brands of Krylon, as some people seem to have real issues with the straight Krylon outdoors spray-on.
2. What ratios are you using to thin your paints and create your washes? Always handy info to have!
3. You haven't gotten to this yet, but is there any chance for some real detail on where you end up placing highlights and shadows? Most people/articles just tell you "put the shadow where it should be dark, and put the highlights where it should be light". While this seems obvious, it's a bit too obvious for those of us new to the hobby, so extra instruction on this topic is always handy!
Thanks for taking the time to put these together, it'll come in very handy for folks like me!
PegaZus
Stealth Freak
Welcome Chompsky! Honored to have your first post be my thread.
1) I've been reading the Reaper threads as well, which is where I remembered reading that too late. Or maybe it was the KS comments. Since both cans were Kryon, and they were sprayed just minutes apart, I have to conclude that the automotive primer = good and enamel = bad. And taking a quick look at the MSDS of the two paints, I would wager it is the acetone in the flat black.
Oh wow. Just researching his as I write, and Cole-Parmer (no links yet; replying via smart phone) lists acetone and PVC (a close cousin to Bones I believe) as "D-Severe Effect" and not recommended for any use! So KSers! Check the MSDS for acetone!
Or something such.
2) I haven't put the thinning ratios in as they'll not be useful. My paints are older and have dried out some. The new paints coming in will be fresh. And each bottle seems to need a different amount.Also, this first one isn't a how to paint article, but I will go I to those details on the planned Let's Paint articles. Best way right now for me to describe them would be milk like for base coats and then Kool Aid for shadows and highlights. It probably a little clue too that I can use a flat ceramic tile for the base coats but need a cupped tray for the others.
3) The Let's Paint series is going to be super detailed. I'm even pondering using a web camera and actually posting up each and every brush stroke I do. I'm a hack painter, with a 6.0 score being a total victory for me, so it's a bit unnerving to even think about doing that. But I think it would help a few who have never lifted a brush before.
I've been painting for six years now, and I JUST had the whole shadows and highlights technique click in my head this last two months, so it will be fresh and upfront in my mind when writing things.
As an FYI, the orcs so far haven't received a lick of shadows or highlights yet. Been a bit surprised at how they've turned out so far.
Last edited:
PegaZus
Stealth Freak
Wife and daughter were sick today, so spent the day home and got to paint a bit while they slept. For those of you who are childless, the most beautiful thing to hear at 4am is "Daddy, I think I'm going to puke". That's what the toilets are for, honey!
Let's just jump in.
Here I'm not sure I'll be going back over these with some more paint to cover up these areas that are glaringly obvious now. That might be an article to itself: How To Find Every Mistake On Your Mini. Step 1: Take a picture. Step 2: Look at picture. Step 3: Fix mistakes. I hate how the camera adds ten pounds to the mini, too.
The limited colors is going to be a huge obstacle for the How To Paint figures. There's just not enough colors to do what I'd normally do, which is just pick a different brown. So I experimented with this, and I'm actually happy with the resulting color. It'll be a handy trick to remember. I suppose I'll have to keep it simple for those. Don't want to get to the point where I'm mixing two drops of red, three drops of blue, a drop of white, a half drop of yellow, and a smidgen of black. I think the beginners should be able to handle ratios of two colors.
+9 pts, 198 pts total
Let's just jump in.
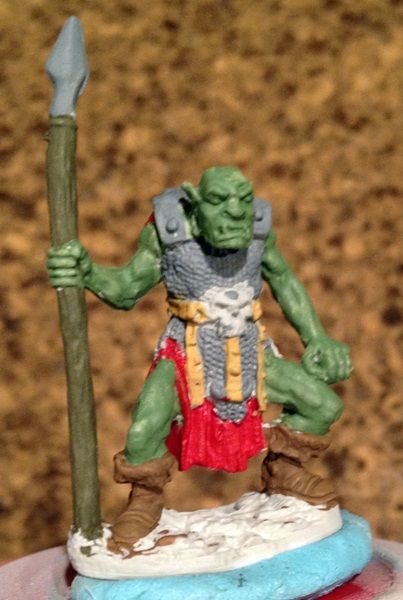
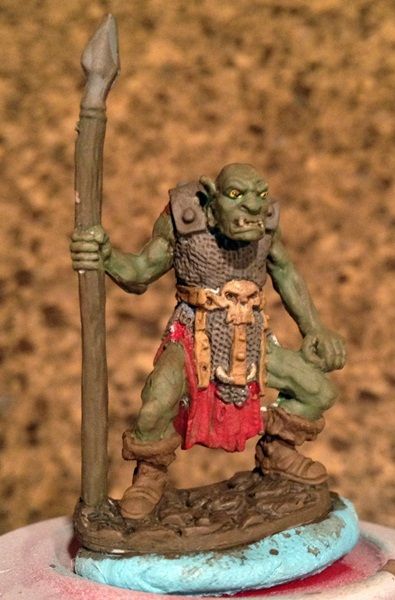
Fixed that, but after I took all the pictures. Oh well. What's funny is I'm super lazy, so poured out the few drops of water I had left from my cups into a tray so I didn't have to go upstairs to get water. Then mixed up the paint and realized I didn't have enough water to clean the brush afterwards, so decided to use a toothpick to paint over it after scraping it off with a dental pick. Did that, and proceeded to place a huge spot of paint on the figures back. Had to use the brush and what water I had to clean that off.Two coats of Tanned Leather (9031) on the straps. And Oh NOES! The white figure has a spot of red on his elbow. Quick fix and done.
I then worked the boots with Tanned Leather (9031) and Muddy Brown (9028) to get a different color from the straps.
What's nice for this is that the white figure's boots look like they've been highlighted already. But that's just two coats of paint over the boots. The gray works as well, and not as stark. But the issue with relying on this to do the highlights is that there's no control over where it gets thin and looks like a highlight, so I'd not recommend it as a practice to get into. But I'll not discard it entirely either.
I finish up by doing the second to last large unpainted area of the mini, that being the spear handle. Done with Muddy Brown (9028) and Grass Green (9014), simply to get a brown that didn't look like the two I'd already done. I'm reserving straight Muddy Brown for the base. Perhaps.
At this point, I'm very disappointed with all the missed paint spots that show up in white and gray. The black primer is able to hide it just a bit and make it look a little natural and not as sloppy. Point for black primer.
Here I'm not sure I'll be going back over these with some more paint to cover up these areas that are glaringly obvious now. That might be an article to itself: How To Find Every Mistake On Your Mini. Step 1: Take a picture. Step 2: Look at picture. Step 3: Fix mistakes. I hate how the camera adds ten pounds to the mini, too.
The limited colors is going to be a huge obstacle for the How To Paint figures. There's just not enough colors to do what I'd normally do, which is just pick a different brown. So I experimented with this, and I'm actually happy with the resulting color. It'll be a handy trick to remember. I suppose I'll have to keep it simple for those. Don't want to get to the point where I'm mixing two drops of red, three drops of blue, a drop of white, a half drop of yellow, and a smidgen of black. I think the beginners should be able to handle ratios of two colors.
+9 pts, 198 pts total
Last edited:
PegaZus
Stealth Freak
Way too long a hiatus, but that's life. Quite disappointed with myself, but overcome by events. Took the minis with me over Thanksgiving break, but didn't manage to actually crack open the paints. It did provide an interesting test: durability. I tried protecting them with just putting a plastic cup over it. Yeah, that didn't exactly work. Bent the spears rather harshly. Now here's the interesting part. The two primered figures made it through just fine. The one without primer had the paint crack off the spear. You could see it wrinkle as well. The two primered figures don't show the wrinkling. Now, this may just be because of something else, such as the location in the tool box or just the size of the pill bottle that it's on. So I'm not going to point that out.
So on to the pictures for today!
So that's it for now. Off to the spin of birthday parties and the last craft show of the season. I'll be having to make a store display here shortly, so I might have this make it all the way into December.
Wait a minute. Damn.
+3 pts, 201 pts total
Oh yay! I hit another 50 pt increment! That means I can buy some minis guilt free!
Wait a minute. Damn.
So on to the pictures for today!
Worked up the base. One coat of 1:1 mix of Muddy Brown and Pure Black. If the spears look bent, it is because they were in storage over a holiday trip, and didn't protect them well enough.
So that's it for now. Off to the spin of birthday parties and the last craft show of the season. I'll be having to make a store display here shortly, so I might have this make it all the way into December.
Wait a minute. Damn.
+3 pts, 201 pts total
Oh yay! I hit another 50 pt increment! That means I can buy some minis guilt free!
Wait a minute. Damn.
Last edited:
PegaZus
Stealth Freak
I did manage to paint a bit more yesterday, but only managed to get pictures tonight. Only detail I added was the skull on front, and afterwards realized that I should have done the little axe/hammer/pick thing hanging down in front, as I figure it could be a bone like thing too. Given the limited paint pallet, I may put all the bumps and knobs on the leather and armor as the same bone color.
And I just noticed a pictures seems to be gone from one of the posts above. I'll sort that out shortly.
+3 pts, 204 pts total
And I just noticed a pictures seems to be gone from one of the posts above. I'll sort that out shortly.
Painted the skull on the belt with Yellowed Bone. I intended to highlight it in Pure White, but decided not to in order to keep things simple. In addition, I found that I'd missed a lot of the gray armor around the skulls, so had to remix that color gray three times before I matched the shade more closely.
+3 pts, 204 pts total
PegaZus
Stealth Freak
Looks like Sunday evening is becoming my painting time. Had a kids' craft show that needed attention all week, and this week is looking to be focused on creating a display for the wife's craft store that we think the owner is going to try opening up with a soft opening this Friday. Joys. But that's the price one pays for being married with children. At least I don't sell shoes for a living. Right?
+3 pts, 207 pts total.
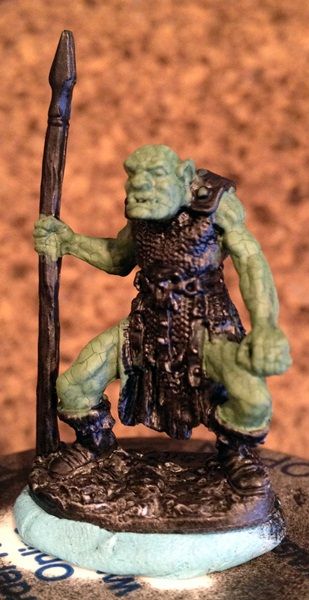
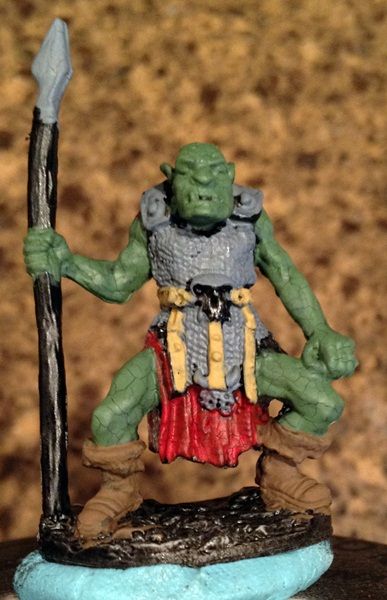
Finished up with some minor details. Sunlight Yellow for the eyes, dotted with a brush tip of Pure Black. Then used Yellowed Bone for the crescent at the end of the leather straps, as well as the little knob things on the leather straps. Then more Yellowed Bone for the teeth. And the minis are, for our purposes, done, at least with what is going to come with the basic paint set from the Kickstarter. There's one little thing I'm going to do that uses something other than the basic set, and that's whipping up a little wash. Many names are used for the wash, and the main ingredient which is Future, or acrylic floor polish. It helps to break up the surface tension and get into all the little cracks.
+3 pts, 207 pts total.
PegaZus
Stealth Freak
Got the wash done, so figured I'd go ahead and upload the pictures from that. All that's left here is to seal them up, then take a group picture so that all three are adjusted the same by the balancing. That'll compare them next to each other nicely. Probably should have tried to do that before the wash, but that's life.

+3 pts, 210 pts total
EDIT: Forgot to note that I'll not manage to do the clear spray tonight. Getting down to 10°F tonight (what, -12° C?) and so I don't think the spray can would perform very well. So, off to watch the rest of the Green Bay / Detroit game then going to bed. Love n kisses. Why? Got no clue.
Here's the pictures with the wash that was applied. This is an extra step that I personally would do for tabletop figures, but not as much with display figures. But that's a different article. The wash was done with three parts Muddy Brown, two parts floor polish, and then four parts water. The water is adjusted to make it runny enough for my taste, yet still able to have enough color to shade things. I didn't want to go with Pure Black simply because I was trying for a bit of a dirty look to the figures. This would be one of those personal decisions, I feel.
The next thing I'll note is that the figures were held upside down so that the wash would flow into the undersides of all the surfaces. One other bad thing about the technique is that it does tend to pop up all the flaws in the mini as well. Still, can be useful.
+3 pts, 210 pts total
EDIT: Forgot to note that I'll not manage to do the clear spray tonight. Getting down to 10°F tonight (what, -12° C?) and so I don't think the spray can would perform very well. So, off to watch the rest of the Green Bay / Detroit game then going to bed. Love n kisses. Why? Got no clue.
Last edited:
PegaZus
Stealth Freak
Final picture is complete! Took a handful of attempts to do so, and discarded the background I had been using (aka the kitchen counter aka me being lazy). It's still not the greatest, but since I didn't work on trying to make things gallery quality, it should do.
Nothing really to note on the progress as things were complete. But, they are all in a single photo in order to compare the colors with each other without any editor manipulation. Or, at least, the same manipulation.
+1 pt, 211 pts total
Now, one worry I've got is when I'm going to put all these together for the article, I'm going to have to re-edit each one to pull the image codes out of the post. I've been unable to use the little button link for images, or at least haven't tried in a while. And actually, I guess that's not that bad. I guess I'm trying to say that I'll have a short delay before it hits the Articles list on the website. Along with all my normal real-life delays. But! I'll be having a complete week off shortly (not for Christmas; that's already taken), and part of the plan is to paint my brains out. Fun fun!
Nothing really to note on the progress as things were complete. But, they are all in a single photo in order to compare the colors with each other without any editor manipulation. Or, at least, the same manipulation.
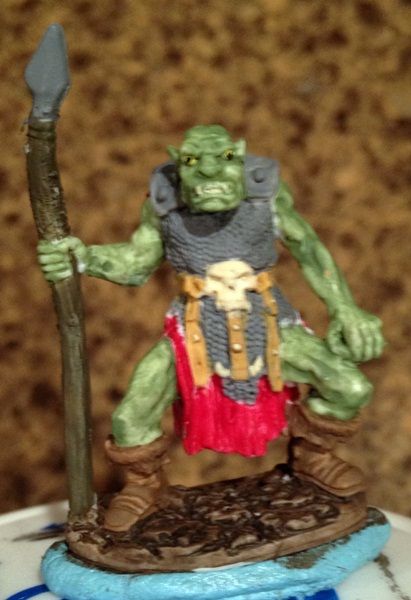
And here's the final result. So, which style should you go with? There's an easy formula that solves this dilemma. Open the photo in an editor, and sample the lower left eyelid of each orc. Get the RGB code for each orc. Divide the red number by the green, then add to that the color for the blue. Then take all three numbers and compare. The one with a seven or eight at the end will be the better way to go.
In other words, throw out everything. There's no "right way" here. Personal preference reigns. The white/primer-less orc (left) is a brighter than the black (middle) or the gray (right). A common technique is to use the brighter colors for heroes and darker colors for villains. Or, you could just paint things brighter.
My personal preference would be to go with the grey. I can get the bright colors I want with a little work, as well as being able to see the details via contrast better. And I think it overall looks the best of the three. If I were speed painting these for a D&D session in three days, I'd go with black. Areas that I miss by accident with the brush can be passed off as really dark shadows. And if anybody complains, drop a Suddenly A Dragon appears trick on the group. Serves 'em right.
So there you have it: no happy ending, just an ending. Pick which one makes you happy and get to painting!
+1 pt, 211 pts total
Now, one worry I've got is when I'm going to put all these together for the article, I'm going to have to re-edit each one to pull the image codes out of the post. I've been unable to use the little button link for images, or at least haven't tried in a while. And actually, I guess that's not that bad. I guess I'm trying to say that I'll have a short delay before it hits the Articles list on the website. Along with all my normal real-life delays. But! I'll be having a complete week off shortly (not for Christmas; that's already taken), and part of the plan is to paint my brains out. Fun fun!
PegaZus
Stealth Freak
And the article is ready for publishing! I think. Can anybody see this link: Priming Reaper Bones Figures
It should be a link to the article. Now, it's currently unpublished, so I doubt it'll show up in the articles area just yet. But, like images that haven't been approved yet, I think it's possible for others to see this via direct link.
Anyway, four days past when I thought I was going to be finished. And I find I whine about how little time I paint/work on the figures. I'm going to have to stop that. I annoyed myself editing the individual posts into a coherent article.
And typos, suggestions, or insults for the article itself are welcome.
PegaZus
Stealth Freak
Starting to plan out my next little foray into Kickstarter painting. I'm looking at my haul from October (ouch), and trying to come up with some logical sequence. Previously, I broke the figures I was trying for into two groups, PCs and NPCs/Cannon Fodder. Now, I'm looking at it that I can break it up a little differently. I could do the NPCs and PCs together, with the encounter figures as their own group. However, if I just break them into three groups, I'll have NPCs, PCs, and CFs. That would probably be more logical, but I've run into a little difficulty.
What's my goal?
Seriously, am I trying to get table top quality? Illustrate more display quality? Expand past the starter set? All three?
So, I'm thinking of topics. I've got three NPCs, three PCs, and multiple encounters. Actually, let's discuss what I've got. Starting with the encounter figures, as I know what I want to do with them. More or less.
Four dire rats -- This screams "Noob Learns to Paint". I did a rat back when I first started, a Reaper How-To kit to boot. Figure base coats, dry brush, and a wash.
Two Tiik Warriors -- Fishman with scales. Oh, I want to do highlighting on these guys so much. With a rainbow of colors. Not sure that's in my skill, but that's the thought. Maybe just gold fish.
The Ghostly Summons -- This one is for sure blending. Multiple thin layers, either hot red flames or ghostly blues. Maybe both? Red at the base turning to magical blue ghost flames and a white figure?
Now the harder areas. Lemmie start with the Townsfolk II set.
Wench -- Maybe basic shading and blending, with the limited paint set as I did with the orcs.
Beggar -- Simple conversions. Turn him from a beggar with a bowl, to a mystic seer with a bowl of flaming future.
Blacksmith -- Again, maybe basic paint set but with an eye on making him look dirty and soot covered. Thinking maybe to break out the MIG pigments on him.
Finally, the PC troop. My Pegasus nature is coming on strong with this one. A gnome fighter and a gnome wizard grouping with Sarah Blitzer, IMEF Marine, touting your SIBG*. Dunno. Maybe she's awoken from cryo-sleep by the two gnomes, a relic of a world in ruin, who now with nothing to fight for, wants to take on the big dragon. Single shot between the eyes. And she's tagging along with her gnome rescuers, and intimidating the hell out of the townsfolk with her boom stick.
For these 3 player stand-ins, I'm thinking I'll focus on the best job I can do with them. Fitting that they're also two of the smallest figures I've loaded my hummingbird ass up with. Don't think I'll go for a limited paint set, and really focus on the basing for the three. Still, for the newly indoctrinated, I'll probably not go too deep. Maybe some cork stones (from the set of coasters I bought 3-4 years ago for that purpose), a few twigs, and maybe an interesting item at their feet.
But, I really need you, the reader of my long winded WIP, to chime in on this. Do you think that this is the right direction? Suggestions for other ways I can present this? Just hit me that I should maybe make one a super simple Paint-With-The-Bushy-Brush-End style How-to. Really need to get some feedback on this whole plan before I get too deep. Either posts here on the thread, or direct messages in case someone's too shy with their recommendation. Don't worry about being goofy. After all, I've got a Marine tooling around with a couple of gnomes, gunning for dragon.
*Standard Issue Big Gun**
**Sadly, I couldn't find a YouTube video with this wonderful line from Ghost in the Shell. Sorry!
Let me preface this with the usual "newbie painter" remark, so take my commentary as you will.
First, these WIP threads are probably the single most useful thing in terms of learning to paint. I can't stress how amazingly wonderful these are, with just a wealth of knowledge to be gained from watching people at work. Watching someone work from start to finish on a project provides insight into so much, from the different ways people approach starting out (planning, base coat everything or start with skin, etc.), to how people approach advanced work such as NMM and blending, seeing each of the steps in action really brings things home. Honestly, my suggestion would be to approach each article you want to do as you might a WIP thread, just with more detail than you might normally throw in. Show things from start to finish, rather than the "we'll just focus on washes here" approach, and you'll be providing a greater depth of information for us new folks. Granted, it is a fairly major trade-off, as it will take much more time.
A demonstration of different styles and approaches for the same thing would be helpful as well, with a specific focus on blending techniques. At an early stage, it's difficult to find a blending technique that works well for you personally, so many of us end up missing styles that might be handy for us. Seeing the various different approaches to what is, arguably, the most difficult skill for a newbie to get under control, would help us pick the style that's right for us.
Finally, any content that you could include on fixing mistakes would be a massive time saver. I picked up the Haley/Forester video, and the single most valuable part of that was the number of sections where you hear "Oh look, I see a mistake here. Don't panic, just go back and...". I know it's not a standardized topic, but as you work on the start to finish, pointing out mistakes that happened (wash too thin/thick, bad blend, etc.) and how to deal with them would really come in handy.
As for choice of mini, I'd recommend one from the Elves line (works well for example cloth), one from the NOVA line for crossover with the GW crowd, and maybe a Pirate as well to give some examples of skin, but mostly sticking to the humanoid range.
As well, choice of paints, if you could stick with Reaper paint lines it would be helpful. Most articles and step by steps out there use the Citadel line, and it's really a pain to try and convert everything.
Anywho, just my opinion.
PegaZus
Stealth Freak
I've taken your comments to heart, Chompsky. I will make the entire articles start to finish of exactly what I do. I figure that I'll make each one targeted towards a specific basic technique. I've been tossing around making a series of complimenting videos of me doing the miniatures as well, but at the present time I'm not really able to put together that video. Namely, I'm on vacation, with the kids out of school, and any video I make will have five screaming cousins. But, once I get back home I'm certain to check into making a series of start-to-finish videos. Thinking of calling it "The Hack Painter Pegazus Paints". Guaranteed to keep you getting less than a 3 on CMON.
One difficulty I've got is that I'm limiting myself to the Bones line right now. I suppose, once the nine (!!!) articles I've got planned out are done, I could open it up to a lot more different kinds of minis. Hell, I've got a Pile to choose from. Certainly looking forward to doing a decent 7 on the Puss in Boots I've got.
Here's the complete plan on what I've got going. I've got the first group started scattered among the sets, which is nothing other than cleaning the metal and priming it. Easiest is to do the limited pallet. For the Paint Pallet, I'm referring to the Paint Set 1 that was available in the Kickstarter, and if it would be limited to that.
MINI ---- PAINT PALLET --- TECHNIQUE
Dire Rats --- Limited --- Dry Brushing
Tiik Warriors --- Unlimited --- Highlights
Ghostly Summons --- Unlimited --- Blending
Wench --- Limited --- Shading
Beggar --- Limited --- Conversions/OSL
Blacksmith --- Limited --- Pigments/Dirtying
Gnome, Elliwyn --- Limited --- Shading/Basic Basing
Gnome, Cassie --- Unlimited --- Shading/Medium Basing
Sara Blitzer --- Unlimited --- NMM/Med Basing
Figured that the PCs would be a better place to focus on the basing, so it has two focus techniques. I'd do a high end base for Sara, but think it would stand out too much compared to the other two.
All of these are subject to change, but the dire rats are already in progress. Well, I say that, but that's the first group that I'm trying to start with. How badly could I screw up dry brushing?
PegaZus
Stealth Freak
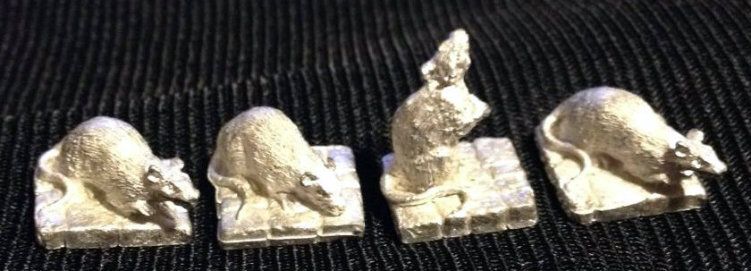
Here's the start of the Dire Rats article.

And so I've started in. I brought a bunch of minis with me on vacation, which by itself is interesting. I should talk about that. Realized that I should discuss the temporary bases I've got, and so have edited the quotes above.
The blue tack solution is something I hadn't thought of. I've been very interested in making "travel boxes" for my minis when I go on vacation. I didn't think about using the putty, and that's been a very tricky part of the design. With that clear, I can actually start better progress on those. In the second picture above, you can see that they've been blue tacked to the cheap flooring. Actually, the cheapest I could find for the basement. I put the figures on little squares, 1" for the small ones, 2" for the larger ones. Then those bases were blue tacked to the piece that I cut those out of. I wasn't exactly sure that they'd stay together, but they survived in the bottom of a tool box over a 400 mile road trip Christmas. So that's really exciting for me. And I'd like nothing better than to jump on working on the mobile painting set, but I've got nine articles to write, and I'm already a month behind.
+2 pts, 213 Total
INTRODUCTION -- This is the second in a series of articles on how to paint the Reaper Bones. The first was on whether or not to prime the Bones line. You can read that one here. These are being done in anticipation of the release of the Reaper Bones Kickstarter minis in March 2013. There could be a large influx of new painters, and this is intended as a bunch of introductory guides. They are going to be a start-to-finish guide.
This particular article is on the Dire Rats. They are part of the Dungeon Attack section of the Vampire Pledge and are currently available in metal. So, those are what are going to be used. I prefer my minis primed, and use grey automotive primer, but in the interest of complete disclosure, here they are cleaned up for priming.
And now, here they are after the grey primer. This is the state that the real Bones figures will be in once I start in on them. They have temporary bases attached. These are simply a cut up piece of cheap wood flooring and some poster tack putty. This has held up rather well, and survived a lengthy trip attached with more tack onto a larger piece of flooring in a tool box. Normally, I've got a large spice bottle that I paint with, and the figure is attached the same way it would be with the temporary base.
And so I've started in. I brought a bunch of minis with me on vacation, which by itself is interesting. I should talk about that. Realized that I should discuss the temporary bases I've got, and so have edited the quotes above.
The blue tack solution is something I hadn't thought of. I've been very interested in making "travel boxes" for my minis when I go on vacation. I didn't think about using the putty, and that's been a very tricky part of the design. With that clear, I can actually start better progress on those. In the second picture above, you can see that they've been blue tacked to the cheap flooring. Actually, the cheapest I could find for the basement. I put the figures on little squares, 1" for the small ones, 2" for the larger ones. Then those bases were blue tacked to the piece that I cut those out of. I wasn't exactly sure that they'd stay together, but they survived in the bottom of a tool box over a 400 mile road trip Christmas. So that's really exciting for me. And I'd like nothing better than to jump on working on the mobile painting set, but I've got nine articles to write, and I'm already a month behind.
+2 pts, 213 Total
