You are using an out of date browser. It may not display this or other websites correctly.
You should upgrade or use an alternative browser.
You should upgrade or use an alternative browser.
Pegazus's Pile of Pminiatures (WIP)
- Thread starter PegaZus
- Start date
PegaZus
Stealth Freak
Where to begin. Much updating. Little wow.
Guess I start with the Well of Chaos. I've been filling up the cistern with Realistic Water from Woodland Scenics to give it, well, some water. Figured I try that whole "painting on water" in order to try to place some "things" in it. Got two layers in, and wasn't really happy with what was going on. It just looked flat. Probably should have done dark paint first, then some lighter, in order to give it some depth. I was trying for some spirit-like things swimming around, like little ghosts and such. Probably should have gone a little transparent as well, but it wasn't showing. Then the third layer was quite thick compared to the other two. And actually, now that I think about it, layer 2 was probably too thin. But I tried something different with this one.

This isn't dry yet. It is ink dabbed into the water using a toothpick. The odd thing is, there are four dabs of white scattered among the four dabs of blue. The white splotch on the far right is one of the four, and the other three are similar. The other white splotches would be the Ghost White paint on the previous layers. Notice how the blue splotches are diffuse? The white ink looked like that immediately, while the blue ink was concentrated and spindly like the white is now. Over five minutes, they swapped appearances. I'm hoping that that the blue ink will return to the tendril-like appearance before the resin sets. In either case, this will be interesting.
Next up are the Star Trek ships. Not much there. Grey automotive primer with Ghost White over them as a base. This is the reason the well has that color. It was on the table to begin with. I'm hoping that I'll start doing the detailing shortly after I give them a more bluish wash. That's going to be tricky as they don't stand in a proper position, and I don't want the wash running off the side and dripping. Maybe I should just be better off trying to paint into the lines, and side-brushing the tops back to the right color. Probably less frustrating.

I was casting about for what to paint next on the video series. The first episode of the new series was up a while ago. I had a battle royale with a smaller pile from my large mountain of minis. They went one-on-one with dice rolls deciding who would continue and who would go back into the drawer. Video is linked below.
Episode 1 Video Link
So Sebeki won, from Crocodile Games' Wargods line. Or, Master of Words won. Little alligator guy. Wizard maybe? I dunno, I don't play the game. My train of thought is definitely not in a straight line, and it did go around a bend too fast and jumped the tracks. He's going to become a crocostimpy. Yes, yes. He's an alligator not a crocodile. The voices in my head demand a crocostimpy, and so that's how he's going to be painted up. I don't get to that point in the video below, as the WIP picture shows. Just getting around doing the basic stuff I do on a metal mini: flash trim, wire brush cleanup, mounting, and then a prime job. I don't expect those who are old-hat with that to watch. The fun begins in Episode 3.

Episode 2 Video Link
+13 pts, 450 pts total
Guess I start with the Well of Chaos. I've been filling up the cistern with Realistic Water from Woodland Scenics to give it, well, some water. Figured I try that whole "painting on water" in order to try to place some "things" in it. Got two layers in, and wasn't really happy with what was going on. It just looked flat. Probably should have done dark paint first, then some lighter, in order to give it some depth. I was trying for some spirit-like things swimming around, like little ghosts and such. Probably should have gone a little transparent as well, but it wasn't showing. Then the third layer was quite thick compared to the other two. And actually, now that I think about it, layer 2 was probably too thin. But I tried something different with this one.
This isn't dry yet. It is ink dabbed into the water using a toothpick. The odd thing is, there are four dabs of white scattered among the four dabs of blue. The white splotch on the far right is one of the four, and the other three are similar. The other white splotches would be the Ghost White paint on the previous layers. Notice how the blue splotches are diffuse? The white ink looked like that immediately, while the blue ink was concentrated and spindly like the white is now. Over five minutes, they swapped appearances. I'm hoping that that the blue ink will return to the tendril-like appearance before the resin sets. In either case, this will be interesting.
Next up are the Star Trek ships. Not much there. Grey automotive primer with Ghost White over them as a base. This is the reason the well has that color. It was on the table to begin with. I'm hoping that I'll start doing the detailing shortly after I give them a more bluish wash. That's going to be tricky as they don't stand in a proper position, and I don't want the wash running off the side and dripping. Maybe I should just be better off trying to paint into the lines, and side-brushing the tops back to the right color. Probably less frustrating.
I was casting about for what to paint next on the video series. The first episode of the new series was up a while ago. I had a battle royale with a smaller pile from my large mountain of minis. They went one-on-one with dice rolls deciding who would continue and who would go back into the drawer. Video is linked below.
Episode 1 Video Link
So Sebeki won, from Crocodile Games' Wargods line. Or, Master of Words won. Little alligator guy. Wizard maybe? I dunno, I don't play the game. My train of thought is definitely not in a straight line, and it did go around a bend too fast and jumped the tracks. He's going to become a crocostimpy. Yes, yes. He's an alligator not a crocodile. The voices in my head demand a crocostimpy, and so that's how he's going to be painted up. I don't get to that point in the video below, as the WIP picture shows. Just getting around doing the basic stuff I do on a metal mini: flash trim, wire brush cleanup, mounting, and then a prime job. I don't expect those who are old-hat with that to watch. The fun begins in Episode 3.
Episode 2 Video Link
+13 pts, 450 pts total
PegaZus
Stealth Freak
Been working on the CrocoStimpy, and even have had the video up for a few days, but I've been too busy and too lazy to make an update. So many other diversions to sap my time.
First thing, however, is an update on the well. I've finally got it complete in my view, and a little peek down the well is actually pretty creepy. I really wish the white had been more diffuse, like the blue did, but I still think I came out with a really cool effect. Oddly enough, it looks more creepy in photos than it does handling it. Eh.

On to the CrocoStimpy. One thing I forgot was how stupidly hard it is to get a good red color over black. Oh how I wish I'd remembered that so I could lay down at least a thin layer of white primer. Sheesh! It took a long time to get it to the point where I'm happy with it.

The colors are a bit harsh right now against the brown background. I might switch to a light grey to see if that helps. And the video is linked below.
Episode 3 Link.
Really wish I managed to paint more, and I won't bore anyone with my broken record complaints about real life getting in my way of my hobbies.
Oops. Damn.
+7 pts, 457 pts total
First thing, however, is an update on the well. I've finally got it complete in my view, and a little peek down the well is actually pretty creepy. I really wish the white had been more diffuse, like the blue did, but I still think I came out with a really cool effect. Oddly enough, it looks more creepy in photos than it does handling it. Eh.
On to the CrocoStimpy. One thing I forgot was how stupidly hard it is to get a good red color over black. Oh how I wish I'd remembered that so I could lay down at least a thin layer of white primer. Sheesh! It took a long time to get it to the point where I'm happy with it.
The colors are a bit harsh right now against the brown background. I might switch to a light grey to see if that helps. And the video is linked below.
Episode 3 Link.
Really wish I managed to paint more, and I won't bore anyone with my broken record complaints about real life getting in my way of my hobbies.
Oops. Damn.
+7 pts, 457 pts total
PegaZus
Stealth Freak
Finally got my act together and got some work done to post up. Pretty standard base coating so far for the stomach and nose. Happily, the nose covered better than I had hoped and I won't have to do a multitude of layers.

Video link below:
Episode 4 Link
+6 pts, 463 pts total
Video link below:
Episode 4 Link
+6 pts, 463 pts total
PegaZus
Stealth Freak
Was sick last week and posted the video but didn't advertise it. Then really didn't feel up to much, so a short video this week. But his head is nearly finished! No pictures this time. I'll get those up sometime.
Video 5 Link
Embedding Video 6 in lieu of pictures:
+10 pts, 473 pts total
Video 5 Link
Embedding Video 6 in lieu of pictures:
+10 pts, 473 pts total
Last edited:
PegaZus
Stealth Freak
I managed to finish up a batch of minis! Yay! They're the Star Trek ships, and I realize that they went from primer to complete here, but I was doing them for me. And they were a pain, I tell ya. The little nacelles kept falling off, and they were hard to hold. Not going to win any awards, but I'm done. Still working on Crocostimpy, too, and I've started his video for this week. Going to be putting it together piecemeal. But I'm getting to the point where I've got both the motivation and time to paint. That's a happy happy!

+1 pts, 474 pts total
+1 pts, 474 pts total
PegaZus
Stealth Freak
Not really. I picked these up quite a while ago just because they're BIG STOMPY SPACESHIPS... er, wait. Doesn't have the same impact.
I do have two packages of Dropzone Commander tanks that I'm thinking I'll paint up. Didn't buy them for CAV, but figure they'll blend in. Pair of UCM Galdius and a pair of PHR Juno A1s.
Now to start planning up paint schemes. Ouch.
EDIT: Just checked the front page. Picked 'em up May 2012. So they've been waiting for two years. Not bad considering I've still got a couple minis that I picked up on my very first shopping trip for minis sometime in 2005 or 2006. I know that doesn't beat some people, but the point is that these were relatively new-old purchases.
Was there a point to that? Guess not.
Last edited:
PegaZus
Stealth Freak
Wow. A month since my last Crocostimpy progress? That's been a lot of whole weeks filled with Mondays. Trust me.
I actually have been working on this, but the sessions have been far and in-between. Worked up the cape, some scarf/lapel thing, and some hieroglyphics. That last item is the fail.
+5 pts, 479 total
I actually have been working on this, but the sessions have been far and in-between. Worked up the cape, some scarf/lapel thing, and some hieroglyphics. That last item is the fail.
+5 pts, 479 total
PegaZus
Stealth Freak
Getting a little bit more done on the Crocostimpy. The image has his lapel painted and lettered (hieroglyphed?) and I painted the rolled up paper to look a bit like a newspaper in homage to Ren. The video shows all this, while the picture was taken just before I started on this evening's recording.
In other news, I think I'm going to try to get some shots for the gallery. It's been a long time since I put anything up, so might as well start making progress on that backlog.

+6 pts, 485 total
In other news, I think I'm going to try to get some shots for the gallery. It's been a long time since I put anything up, so might as well start making progress on that backlog.
+6 pts, 485 total
PegaZus
Stealth Freak
And I finally managed to get Crocostimpy to a decent table top standard. I haven't attached nor finished the base, as I'm planning at some point to go back over him to do some shading, extra highlights, and bring him up a bit in detail. But that'll have to wait, and won't be put up as a series.
Pictures first, then the ending video!


+8 pts, 498 total
Pictures first, then the ending video!
+8 pts, 498 total
PegaZus
Stealth Freak
Turned out nice and vibrant.
Maybe we should have a contest to see who paints slower! Lol")
No doubt. Four months to get something to tabletop. And what's really sad is that if I hadn't made it a painting series that I feel obligated to update once a week (er, two weeks), I'd have painted nothing in that time. I've just got too many hobbies.
I should probably quit my job and concentrate on getting hobbies done.
Wait. That's a bad idea, idn't? *sigh* Just another 23 years tho. Then lots of free time.
PegaZus
Stealth Freak
Time for a little something different. I've now got a PLA 3d printer, and I'm enjoying it so far. Printed out a reindeer finger puppet and a die (and another after the first one failed at almost the end). Then printed out a reverse engineered dish washer handle cap. Then corrected the CAD model and printed out a second one. Then another correction and two final ones. Then corrected the CAD, but gave up on printing out new ones because it was close enough.
Then I got into the meat of what I really bought it for. HOBBY. My first target was the Stone Troll that is from mini2print. Here's a link to the CMON thread that m2p started to announce it, in case you're interested in some other shots of it. I was asked on the Reaper forums how the material sands. And, honestly, I didn't know. But I've got two dish washer handle caps that are destined to be junked, or at least re-purposed as something. Prefect timing then.
I didn't really think about photos until after I'd done all the testing, so I'll explain things as we go and you might have to look back every now an then. Let's start with the materials we've got.
From L-R, Cap #2, the Stone Troll, Sir Forscale (Garrick The Bold), and Cap #1

And for what I have on hand to try a little finishing work: a felt disk, a grinding bit, and a poofy... thing.

Cap #1 was an attempt at using gesso and milliput to fill in the lines and such. It's not working as the gesso wasn't thick enough and the milliput didn't cure, so we'll skip him. On to Cap #2!

This was done in several stages, so I'll explain that first and you'll see the results of all of that in the above picture. The manual doesn't recommend high speed sanding. I haven't actually tried low speed sanding other than by hand. But that's stage 4ish. A google search of sanding PLA found me on a jewelry making website, and several there recommended cloth disks. I'm not sure that it's the same, but I used a felt disk on the right half of the above cap. And it worked. But I wouldn't call it sanding, but more of a blending. I think it was heating the ridges up to a plastic stage (go figure) and then smeared them. Which works. It's going to take a bit of practice if I want to continue to use that technique. It'll be interesting to try to go around curved surfaces, but for flat panels I think it's fine.
At this point, I brushed on some brown liner from Reaper. That's what a lot of people are using to "prime" Bones, so figured it might work here. I think that PLA is a little more accepting of acrylic paint that Bones, so that'll be a plus. Then I did some actual sanding with some 180 grit foam sanding files, first on the right side and then on the as-untouched left. That got things really very smooth. It still has that badly mislaid layer, the dark line roughly a third up from the bottom. Now some fresh milliput might be able to fill in the crack. I'm also thinking about getting some liquid greenstuff. I may just go get some automotive putty, as the "mini" I'm planning on building, a true-engineered CAV drop ship, is going to be fairly large. I may wind up needing that much and don't want to break my wallet. One of the odd things is that the putty I apply will probably cost more than the PLA filament.
I do have one more test to do, and that's the "low speed" sanding with a Dremel. I figure if I can learn to do it that way, it'll help out a lot, especially with the little surfaces. Speaking of which, let's look at what I'm facing on the Stone Troll.
Below are the three major areas that I'm going to be dealing with. For reference, I did NOT print this at the highest resolution that I could, which is 100 micron layers (.100 mm, .004 inch). I did it in 150 microns instead, and I think I'm happy that I did that. That decreases the time for it to build, and thus the amount of time I have to babysit it. While it was building the legs, the edges of them curled up and the print nozzle would knock them each time. I think that's happened a few times, which results in it pulling the object off of the build tape. At that point, it's into the reject bin for it. Happened once on this figure, and on a die.

As you can maybe see, there's a couple of layers that didn't line up right, similar to what happened on the dish washer cap. I believe the XY resolution is .150 microns regardless of what the layer thickness is. Those will have to be removed. There are curls and bubbles scattered amount, debris left from the print nozzle and/or PLA defects. Those are pretty common. The big thing I'll have to work out is the tail. It started to lean I think or perhaps was pushed by the nozzle. This made a big mismatch between the two parts of it. I'll have to green stuff that or something else. One thought is to remove the lower part of the tail entirely, and sculpt the remaining part into a stubby tail. That's probably the easiest to do, so may be what I end up doing.
One last picture, and what will be one of the easier clean-ups. There's little hairs that form when the nozzle goes from one print area to another. The plastic hardens on one area, then is pulled like taffy to the second. Most of these I can just scrape off with a fingernail, so they don't concern me too much.

Just a couple of parting thoughts. The 3D software I've got that sends the print to the printer threw a warning when I was first trying to print, which was at 100 microns. I didn't actually do that, as it was going to require 8 hours if I remember correctly. The warning was that there were some overhangs that exceeded 45°, and that was going potentially cause issues. When I went to 150 microns, that error disappeared. I'm not sure what would have happened had I tried to print at that resolution. I suspect two things: 1) that it'd be knocked off the tape due to the closeness of the object to the print head, and 2) those overhands would wind up needing a lot of repair.
As I continue on this, I'll update this post, along with the video that I made. It's not going to be a regular series, which I try to do every Tuesday, with little success lately, as I don't want to feel pressured to have to work it. That'll come with the CAV KS Ace package shipping out sometime this next week. I've volunteered to paint a couple out that set and post it online. It's what I'm planning to do on Tuesdays once I get it.
Video basically stating everything I've said above is below, although I do buff the base actually in the video. Hard to see the result, but it's there.
+10 pts, 508 total (I'll skip the guilt-free purchase for crossing 500, and just stop feeling guilty about something I've purchased in the past)
Then I got into the meat of what I really bought it for. HOBBY. My first target was the Stone Troll that is from mini2print. Here's a link to the CMON thread that m2p started to announce it, in case you're interested in some other shots of it. I was asked on the Reaper forums how the material sands. And, honestly, I didn't know. But I've got two dish washer handle caps that are destined to be junked, or at least re-purposed as something. Prefect timing then.
I didn't really think about photos until after I'd done all the testing, so I'll explain things as we go and you might have to look back every now an then. Let's start with the materials we've got.
From L-R, Cap #2, the Stone Troll, Sir Forscale (Garrick The Bold), and Cap #1
And for what I have on hand to try a little finishing work: a felt disk, a grinding bit, and a poofy... thing.
Cap #1 was an attempt at using gesso and milliput to fill in the lines and such. It's not working as the gesso wasn't thick enough and the milliput didn't cure, so we'll skip him. On to Cap #2!
This was done in several stages, so I'll explain that first and you'll see the results of all of that in the above picture. The manual doesn't recommend high speed sanding. I haven't actually tried low speed sanding other than by hand. But that's stage 4ish. A google search of sanding PLA found me on a jewelry making website, and several there recommended cloth disks. I'm not sure that it's the same, but I used a felt disk on the right half of the above cap. And it worked. But I wouldn't call it sanding, but more of a blending. I think it was heating the ridges up to a plastic stage (go figure) and then smeared them. Which works. It's going to take a bit of practice if I want to continue to use that technique. It'll be interesting to try to go around curved surfaces, but for flat panels I think it's fine.
At this point, I brushed on some brown liner from Reaper. That's what a lot of people are using to "prime" Bones, so figured it might work here. I think that PLA is a little more accepting of acrylic paint that Bones, so that'll be a plus. Then I did some actual sanding with some 180 grit foam sanding files, first on the right side and then on the as-untouched left. That got things really very smooth. It still has that badly mislaid layer, the dark line roughly a third up from the bottom. Now some fresh milliput might be able to fill in the crack. I'm also thinking about getting some liquid greenstuff. I may just go get some automotive putty, as the "mini" I'm planning on building, a true-engineered CAV drop ship, is going to be fairly large. I may wind up needing that much and don't want to break my wallet. One of the odd things is that the putty I apply will probably cost more than the PLA filament.
I do have one more test to do, and that's the "low speed" sanding with a Dremel. I figure if I can learn to do it that way, it'll help out a lot, especially with the little surfaces. Speaking of which, let's look at what I'm facing on the Stone Troll.
Below are the three major areas that I'm going to be dealing with. For reference, I did NOT print this at the highest resolution that I could, which is 100 micron layers (.100 mm, .004 inch). I did it in 150 microns instead, and I think I'm happy that I did that. That decreases the time for it to build, and thus the amount of time I have to babysit it. While it was building the legs, the edges of them curled up and the print nozzle would knock them each time. I think that's happened a few times, which results in it pulling the object off of the build tape. At that point, it's into the reject bin for it. Happened once on this figure, and on a die.
As you can maybe see, there's a couple of layers that didn't line up right, similar to what happened on the dish washer cap. I believe the XY resolution is .150 microns regardless of what the layer thickness is. Those will have to be removed. There are curls and bubbles scattered amount, debris left from the print nozzle and/or PLA defects. Those are pretty common. The big thing I'll have to work out is the tail. It started to lean I think or perhaps was pushed by the nozzle. This made a big mismatch between the two parts of it. I'll have to green stuff that or something else. One thought is to remove the lower part of the tail entirely, and sculpt the remaining part into a stubby tail. That's probably the easiest to do, so may be what I end up doing.
One last picture, and what will be one of the easier clean-ups. There's little hairs that form when the nozzle goes from one print area to another. The plastic hardens on one area, then is pulled like taffy to the second. Most of these I can just scrape off with a fingernail, so they don't concern me too much.
Just a couple of parting thoughts. The 3D software I've got that sends the print to the printer threw a warning when I was first trying to print, which was at 100 microns. I didn't actually do that, as it was going to require 8 hours if I remember correctly. The warning was that there were some overhangs that exceeded 45°, and that was going potentially cause issues. When I went to 150 microns, that error disappeared. I'm not sure what would have happened had I tried to print at that resolution. I suspect two things: 1) that it'd be knocked off the tape due to the closeness of the object to the print head, and 2) those overhands would wind up needing a lot of repair.
As I continue on this, I'll update this post, along with the video that I made. It's not going to be a regular series, which I try to do every Tuesday, with little success lately, as I don't want to feel pressured to have to work it. That'll come with the CAV KS Ace package shipping out sometime this next week. I've volunteered to paint a couple out that set and post it online. It's what I'm planning to do on Tuesdays once I get it.
Video basically stating everything I've said above is below, although I do buff the base actually in the video. Hard to see the result, but it's there.
+10 pts, 508 total (I'll skip the guilt-free purchase for crossing 500, and just stop feeling guilty about something I've purchased in the past)
Last edited:
PegaZus
Stealth Freak
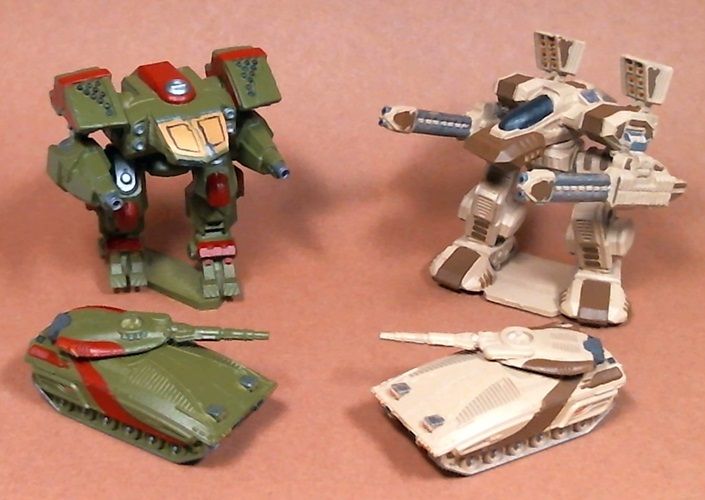
Haven't posted any WIP pictures of these, mostly because they were done just for my own fun. But they're finished, so figured I'd show them off a little.
These are a Reaper CAV Concussion (24518) and a Centurion (24570) behind two Dropzone Commander Juno A1 Infantry Fighting Vehicles. I thought they were tanks, but just did a full name search and I guess they're not. Eh, oh well. Enjoy!
+1, 509 total
These are a Reaper CAV Concussion (24518) and a Centurion (24570) behind two Dropzone Commander Juno A1 Infantry Fighting Vehicles. I thought they were tanks, but just did a full name search and I guess they're not. Eh, oh well. Enjoy!
+1, 509 total
